USER’S
MANUAL
Part 2
TRIMLINE®
Memory
Telephone 210
Please also read
Part 1 — Important
Product Information
© 2005 Advanced American Telephones. All Rights Reserved. AT&T and the Globe Design are trademarks of AT&T Corp., licensed to Advanced American Telephones.
Printed in China. Issue 5AT&T 09/05
TABLE/DESK INSTALLATION
This telephone includes a
1Fill in directory card Remove the directory card and write in your own telephone number.Also write the telephone numbers (or names) that you want to store in each memory location.
Reinstall the card and clear plastic cover.
2 Connect line cord to telephone |
| |
Plug the long line cord into the | Figure 1 | |
jack on the underside of the | ||
| ||
telephone base.Then feed the |
| |
line cord through the channel |
| |
provided so the telephone sits |
| |
flat on your table or desk |
| |
during use (Figure 1). |
|
3 Connect line cord to wall jack Plug free end of the line cord into a modular wall jack. Make sure it snaps firmly into place.
4Set DIAL mode switch This product comes set in the
tone (TT) mode. Make sure
you choose the correct dialing method (TT or DP); touch tone dialing will not work if you have dial pulse service. (Figure 2)
5Connect handset to base
Plug one end of the coiled handset cord into the handset, and the other end into the base.Then hang up.
6Check for dial tone
Lift the handset and listen for dial tone. If you cannot hear a dial tone, refer to IN CASE OF DIFFICULTY and try to correct the problem.
TO DISCONNECT the telephone, squeeze the clip on the modular plug and pull it out of the jack.
1
WALL INSTALLATION
1Fill in directory card
Remove the directory card and write in your own telephone number.Also write the telephone numbers (or names) that you want to store in each memory location.
2Reverse handset tab
To install the telephone on a wall jack, you must reverse the small tab beneath the directory card.This tab holds the handset in place when you hang up.
Remove the directory card and plastic cover. Use a paper clip to lift and remove the handset tab. Reverse the tab and reinstall it as shown (Figure 1).Then replace the directory card and cover.
AB
C
D
Figure 1
3Plug the line cord into the jack on the underside of the base. Feed the line cord into
the channel and wind it around the mounting area. Feed the last portion (as short as possible), through one of the slots in the mounting area (Figure 2).
Figure 2
2
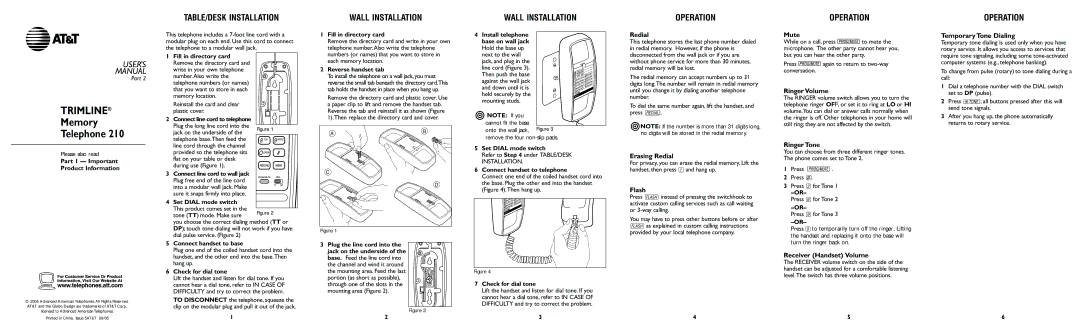
WALL INSTALLATION
4Install telephone base on wall jack Hold the base up
next to the wall jack, and plug in the line cord (Figure 3). Then push the base against the wall jack and down until it is held securely by the mounting studs.
NOTE: If you
cannot fit the base
onto the wall jack, Figure 3 remove the four
5Set DIAL mode switch
Refer to Step 4 under TABLE/DESK INSTALLATION.
6Connect handset to telephone
Connect one end of the coiled handset cord into the base. Plug the other end into the handset (Figure 4).Then hang up.
Figure 4
7Check for dial tone
Lift the handset and listen for dial tone. If you cannot hear a dial tone, refer to IN CASE OF DIFFICULTY and try to correct the problem.
3
OPERATION
Redial
This telephone stores the last phone number dialed in redial memory. However, if the phone is disconnected from the wall jack or if you are without phone service for more than 30 minutes, redial memory will be lost.
The redial memory can accept numbers up to 31 digits long.The number will remain in redial memory until you change it by dialing another telephone number.
To dial the same number again, lift the handset, and press R.
NOTE: If the number is more than 31 digits long, no digits will be stored in the redial memory.
Erasing Redial
For privacy, you can erase the redial memory. Lift the handset, then press 1and hang up.
Flash
Press Finstead of pressing the switchhook to activate custom calling services such as call waiting or
You may have to press other buttons before or after Fas explained in custom calling instructions provided by your local telephone company.
4
OPERATION
Mute
While on a call, press ![]() to mute the microphone. The other party cannot hear you, but you can hear the other party.
to mute the microphone. The other party cannot hear you, but you can hear the other party.
Press ![]() again to return to
again to return to
Ringer Volume
The RINGER volume switch allows you to turn the telephone ringer OFF, or set it to ring at LO or HI volume.You can dial or answer calls normally when the ringer is off. Other telephones in your home will still ring; they are not affected by the switch.
Ringer Tone
You can choose from three different ringer tones. The phone comes set to Tone 2.
1Press ![]() .
.
2Press #.
3Press 3for Tone 1
Press 6for Tone 2
Press 9for Tone 3
Press 0to temporarily turn off the ringer. Lifting the handset and replacing it onto the base will turn the ringer back on.
Receiver (Handset) Volume
The RECEIVER volume switch on the side of the handset can be adjusted for a comfortable listening level.The switch has three volume positions.
5
OPERATION
Temporary Tone Dialing
Temporary tone dialing is used only when you have rotary service. It allows you access to services that require tone signaling, including some
To change from pulse (rotary) to tone dialing during a call:
1Dial a telephone number with the DIAL switch set to DP (pulse).
2Press t; all buttons pressed after this will send tone signals.
3After you hang up, the phone automatically returns to rotary service.
6