Personal Video Recorder
PERSONAL MEDIA CENTER QUICK GUIDE
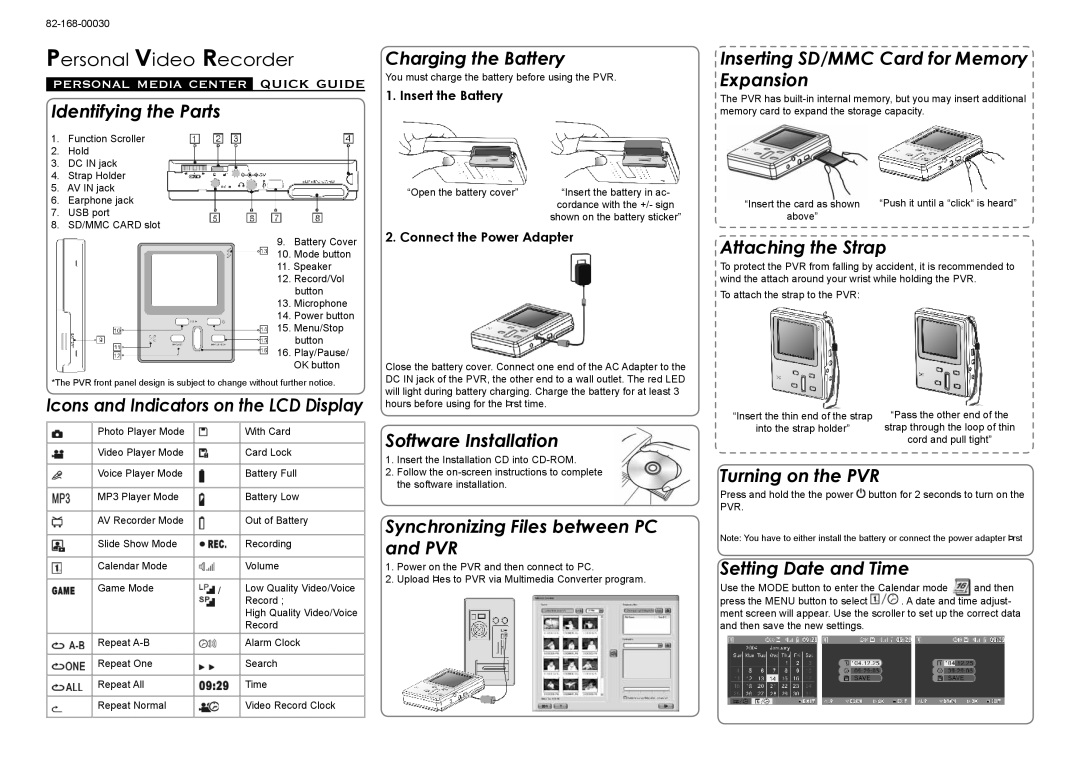
Identifying the Parts
1.Function Scroller
2.Hold
3.DC IN jack
4.Strap Holder
5.AV IN jack
6.Earphone jack
7.USB port
8.SD/MMC CARD slot
9. Battery Cover
10. Mode button
11. Speaker
12. Record/Vol button
13. Microphone
14. Power button
15. Menu/Stop button
16. Play/Pause/ OK button
*The PVR front panel design is subject to change without further notice.
Icons and Indicators on the LCD Display
| Photo Player Mode |
| With Card |
|
|
|
|
| Video Player Mode |
| Card Lock |
|
|
|
|
| Voice Player Mode |
| Battery Full |
|
|
|
|
| MP3 Player Mode |
| Battery Low |
|
|
|
|
| AV Recorder Mode |
| Out of Battery |
|
|
|
|
| Slide Show Mode |
| Recording |
|
|
|
|
| Calendar Mode |
| Volume |
|
|
|
|
| Game Mode | / | Low Quality Video/Voice |
|
|
| Record ; |
|
|
| High Quality Video/Voice |
|
|
| Record |
| Repeat |
| Alarm Clock |
|
|
|
|
| Repeat One |
| Search |
|
|
|
|
| Repeat All |
| Time |
|
|
|
|
| Repeat Normal |
| Video Record Clock |
|
|
|
|
Charging the Battery
You must charge the battery before using the PVR.
1. Insert the Battery
“Open the battery cover” | “Insert the battery in ac- |
| cordance with the +/- sign |
| shown on the battery sticker” |
2. Connect the Power Adapter
Close the battery cover. Connect one end of the AC Adapter to the DC IN jack of the PVR, the other end to a wall outlet. The red LED will light during battery charging. Charge the battery for at least 3 hours before using for the Þrst time.
Software Installation
1.Insert the Installation CD into
2.Follow the
Synchronizing Files between PC and PVR
1.Power on the PVR and then connect to PC.
2.Upload Þles to PVR via Multimedia Converter program.
Inserting SD/MMC Card for Memory Expansion
The PVR has
“Insert the card as shown | “Push it until a “click“ is heard” |
above” |
|
Attaching the Strap
To protect the PVR from falling by accident, it is recommended to wind the attach around your wrist while holding the PVR.
To attach the strap to the PVR:
“Insert the thin end of the strap | “Pass the other end of the |
into the strap holder” | strap through the loop of thin |
| cord and pull tight” |
Turning on the PVR
Press and hold the the power ![]() button for 2 seconds to turn on the PVR.
button for 2 seconds to turn on the PVR.
Note: You have to either install the battery or connect the power adapter Þrst
Setting Date and Time
Use the MODE button to enter the Calendar mode | and then |
press the MENU button to select ![]() . A date and time adjust- ment screen will appear. Use the scroller to set up the correct data and then save the new settings.
. A date and time adjust- ment screen will appear. Use the scroller to set up the correct data and then save the new settings.