CD3210
Owner’s Manual
PWR
| AUX |
| CD3210 |
| AM/FM/CD RECEIVER |
| 45W x 4 |
|
| |
VOL |
|
|
|
|
|
|
|
|
| |
|
|
|
|
| RPT RDM INT | PROGRAM |
|
| ||
|
|
|
|
|
|
|
| |||
|
| COMPACT |
|
|
|
|
| CH |
|
|
| MUTE | DIGITAL AUDIO |
|
|
|
|
|
|
|
|
|
|
|
|
|
|
|
|
|
| |
SEL |
|
|
|
|
|
|
|
|
| BAND |
| RPT | RPT | RDM | INT | PGM | MEM/CLR | ELAPSE |
| AUX | |
|
|
| ||||||||
VOL | 1 | 2 | 3 | 4 | 5 | 6 |
|
|
|
|
|
| AS/PS BASS | SCAN | DISP | ||||||
Audiovox Electronics Corporation
150 Marcus Boulevard
Hauppauge, NY 11788
www.jensen.com
© 2004 Audiovox v.111103
Thank You!
Thank you for choosing a Jensen product. We hope you will find the instructions in this owner’s manual clear and easy to follow. If you take a few minutes to look through it, you’ll learn how to use all the features of your new Jensen receiver for maximum enjoyment.
Preparation. . . . . . . . . . . . . . . . . . . . . . . . . . . . . . . . . . . . . . . . . . . . . . . . . . . . . . . . . . . . . . . 1
Wiring . . . . . . . . . . . . . . . . . . . . . . . . . . . . . . . . . . . . . . . . . . . . . . . . . . . . . . . . . . . . . . . . . . . 3
Installation . . . . . . . . . . . . . . . . . . . . . . . . . . . . . . . . . . . . . . . . . . . . . . . . . . . . . . . . . . . . . . . 5
Basic Operation . . . . . . . . . . . . . . . . . . . . . . . . . . . . . . . . . . . . . . . . . . . . . . . . . . . . . . . . . . . 6
Tuner Operation. . . . . . . . . . . . . . . . . . . . . . . . . . . . . . . . . . . . . . . . . . . . . . . . . . . . . . . . . . . 9
CD Player Operation . . . . . . . . . . . . . . . . . . . . . . . . . . . . . . . . . . . . . . . . . . . . . . . . . . . . . . . 11
Remote Control . . . . . . . . . . . . . . . . . . . . . . . . . . . . . . . . . . . . . . . . . . . . . . . . . . . . . . . . . . . 12
Troubleshooting . . . . . . . . . . . . . . . . . . . . . . . . . . . . . . . . . . . . . . . . . . . . . . . . . . . . . . . . . . 13
Specifications . . . . . . . . . . . . . . . . . . . . . . . . . . . . . . . . . . . . . . . . . . . . . . . . . . . . . . . . . . . . 13
Warranty . . . . . . . . . . . . . . . . . . . . . . . . . . . . . . . . . . . . . . . . . . . . . . . . . . . . . . . . . . . . . . . . . 13
Preparation
Getting Started
It’s a good idea to read all of the instructions before beginning the installation.
Tools and Supplies
The following tools and supplies are needed to install the radio.
•Torx type, Flat and Phillips screwdrivers
•Wire cutters and strippers
•Tools to remove existing radio (screwdriver, socket wrench set or other tools)
•Electrical tape
•Crimping tool
•Volt meter/test light
•Crimp connections
•18 gauge wire for power connections
•
Speaker Requirements: Only connect speakers rated in the load impedance of 4 ohms. Speakers with a load impedance less than 4 ohms could damage the unit.
Disconnect Battery
Before you begin, always disconnect the battery negative terminal.
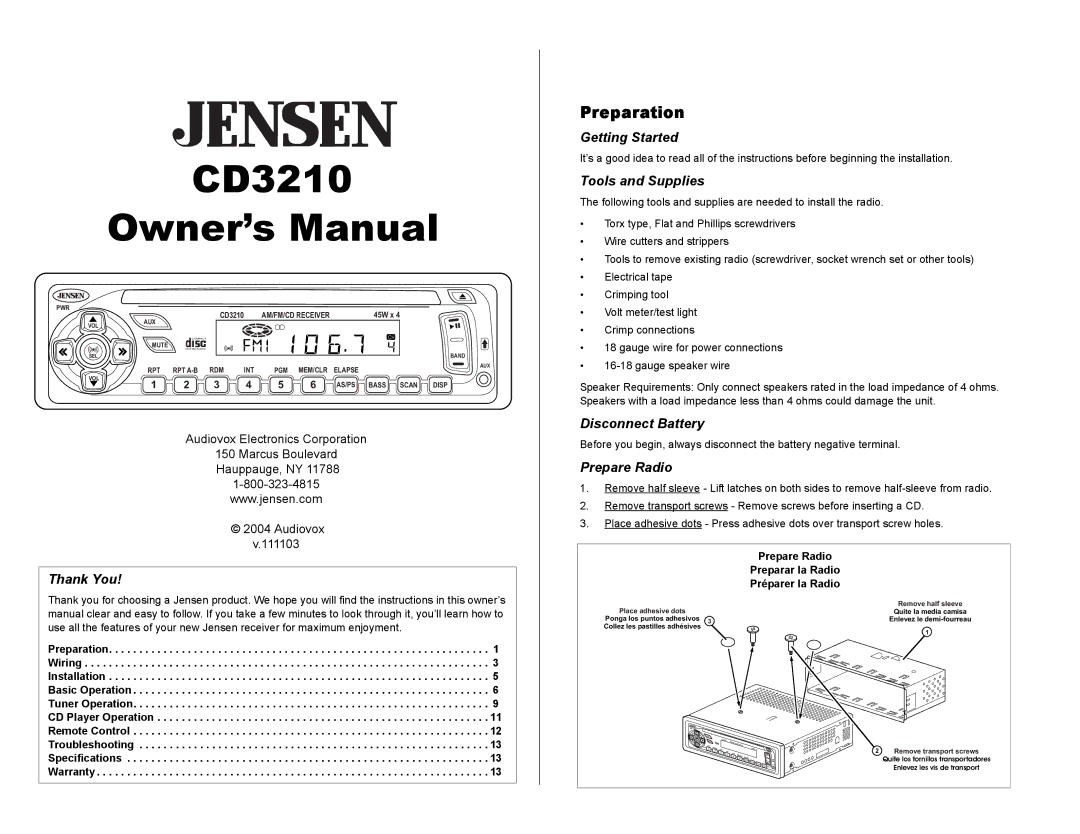
Prepare Radio
1.Remove half sleeve - Lift latches on both sides to remove
2.Remove transport screws - Remove screws before inserting a CD.
3.Place adhesive dots - Press adhesive dots over transport screw holes.
Prepare Radio
Preparar la Radio
Préparer la Radio
|
| Remove half sleeve |
Place adhesive dots |
| Quite la media camisa |
Ponga los puntos adhesivos | 3 | Enlevez le |
Collez les pastilles adhésives
1
PWR
VOL |
|
|
|
|
|
|
|
|
|
AUX |
|
|
|
|
|
|
|
|
|
MUTE |
| CD3210 |
| AM/FM/CD |
|
|
|
|
|
VOL |
|
|
| RECEIVER |
|
|
|
| |
RPT | RPT |
|
|
|
|
|
|
| |
1 | RDM |
|
| RD | 45W x 4 |
| 2 | Remove transport screws | |
2 | 4 | PGM |
|
| |||||
| 3 |
|
|
| |||||
|
| INT |
|
|
|
|
|
| |
|
|
|
| 5 | MEM/CLR | ELAPSE |
|
| Quite los tornillos transportadores |
|
|
|
|
| 6 |
|
| ||
|
|
|
|
|
| AS/PS BASS | BAND |
| |
|
|
|
|
|
|
| SCAN | AUX | Enlevez les vis de transport |
|
|
|
|
|
|
| DISP |
|
|