Manuals
/
Audiovox
/
TV and Video
/
TV DVD Combo
Audiovox
VE720
manual
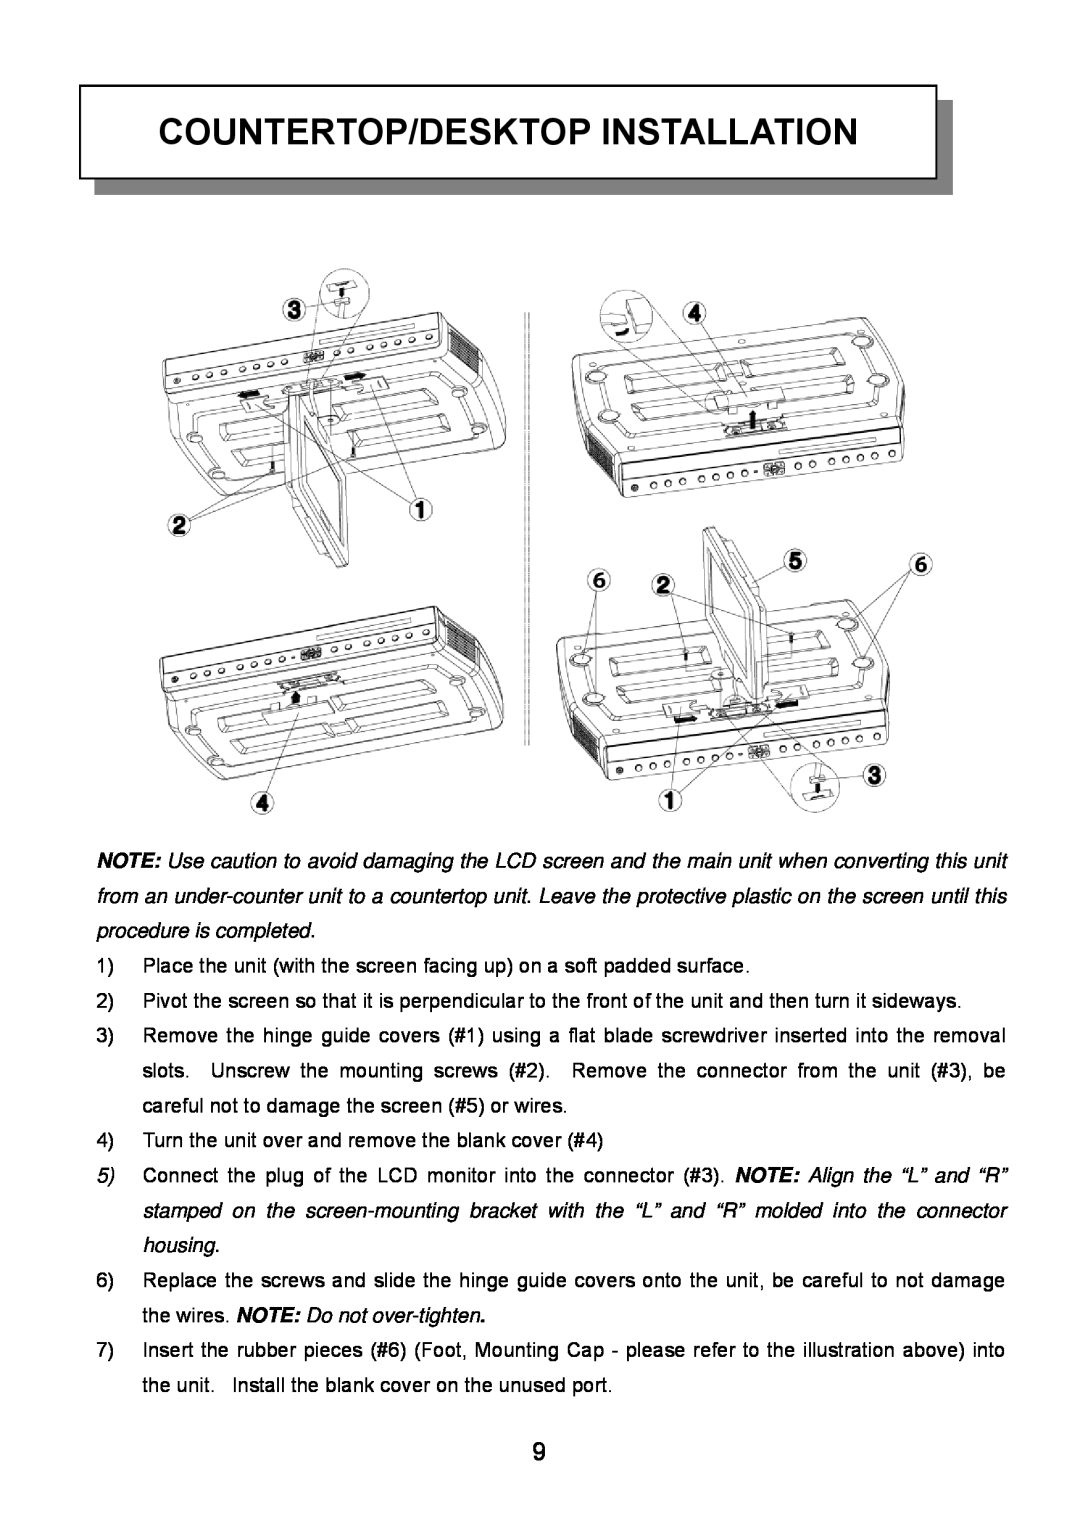
Countertop/Desktop Installation
Models:
VE720
1
10
33
33
Download
33 pages
19.54 Kb
7
8
9
10
11
12
13
14
Troubleshooting
Specs
Install
Deactivating Alarm
Password
Initial Setup
Battery Installation
Setting The Cable Tv Mode
Remote Control Functions
Safety
Page 10
Image 10
Page 9
Page 11
Page 10
Image 10
Page 9
Page 11
Contents
Slot-in DVD Player & 9” TFT LCD Monitor Multi-function Remote Control
OWNER’S and INSTALL
UNDER THE COUNTER 7” TV AM/FM RADIO and DVD PLAYER
VE720
INSIDE. REFER SERVICING TO QUALIFIED SERVICE PERSONNEL
INTRODUCTION
REMOVE COVER OR BACK. NO USER-SERVICEABLE PARTS
CAUTION TOREDUCE THE RISK OFELECTRIC SHOCK, DO NOT
MODEL No
INFORMATION
SERIAL No
IMPORTANT SAFETY INFORMATION
A. When the power-supply cord or plug is damaged
Under cabinet mounting
Cable System Installation
Speaker Impedance Marking External 8 ohm speakers only
Installation
TABLE OF CONTENTS
Important Safety Information
Countertop/Desktop Installation
11. Owners Installation manual
CONTENTS OF PACKAGE
3. Remote Control 4. Multi Height Spacer
1. VE720 2. Hardware bag
UNDER CABINET INSTALLATION
COUNTERTOP/DESKTOP INSTALLATION
1 ON/OFF BUTTON - Power ON/OFF
FRONT PANEL CONTROLS
REAR PANEL CONNECTIONS
BATTERY INSTALLATION
Rear View, Battery Size AAA
9 PREV IWW 10 Digit 0-9 Select 11 TITLE 12 DISPLAY 13 SUB TITLE
REMOTE CONTROL FUNCTIONS
1 EJECT 2 DVD 3 TV 4 SETUP 5 SEEK DN, SEEKUP 6 MENU 7 FRWW 8 STOP
14 AUDIO 15 SCREEN 16 ANGLE AP 17 ON/OFF 18 A/V 19 AM/FM
TV MODE
DVD REMOTE FUNCTION
CDDA, MP3
RADIO REMOTE FUNCTION
TV REMOTE FUNCTION
MISC REMOTE FUNCTION
SETTING THE TIME
INITIAL SETUP
CHANNEL TUNING SETUP
OPERATION
DEACTIVATING ALARM
SETTING and ACTIVATING the ALARM
NOTE If a series of dashes appear -- --, the Alarm is DEACTIVATED
SETTING THE ALARM TONES
SETTING THE SPEAKER MODE
SETTING THE CABLE TV MODE
SETTING THE AIR TV MODE
SETTING THE PRESETS IN AM, FM OR TV MODES
Inserting and Ejecting the Disc
USING THE DVD PLAYER
Searching for a Specific Scene/song by using Chapters
Playback and Stop
Changing the Subtitle Language
Repetitive Playback -To Repeat a Specific Section
Repetitive Playback -To Repeat a Specific Section A-B Repeat
Changing the Vocal Language AUDIO
Viewing the Main Disc Menu
Viewing Different Angles
Viewing the Playback Time, Title and Chapter Status
5. The elapsed time of title 6. The number of total chapters
1. The type of disc 2. The number of current title
3. The number of total titles 4. The number of current chapter
7. The remaining time of title 8. The number of the current angle
PLAYING AUDIO CDS
USING THE REPEAT FEATURE
PLAYING MP3 DISCS
USING THE REPEAT FEATURE
PLAYING A JPEG FILE
SETUP
The following options are available when in SETUP mode
LANGUAGE Menu
Press ENTER button to display the sub-menu
8. Press the SETUP button to exit the SETUP mode
Use the Û or buttons to highlight the desired menu item
6. Press the ENTER button to select the option item
VIDEO Menu
Rating Menu
CHANGE PASSWORD & RATING
Load Factory
settings
DISPLAY
TECHNICAL SPECIFICATIONS
GENERAL
DISC AVAILABLE
Problem
TROUBLESHOOTING CHECK LIST
Solution
2005 Audiovox Electronics Corp., Hauppauge, NY
128-7340
Top
Page
Image
Contents