FCC Registration Information
This equipment complies with Part 68 of the FCC rules. On the bottom of the modular adapter is a label that contains, among other information, the FCC registration number and ringer equiva- lence number (REN) for this equipment. If requested, this information must be provided to the telephone company.
The telephone company may make changes in its facilities, equipment, operation or procedures that could affect the operation of the equipment. If this happens, the
telephone company should provide you advance notice in order for you to make the necessary modifications to maintain uninterrupted services.
If you experience problems with your headset, please refer to the warranty section for information on warranty and repair service. If the problem is causing harm to the
telephone network, the telephone company may request that you remove the equipment until the problem is resolved. In extreme cases, the telephone company may be forced to disconnect your service before notifying you of the problem.
Avis d’Industrie Canada
Avis: L’étiquette d’Industrie Canada (IC) identifie le matériel homologué. Cette étiquette certifie que le matériel satisfait à certaines exigences de sécurité, de fonctionnement et de protection du réseau de télécommunications. Le ministère ne garantit pas que le matériel fonctionnera à la sat- isfaction de l’utilisateur.
Avant d’installer ce matériel, les utilisateurs doivent s’assurer qu’il peut être raccordé aux instal- lations de la compagnie locale de télécommunications. Le matériel doit également être installé selon une méthode de raccordement acceptée. Le client doit savoir que le respect des conditions ci-dessus ne peut pas prévenir la détérioration du service dans certaines conditions.
Les réparations de matériel homologué doivent être effectuées par un centre d’entretien canadien agréé désigné par le fournisseur. En cas de réparation ou de modification faite par l’utilisateur à ce matériel, ou de défauts de fonctionnement du matériel, la compagnie de télécommunications peut demander à l’utilisateur de débrancher le matériel.
Pour leur propre protection, les utilisateurs doivent s’assurer que les raccordements de mise à la terre des lignes d’électricité ou de téléphone et le système interne de tuyaux métalliques d’eau, le cas échéant, sont reliés ensemble. Cette précaution est particulièrement importante en région rurale.
Avertissement: Les utilisateurs ne doivent pas tenter de faire ces raccordements eux-mêmes mais doivent communiquer avec un inspecteur électrique ou un électricien, suivant le cas.
Avis : Le numéro d'équivalence de la sonnerie attribué à chaque dispositif terminal indique le nombre maximum de terminaux permis à se raccorder à un réseau téléphonique. La terminaison d'un réseau peut se composer de toute combinaison de dispositifs, mais le total des numéros de d'équivalence de la sonnerie de tous les dispositifs ne doit pas dépasser 5.
Mirage Usage Instructions
1Placing the headset capsule on your ear
Your Mirage headset has been designed so that it can be worn on either ear. Before placing the capsule on your ear, position the receiver so that it points outward. If Mirage is to be worn on the right ear, position the receiver as shown in Figure 1A. For usage on the left ear, position the receiver as in Figure 1B.
2Extend the voice tube approximately 2.5 cm. Hold the Mirage capsule above your ear and against your head. Slide the capsule downward, behind the top portion of your ear until positioned as shown in Figure 2.
3Positioning the receiver
After placing the headset capsule on your ear, rotate the receiver to rest against the centre of your outer ear for maximum comfort and hearing level (Figure 3). Note: Do not try to rotate the receiver beyond the voice tube.
4Attaching the capsule to glasses
If your headset is not sufficiently secure on your ear, use the eyeglass clip.
1.For plastic frames slip the eyeglass clip onto either the left or right side of your glasses (Figure 4A).
2.For thin metal frames, pull back the tab on the top of the eyeglass clip (Figure 4B). Slip onto the desired side of your glasses so that the clip is held in place when the tab is released.
3.Attach the capsule to the eyeglass clip (Figure 4C).
5Adjusting the voice tube
The voice tube on your headset is adjustable in two ways: First, it pivots at the metal ball joint of the capsule; and second, it telescopes in and out.
With one hand, hold the capsule securely against your head, and with the other hand hold the voice tube at the bend. Pull or push in, and rotate the tip of the voice tube to a position off the corner of your mouth (Figure 5).
6Adjusting the clothing clip
The clothing clip, when used properly, keeps the weight of the cord from affecting the stability of the headset.
Attach the clothing clip to part of your clothing at chest level. Press the cable clamp ends in to adjust the amount of slack in the cord. The cord between the headset and the clothing clip should have enough slack so the headset is not disturbed by head movements.
7Quick Disconnect™
Some headsets come equipped with a miniature connector called a Quick Disconnect, which allows you to put a call on hold and perform tasks away from the telephone without removing your headset.
Grasp each half of the Quick Disconnect as shown and pull straight apart. The call will remain on the line. When you return to your telephone, reconnect the Quick Disconnect. and the conversation can resume.
8Volume control
To set the volume control (Figure 8) to the listening level most comfortable for you, start with the wheel turned to #1, the lowest level. To increase the volume, rotate the wheel to a higher number.
Note: Some headset models do not have an amplifier or volume control.
9Care of your headset
Periodically wipe the capsule, receiver and voice tube with a soft damp cloth, lightly dampened with water. Do not use alcohol, cleaning solvents or detergents.
10Adjusting the mouthpiece
Carefully shape the boom with both hands as shown. Do not bend or twist the boom within 1/2 inch of the microphone.
11Position the turret and boom so that the microphone is two finger widths from the corner of your mouth.
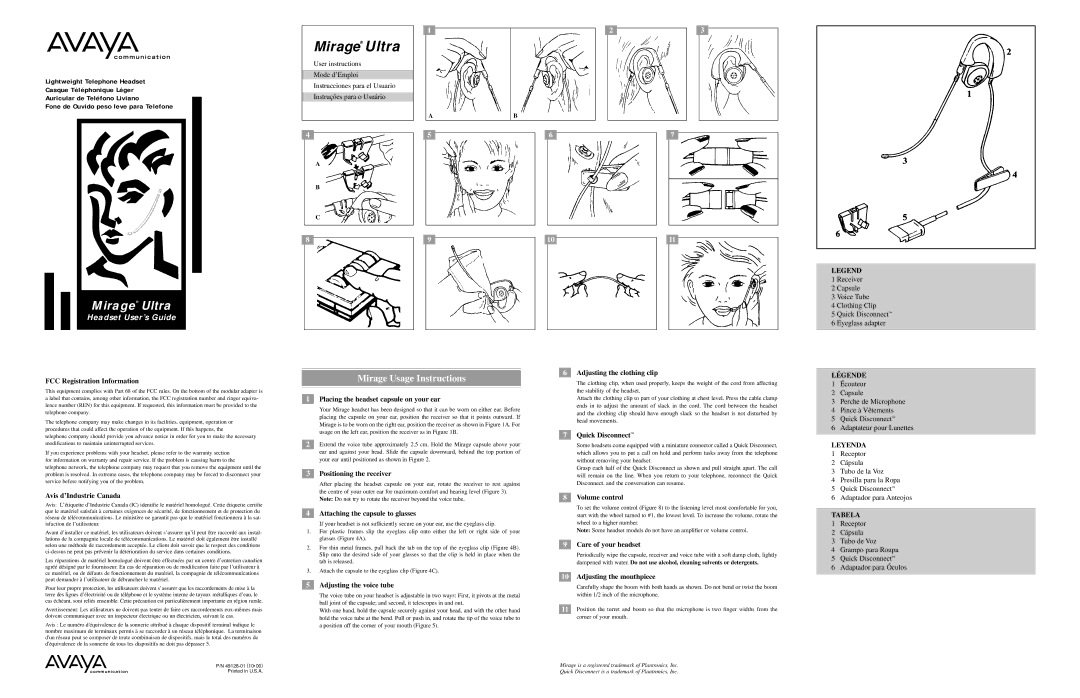
LÉGENDE
1Écouteur
2Capsule
3Perche de Microphone
4Pince à Vêtements
5Quick Disconnect™
6Adaptateur pour Lunettes
LEYENDA
1Receptor
2Cápsula
3Tubo de la Voz
4Presilla para la Ropa
5Quick Disconnect™
6Adaptador para Anteojos
TABELA
1Receptor
2Cápsula
3Tubo de Voz
4Grampo para Roupa
5Quick Disconnect™
6Adaptador para Óculos