Manuals
/
AVerMedia Technologies
/
Home Audio
/
Home Theater System
AVerMedia Technologies
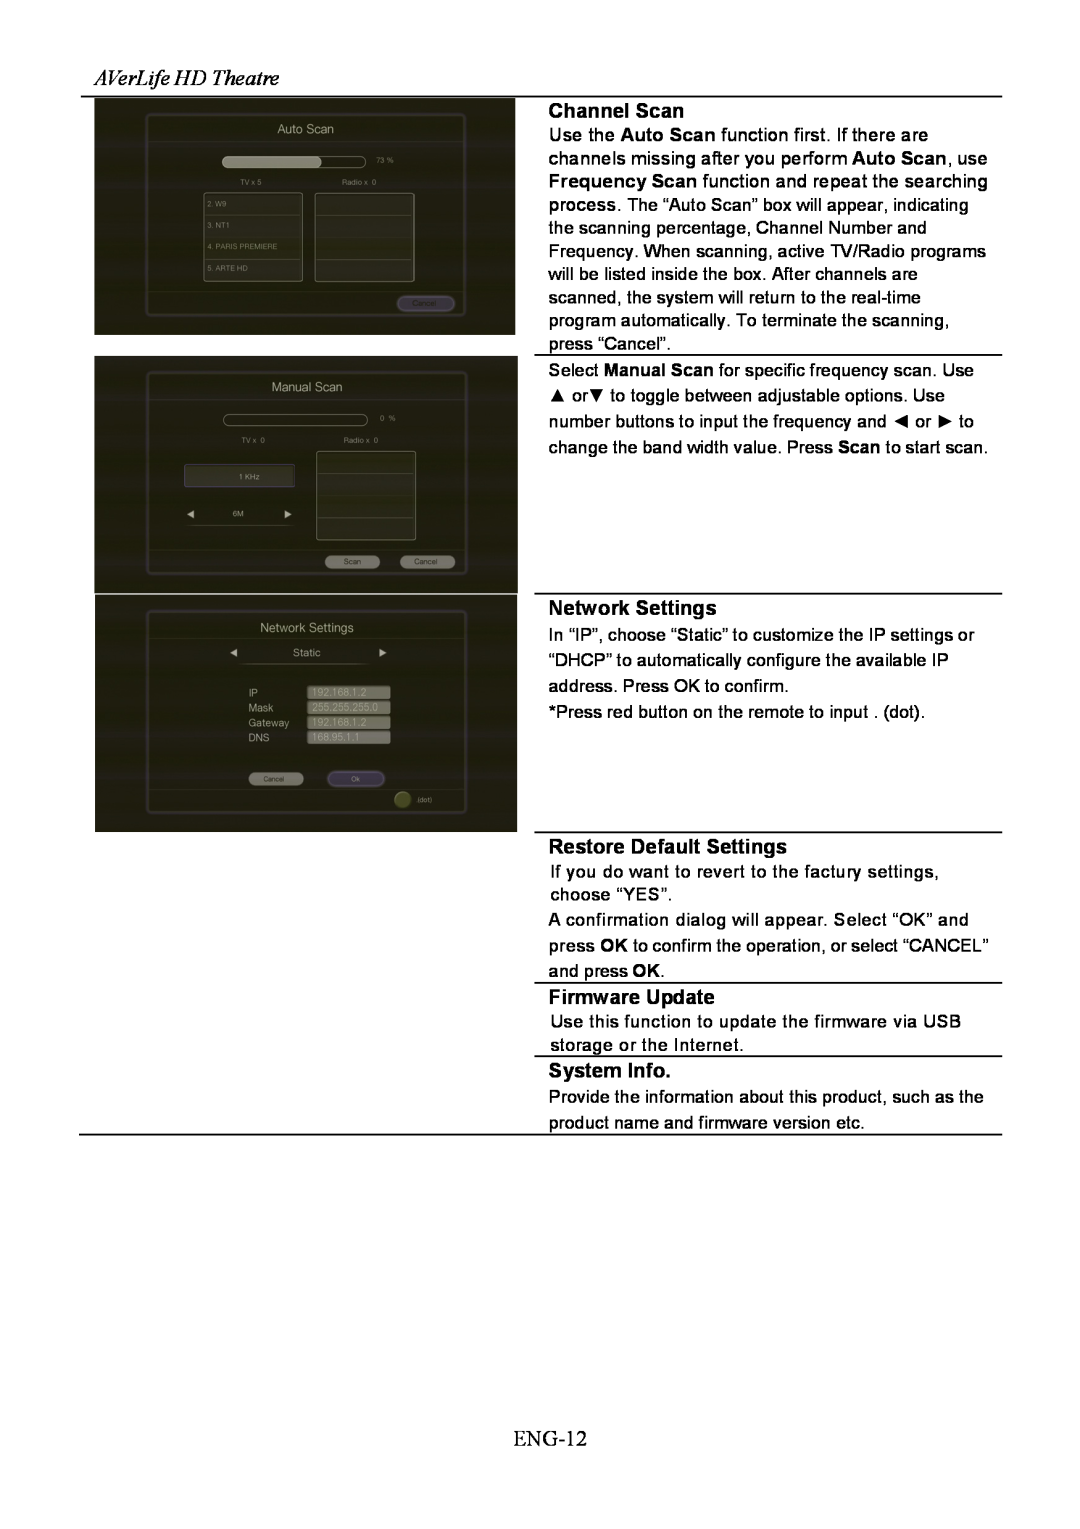
A211 AVerLife HD Theatre, Channel Scan, Network Settings, Firmware Update
Models:
A211
1
18
96
96
Download
96 pages
62.19 Kb
15
16
17
18
19
20
21
22
Specification
Configuración Modo Sueño
3.2 Télécommande
OSD Menu Settings
The Remote Control
Restore Default Settings
Power Saving
Firmware Update
Résolution
Page 18
Image 18
Page 17
Page 19
Page 18
Image 18
Page 17
Page 19
Contents
User Manual
English Deutsch Français Italiano Español
Português Ελληνική
AVerLife HD Theater
Page
Page
Page
Power
Specification
SAFETY Information
Dimension
DISCLAIMER
EUROPEAN COMMUNITY COMPLIANCE STATEMENT
Class B EMC
TRADEMARKS
Chapter
Table of Content
OSD Menu Settings
Chapter
Component Cable
Chapter 1 What’s in the Package
AVerLife HD Theatre
RCA Cable
2.2Infrared Sensor
Chapter 2 The Unit Parts
2.1 Touch Button Control Panel
English
AVerLife HD Theatre
Chapter 3 Installation and Setup
2.3 Connection Ports
ENG-4
English
3.2 The Remote Control
3.1 First time Launch
User’s Manual
AVerLife HD Theatre
ENG-6
3.3 Teletext Control Buttons
English
ENG-7
User’s Manual
4:3 / 16:9 support
Chapter 4 OSD Menu Settings
Resolution
Refresh Rate Hz
Schedule
English
User’s Manual
Playlist
4.5 Playback
AVerLife HD Theatre
ENG-10
English
Display Resolution
Power Saving
User’s Manual
Firmware Update
Network Settings
Restore Default Settings
AVerLife HD Theatre
Inhalt
Component-Kabel
Kapitel 1 Lieferumfang
AVerLife HD Theater
Composite-Kabel
2.2 Infrarotsensor
Kapitel 2 Die Teile des Gerätes
2.1 Bedienfeld
Deutsch
AVerLife HD Theater
Kapitel 3 Einrichtung
2.3 Anschlüsse
DEU-4
Deutsch
3.1 Erstmalige Verwendung
3.2 Die Fernbedienung
Benutzerhandbuch
AVerLife HD Theater
DEU-6
Benutzerhandbuch
3.3 Teletext-Steuertasten
Deutsch
DEU-7
Auflösung
Kapitel 4 OSD-Menüeinstellungen
AVerLife HD Theater
4:3 / 16:9 Unterstützung
Schedule Aufnahme Planung
Deutsch
Benutzerhandbuch
Playlist
4.3 Playback
AVerLife HD Theater
DEU-10
Bildschirmauflösung
Deutsch
Benutzerhandbuch
Seitenverhältnis
AVerLife HD Theater
Network Settings
Firmware Update
Kanalsuchlauf
Contenu de l’emballage
Sommaire
Chapitre
Chapitre
Câble composante
Chapitre 1 Contenu de l’emballage
AVerLife HD Theater
Câble composite
2.2Détecteur infrarouge
Chapitre 2 Description du matériel
2.1 Panneau de contrôle avec boutons
Français
AVerLife HD Theater
Chapitre 3 Installation et configuration
2.3 Ports de connexion
FRA-4
Français
3.2 Télécommande
3.1 Premier démarrage
Ce guide d’utilisation
AVerLife HD Theater
FRA-6
Ce guide d’utilisation
3.3 Boutons de contrôle de télétexte
Français
FRA-7
4 3 / 16 9 support
Chapitre 4 Paramètres du menu OSD
Résolution
Taux de rafraîchissement Hz
Schedule Planification
Français
Ce guide d’utilisation
Playlist Sélections
4.5 Playback Lecture
AVerLife HD Theater
FRA-10
Français
Display Resolution Résolution daffichage
Power Saving Économie dénergie
Ce guide d’utilisation
AVerLife HD Theater
Network Settings Réglages de réseau
Firmware Update Mise à jour du firmware
Channel Scan Recherche des chaînes
Indice
Cavo component
Capitolo 1 Contenuto della confezione
AVerLife HD Theater
Cavo composito
2.2 Sensore ad Infrarossi
Capitolo 2 Parti dell’unità
2.1 Tastiera del pannello di controllo
Italiano
AVerLife HD Theater
Capitolo 3 Installazione e Impostazione
2.3 Porte di collegamento
ITA-4
Italiano
3.1 Prima esecuzione
3.2 Il telecomando
Questo manuale d’uso
AVerLife HD Theater
ITA-6
Questo manuale d’uso
3.3 Pulsanti di Controllo del Teletesto
Italiano
ITA-7
supporta 4:3 / 16:9
Capitolo 4 Impostazioni del menu OSD
Resoluzione
Frequenza di aggiornamento Hz
Schedule Programmazione
Italiano
Questo manuale d’uso
Playlist
4.5 Playback Riproduzione
AVerLife HD Theater
ITA-10
Italiano
Display Resolution Risoluzione Video
Power Saving Risparmio Energia
Questo manuale d’uso
Firmware Update Aggiornamento Firmware
Network Settings Impostazioni di Rete
Restore Default Settings Ripristino Settaggi
AVerLife HD Theater
Índice
Cable de componentes
Capítulo 1 Contenido del paquete
AVerLife HD Theater
Cable compuesto
2.2 Sensor de infrarrojos
Capítulo 2 Piezas de la unidad
2.1 Panel de control de botones táctiles
Español
AVerLife HD Theater
Capítulo 3 Instalación y configuración
2.3 Puertos de conexión
ESP-4
Español
3.1 Inicio por primera vez
3.2 El mando a distancia
Manual del usuario
AVerLife HD Theater
ESP-6
Manual del usuario
3.3 Botones de Control de Teletexto
Español
ESP-7
Modo de 4 3
Capítulo 4 Configuración del menú OSD
Resolución
Tasa de refresco Hz
Programación
Español
Manual del usuario
Lista de Reproducción
4.5 Reproducción
AVerLife HD Theater
ESP-10
Manual del usuario
Configuración Modo Sueño
Español
Resolución de Pantalla
Búsqueda de Canales
Configuración de Red
AVerLife HD Theater
Restaurar Valores Predefinidos
Índice
Capítulo
Cabo de sinal componente
Capítulo 1 Conteúdo da embalagem
AVerLife HD Theater
Cabo de sinal composto
Português
Capítulo 2 Partes do aparelho
2.2Sensor de infravermelhos
Manual do Usuário
AVerLife HD Theater
Capítulo 3 Configuração
2.3 Portas de ligação
PTG-4
Manual do Usuário
3.2The Remote Control
3.1Ligar Pela Primeira Vez
PTG-5
AVerLife HD Theater
PTG-6
Manual do Usuário
3.3Botones de Control de Teletexto
Português
PTG-7
Resolução
Capítulo 4 Configurações do Menu OSD
4.2MENU
Suporte 4:3 / 16:9
Schedule Agendar
Português
Manual do Usuário
Playlist Agendar
4.5 Playback Reproduzir
AVerLife HD Theater
PTG-10
Português
Display Resolution Resolução de visualização
Power Saving Modo poupança de energia
Manual do Usuário
Firmware Update Actualização do Firmware
Network Settings
Restore Default Settings Restaurar predefinições
AVerLife HD Theater
Kεφάλαιο 2 Εξαρτήματα της Μονάδας
Πίνακας Περιεχομένων
Kεφάλαιο 1 Τι περιλαμβάνεται στη συσκευασία
Kεφάλαιο 3 Εγκατάσταση και Παραμετροποίηση
Καλώδιο Παροχής Τροφοδοσίας Ρεύματος
Kεφάλαιο 1 Τι περιλαμβάνεται στη συσκευασία
AVerLife HD Theater
Καλώδιο RCA
2.2Αισθητήρας Υπέρυθρων Ακτινών Infrared
Kεφάλαιο 2 Εξαρτήματα της Μονάδας
2.1Τι περιλαμβάνεται στη συσκευασία
Ελληνική
AVerLife HD Theater
Kεφάλαιο 3 Εγκατάσταση και Παραμετροποίηση
2.3Θύρες Σύνδεσης
ELL-4
Ελληνική
3.2 The Remote Control
3.1Εκκίνηση για πρώτη φορά
Εγχειρίδιο Χρήσης
AVerLife HD Theater
ELL-6
Εγχειρίδιο Χρήσης
3.3Κουμπιά Ελέγχου Τηλεκειμένου
Ελληνική
ELL-7
Υποστήριξη 4 3 / 16
Kεφάλαιο 4 Ρυθμίσεις Μενού OSD
Ανάλυση
Ρυθμός ανανέωσης Hz
Schedule Πρόγραμματισμός
Ελληνική
Εγχειρίδιο Χρήσης
Playlist
/// για να επιλέξετε το στοιχείο
4.5 Playback Αναπαραγωγ
AVerLife HD Theater
ELL-10
Ελληνική
Display Resolution Ανάλυση προβολής
Power Saving Εξοικονόμ. Ενέργειας
Εγχειρίδιο Χρήσης
Firmware Update Ενημέρωση υλικολογισμικού
Network Settings
Restore Default Settings Επαναφ. προεπιλ. ρυθμίσ
AVerLife HD Theater
Page
Page
Page
Page
Top
Page
Image
Contents