
VP150 specifications
The Axiom Audio VP150 is a high-performance center channel speaker designed to enhance your home theater experience. Renowned for its precise sound reproduction and engineering excellence, the VP150 is a key component for anyone serious about achieving an immersive audio environment.One of the standout features of the VP150 is its 5-driver configuration, which consists of dual 5.25-inch polypropylene woofers, dual 1-inch titanium tweeters, and a 5.25-inch midrange driver. This arrangement allows for a broad frequency response, making dialogue crisp and clear while ensuring that effects and music maintain their depth and richness. The dual tweeters are particularly advantageous, as they help create a wider soundstage, allowing for an enveloping audio experience that draws the listener into the action.
The VP150 prides itself on its ability to deliver a flat frequency response from 40Hz to 20kHz, ensuring that every aspect of your audio is reproduced accurately. This characteristic is crucial for home theater setups where clarity in dialogue is paramount. The speaker can effectively handle high sound pressure levels, ensuring it performs well even in larger rooms without distortion.
A design highlight of the VP150 is its robust cabinet construction, which is built to minimize vibration and resonance. The speaker is crafted from high-density MDF, and its internal bracing further enhances the overall sound quality by reducing cabinet coloration. The overall aesthetic is both modern and timeless, making it an attractive addition to any home décor.
Axiom's proprietary technologies play a significant role in the VP150's performance. The company's patented driver design utilizes a unique waveguide that optimizes dispersion, providing consistent sound across various listening positions. The result is a speaker that performs well regardless of where you're situated in the room.
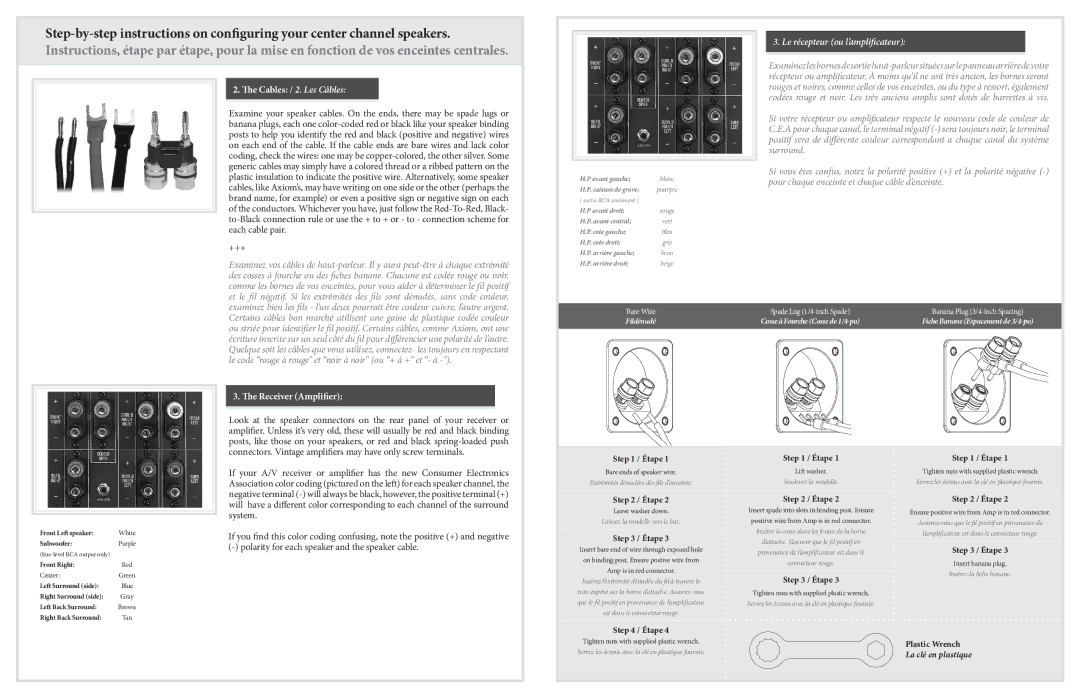
Connectivity is straightforward, as the VP150 is designed to be compatible with a variety of AV receivers and home theater systems. With its binding posts allowing for bi-wiring capabilities, audiophiles can optimize their setup further to achieve improved performance.
In conclusion, the Axiom Audio VP150 is a potent center channel speaker that excels in clarity, precision, and build quality. It offers an outstanding audio solution for home theater enthusiasts, ensuring that every movie night is an exciting and immersive experience. With its advanced technologies and design features, the VP150 stands out as a leading choice in the realm of audio excellence.