Installation adjustment mode


&HLOLQJ


Important : Access to adjustments


%


3'

$


&'

The top cover of the projector should be removed in order to gain


access to the adjustments.


Please refer to p.4-1 for how to remove the top cover.


Projector Distance


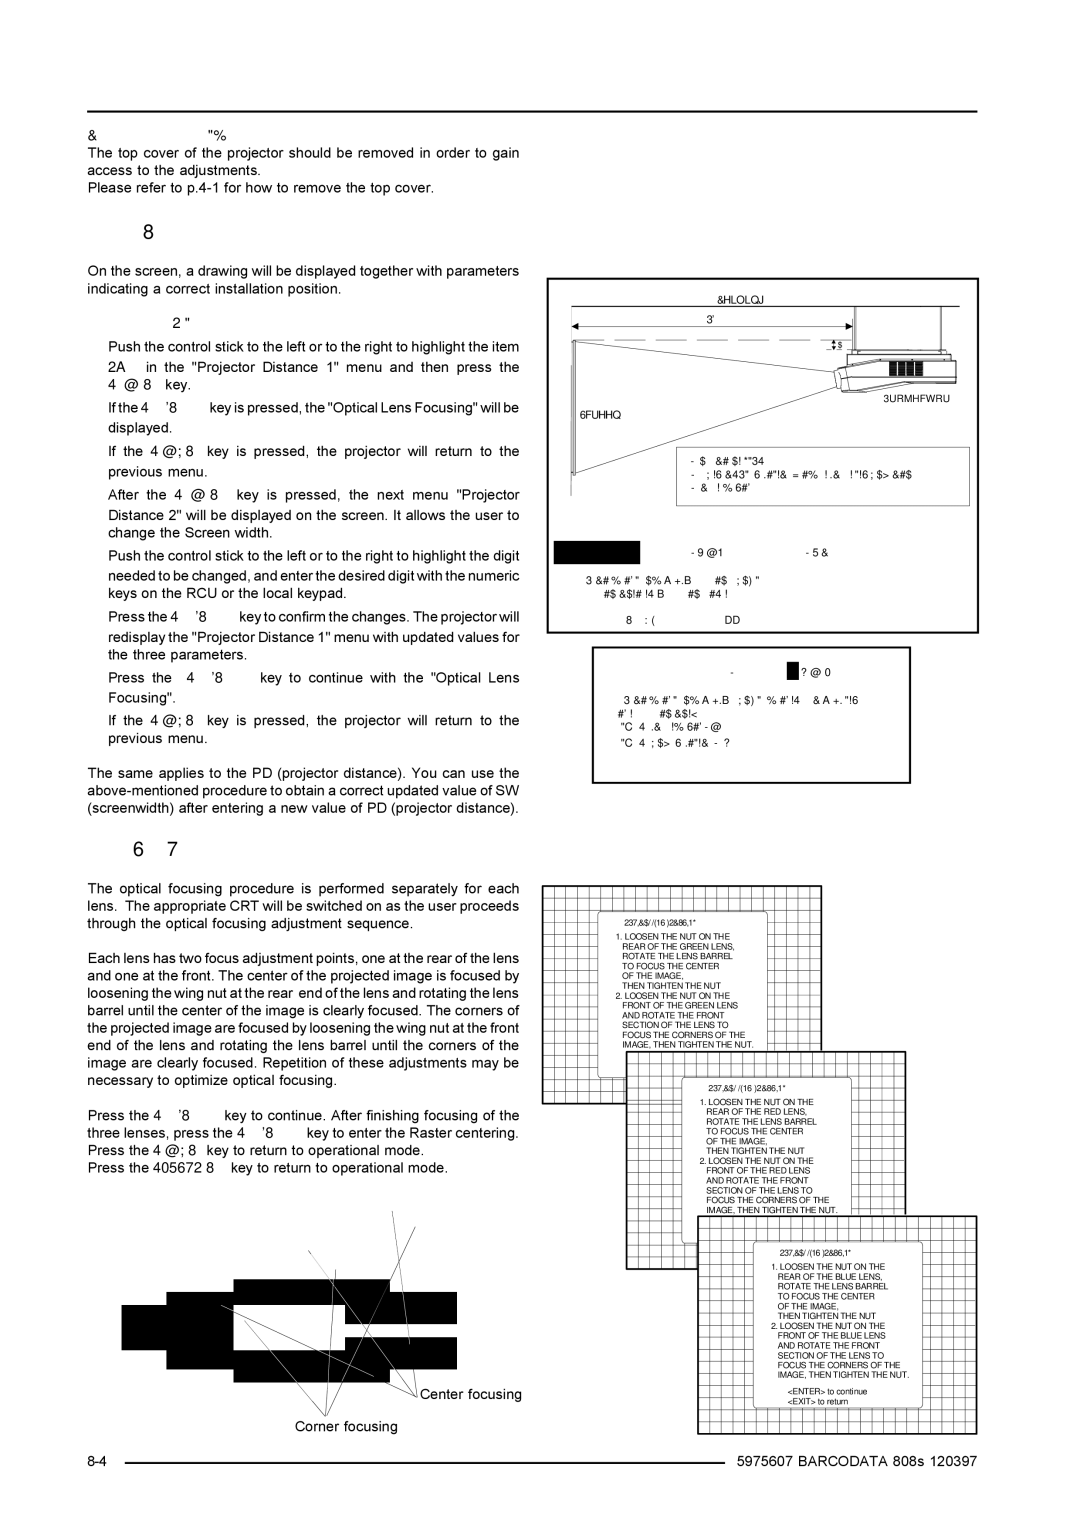
On the screen, a drawing will be displayed together with parameters


indicating a correct installation position.


To change the screen width :


Push the control stick to the left or to the right to highlight the item


6FUHHQ


3URMHFWRU


SW in the "Projector Distance 1" menu and then press the


<TEXT> key.


If the <ENTER> key is pressed, the "Optical Lens Focusing" will be


displayed.


If the <EXIT> key is pressed, the

projector

will return to the


6:FUHHQ￿ZLGWK

A = Correction)URQWvalue￿YLHZ


previous menu.


PD= Perpendicular distance between screen and projector

After the <TEXT> key is pressed,

the next

menu "Projector


SW= Screen width


Distance 2" will be displayed on the screen. It allows the user to


change the Screen width.


Push the control stick to the left or to the right to highlight the digit


SW = 2.6 m

PD= 3.64m

A=12 cm


needed to be changed, and enter the desired digit with the numeric


Select with arrow keys; <TEXT> to reprogram


keys on the RCU or the local keypad.


<ENTER> to continue; <EXIT> to return.


Press the <ENTER> key to confirm the changes. The projector will


WARNING: ONLY FOR STANDARD PROJECTORS !!


redisplay the "Projector Distance 1" menu with updated values for


the three parameters.


Press the <ENTER> key to continue with the "Optical Lens


SCREENWIDTH = 2 , 6 0 m


Focusing".


Select with arrow keys; reprogram with numeric keys and


If the <EXIT> key is pressed, the

projector

will return to the


then <ENTER> to confirm.


Maximum screenwidth = 6 m


previous menu.


Maximum proj. distance = 8,1 m.


The same applies to the PD (projector distance). You can use the


237,&$/￿/(16￿)2&86,1*


above-mentioned procedure to obtain a correct updated value of SW


(screenwidth) after entering a new value of PD (projector distance).


Optical Lens Focusing


The optical focusing procedure is performed separately for each


lens. The appropriate CRT will be switched on as the user proceeds


through the optical focusing adjustment sequence.


1. LOOSEN THE NUT ON THE


Each lens has two focus adjustment points, one at the rear of the lens


REAR OF THE GREEN LENS,


ROTATE THE LENS BARREL


and one at the front. The center of the projected image is focused by


TO FOCUS THE CENTER


OF THE IMAGE,


loosening the wing nut at the rear end of the lens and rotating the lens


THEN TIGHTEN THE NUT


2. LOOSEN THE NUT ON THE


barrel until the center of the image is clearly focused. The corners of


FRONT OF THE GREEN LENS


AND ROTATE THE FRONT


the projected image are focused by loosening the wing nut at the front


SECTION OF THE LENS TO


end of the lens and rotating the lens barrel until the corners of the


FOCUS THE CORNERS OF THE


IMAGE, THEN TIGHTEN237,&THE$NUT/￿/(16. ￿)2&86,1*


image are clearly focused. Repetition of these adjustments may be


necessary to optimize optical focusing.


Press the <ENTER> key to continue. After finishing focusing of the


1. LOOSEN THE NUT ON THE


REAR OF THE RED LENS,


three lenses, press the <ENTER> key to enter the Raster centering.


ROTATE THE LENS BARREL


TO FOCUS THE CENTER


Press the <EXIT> key to return to operational mode.


OF THE IMAGE,


THEN TIGHTEN THE NUT


Press the <ADJUST> key to return to operational mode.


2. LOOSEN THE NUT ON THE


FRONT OF THE RED LENS


AND ROTATE THE FRONT


SECTION OF THE LENS TO


FOCUS THE CORNERS OF THE


IMAGE, THEN TIGHTEN237,&THE$/￿/(16NUT. ￿)2&86,1*


1. LOOSEN THE NUT ON THE REAR OF THE BLUE LENS, ROTATE THE LENS BARREL TO FOCUS THE CENTER

OF THE IMAGE,

THEN TIGHTEN THE NUT 2. LOOSEN THE NUT ON THE

FRONT OF THE BLUE LENS AND ROTATE THE FRONT

SECTION OF THE LENS TO

FOCUS THE CORNERS OF THE

IMAGE, THEN TIGHTEN THE NUT.


Center focusing

<ENTER> to continue


<EXIT> to return


Corner focusing


8-4


5975607 BARCODATA 808s 120397


Page 31
Image 31
Barco R9002038, R9002031 installation manual Projector Distance, Optical Lens Focusing

R9002038, R9002031 specifications

Barco is a renowned name in the field of visualization and display technology, consistently pushing the boundaries of what is possible in the realm of projection systems. Two prominent models from their product line are the Barco R9002031 and R9002038, which are celebrated for their exceptional performance and innovative features.

The Barco R9002031 is primarily designed for high-performance applications, making it an ideal choice for command and control rooms, simulation, and training environments. One of its standout features is the advanced DLP technology, which delivers exceptional brightness and contrast, resulting in vibrant images that maintain clarity even in well-lit conditions. The projector boasts a resolution of 1920x1200, which ensures that every detail is rendered with precision.

In addition to superior image quality, the R9002031 supports a variety of input sources, facilitating seamless integration into existing setups. Its flexible connectivity options, including HDMI and DisplayPort, enhance its versatility, allowing users to connect different devices without hassle. Furthermore, its compact design is optimized for space efficiency, making it suitable for various installation environments.

On the other hand, the Barco R9002038 takes things a step further with its impressive brightness and advanced color processing technologies. With a higher lumen output, this model is perfect for larger venues where visibility is a concern. The R9002038 is equipped with Barco’s proprietary color management system, which ensures accurate color reproduction, providing images that are true to life.

Another characteristic feature of both models is their durability and reliability. Barco systems are known for their long operational life, significantly reducing maintenance costs. The built-in cooling systems allow for extended use without overheating, providing peace of mind during critical operations.

In terms of user experience, both the R9002031 and R9002038 offer intuitive interfaces and remote management capabilities. Users can easily adjust settings and monitor performance, enhancing operational efficiency.

In summary, the Barco R9002031 and R9002038 models exemplify cutting-edge technology and design, making them suitable for a wide range of professional applications. Their impressive features, advanced imaging technologies, and robust reliability set them apart in the competitive landscape of visualization systems, ensuring that Barco remains a leader in the industry.