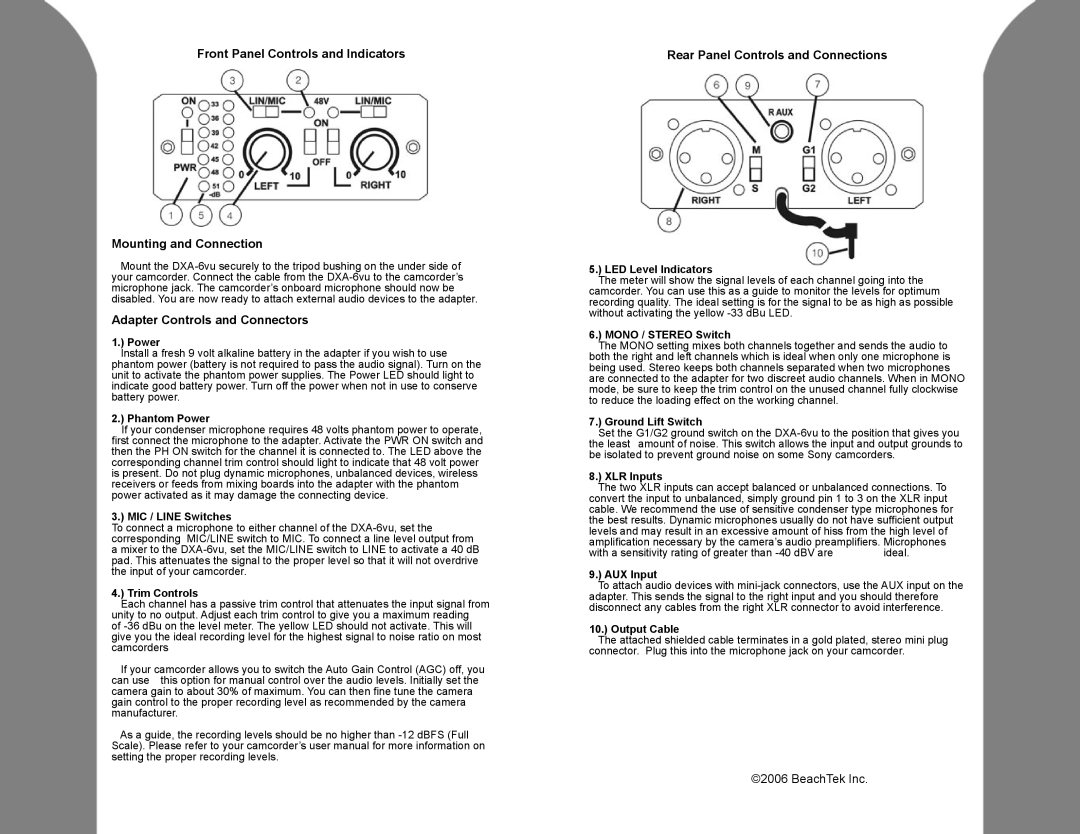
Front Panel Controls and Indicators
Mounting and Connection
Mount the
Adapter Controls and Connectors
1.) Power
Install a fresh 9 volt alkaline battery in the adapter if you wish to use phantom power (battery is not required to pass the audio signal). Turn on the unit to activate the phantom power supplies. The Power LED should light to indicate good battery power. Turn off the power when not in use to conserve battery power.
2.) Phantom Power
If your condenser microphone requires 48 volts phantom power to operate, first connect the microphone to the adapter. Activate the PWR ON switch and then the PH ON switch for the channel it is connected to. The LED above the corresponding channel trim control should light to indicate that 48 volt power is present. Do not plug dynamic microphones, unbalanced devices, wireless receivers or feeds from mixing boards into the adapter with the phantom power activated as it may damage the connecting device.
3.) MIC / LINE Switches
To connect a microphone to either channel of the
4.) Trim Controls
Each channel has a passive trim control that attenuates the input signal from unity to no output. Adjust each trim control to give you a maximum reading
of
If your camcorder allows you to switch the Auto Gain Control (AGC) off, you can use this option for manual control over the audio levels. Initially set the camera gain to about 30% of maximum. You can then fine tune the camera gain control to the proper recording level as recommended by the camera manufacturer.
As a guide, the recording levels should be no higher than
Rear Panel Controls and Connections
5.) LED Level Indicators
The meter will show the signal levels of each channel going into the camcorder. You can use this as a guide to monitor the levels for optimum recording quality. The ideal setting is for the signal to be as high as possible without activating the yellow
6.) MONO / STEREO Switch
The MONO setting mixes both channels together and sends the audio to both the right and left channels which is ideal when only one microphone is being used. Stereo keeps both channels separated when two microphones are connected to the adapter for two discreet audio channels. When in MONO mode, be sure to keep the trim control on the unused channel fully clockwise to reduce the loading effect on the working channel.
7.) Ground Lift Switch
Set the G1/G2 ground switch on the
8.) XLR Inputs
The two XLR inputs can accept balanced or unbalanced connections. To
convert the input to unbalanced, simply ground pin 1 to 3 on the XLR input
cable. We recommend the use of sensitive condenser type microphones for
the best results. Dynamic microphones usually do not have sufficient output
levels and may result in an excessive amount of hiss from the high level of
amplification necessary by the camera’s audio preamplifiers. Microphones | |
with a sensitivity rating of greater than | ideal. |
9.) AUX Input
To attach audio devices with
10.) Output Cable
The attached shielded cable terminates in a gold plated, stereo mini plug connector. Plug this into the microphone jack on your camcorder.
©2006 BeachTek Inc.