Mount the burner

Protect the Air Tube From

Overheating

Overheating could cause damage to the air tube and other combustion components lead- ing to equipment malfunction and impaired combustion performance.

yThe end of the air tube must not extend into the com- bustion chamber unprotected unless it has been facto- ry-tested and specified by the appliance manufacturer.

yPosition the end of the air tube ¼” back from flush with the refractory inside entry wall to prevent damage from overheating.

‰Mount flange(s) on air tube

yThis section does not apply to burners with welded flang- es.

yDo not install air tube on burner.

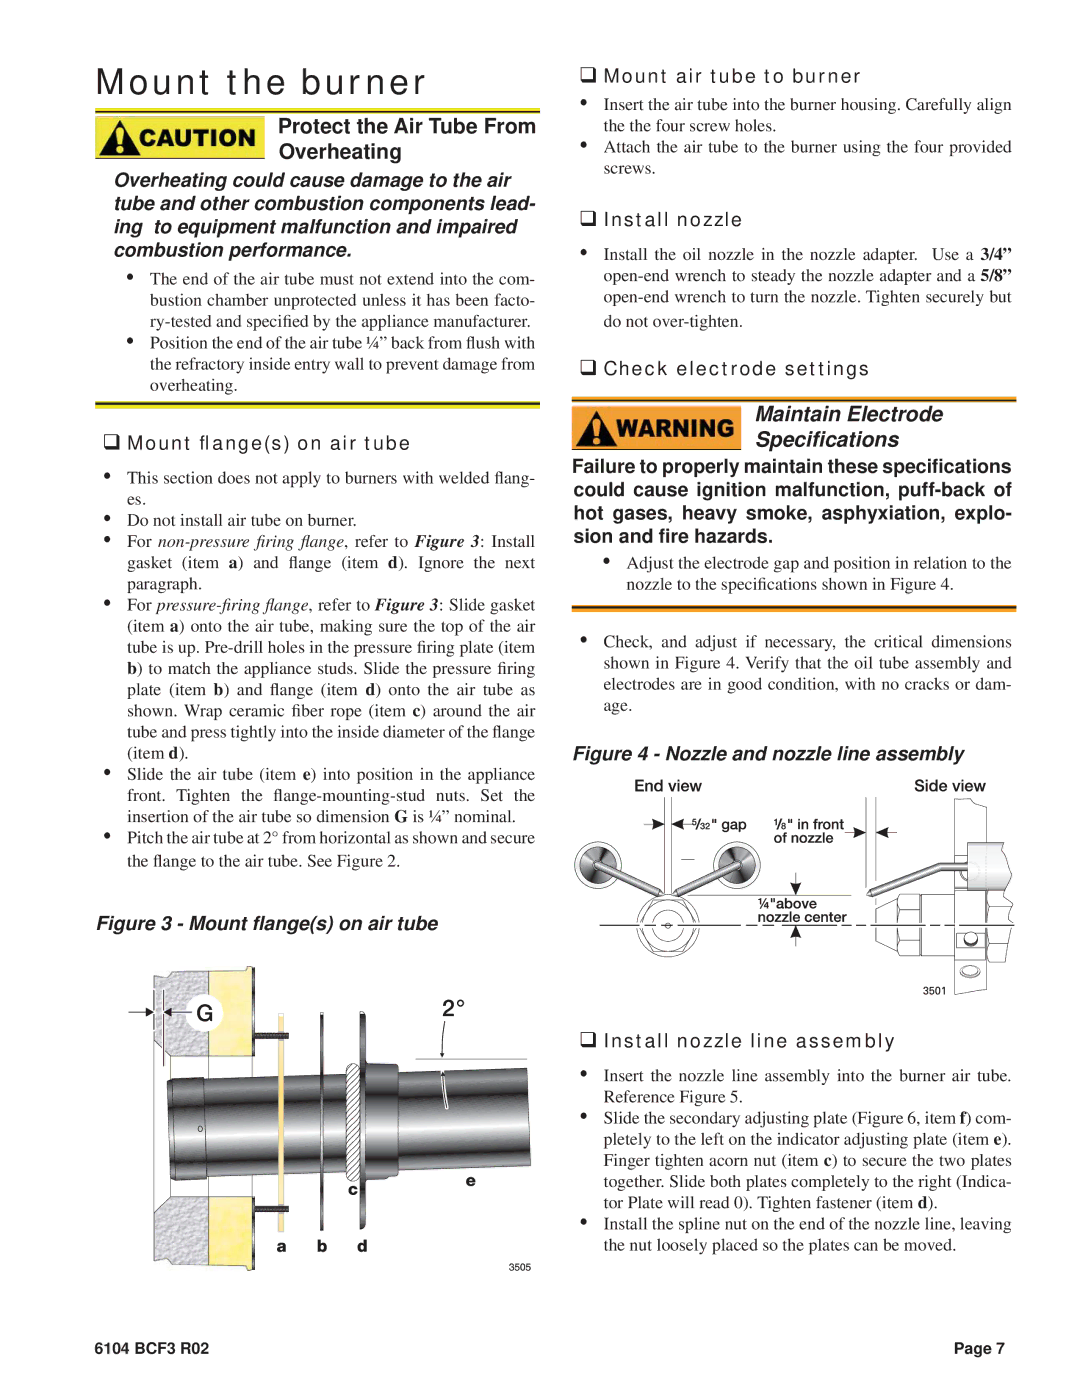
yFor non-pressure firing flange, refer to Figure 3: Install gasket (item a) and flange (item d). Ignore the next paragraph.

yFor pressure-firing flange, refer to Figure 3: Slide gasket (item a) onto the air tube, making sure the top of the air tube is up. Pre-drill holes in the pressure firing plate (item b) to match the appliance studs. Slide the pressure firing plate (item b) and flange (item d) onto the air tube as shown. Wrap ceramic fiber rope (item c) around the air tube and press tightly into the inside diameter of the flange (item d).

ySlide the air tube (item e) into position in the appliance front. Tighten the flange-mounting-stud nuts. Set the insertion of the air tube so dimension G is ¼” nominal.

yPitch the air tube at 2° from horizontal as shown and secure the flange to the air tube. See Figure 2.

‰Mount air tube to burner

yInsert the air tube into the burner housing. Carefully align the the four screw holes.

yAttach the air tube to the burner using the four provided screws.

‰Install nozzle

yInstall the oil nozzle in the nozzle adapter. Use a 3/4” open-end wrench to steady the nozzle adapter and a 5/8” open-end wrench to turn the nozzle. Tighten securely but do not over-tighten.

‰Check electrode settings

Maintain Electrode

Specifications

Failure to properly maintain these specifications could cause ignition malfunction, puff-back of hot gases, heavy smoke, asphyxiation, explo- sion and fire hazards.

yAdjust the electrode gap and position in relation to the nozzle to the specifications shown in Figure 4.

yCheck, and adjust if necessary, the critical dimensions shown in Figure 4. Verify that the oil tube assembly and electrodes are in good condition, with no cracks or dam- age.

Figure 4 - Nozzle and nozzle line assembly

Figure 3 - Mount flange(s) on air tube

‰ Install nozzle line assembly

y Insert the nozzle line assembly into the burner air tube. Reference Figure 5.

y Slide the secondary adjusting plate (Figure 6, item f) com- pletely to the left on the indicator adjusting plate (item e). Finger tighten acorn nut (item c) to secure the two plates together. Slide both plates completely to the right (Indica- tor Plate will read 0). Tighten fastener (item d).

y Install the spline nut on the end of the nozzle line, leaving the nut loosely placed so the plates can be moved.

6104 BCF3 R02

Page 7

Page 7
Image 7
Beckett CF375 manual Mount the burner, Protect the Air Tube From Overheating

CF375 specifications

The Beckett CF series, encompassing models CF3500A, CF2500A, CF2300A, CF800, and CF375, represents a robust lineup of oil burners designed for residential and commercial heating applications. These models are engineered for efficiency, reliability, and ease of use, making them a preferred choice among HVAC professionals and homeowners alike.

The CF3500A is a high-capacity model that excels in providing consistent heating for larger spaces. With a firing rate of up to 3.5 gallons per hour, it is equipped with advanced nozzle technology that improves fuel atomization, resulting in better combustion efficiency. This model features a compact design, making it easy to install in various settings, and it includes an integrated control module for straightforward operation.

The CF2500A offers impressive performance with a moderate firing rate suitable for mid-sized buildings. It incorporates Beckett's patented Clean Cut design which minimizes smoke and reduces emissions. This model also comes with a diagnostic LED display, allowing for quick identification of system status and potential issues, enhancing maintenance efficiency.

The CF2300A is tailored for smaller applications while still maintaining a strong performance profile. Its compact size does not compromise power, as it utilizes advanced combustion technologies to ensure effective heating. The user-friendly interface allows for effortless adjustments, and its low profile design fits into tight spaces, making it ideal for residential use.

For applications requiring versatility, the CF800 stands out with a multi-fuel capability, allowing it to run on both oil and biodiesel. It boasts an energy-efficient design that contributes to cost savings over time. The CF800's unique air delivery system enhances combustion efficiency, reducing noise levels and improving overall comfort in the living environment.

Finally, the CF375 is designed for high-efficiency performance in professional settings. Its durable construction ensures long-lasting service, and it is equipped with advanced control systems that optimize fuel delivery and combustion. This model is particularly noted for its low emissions, aligning with modern environmental standards while providing reliable heating.

Together, the Beckett CF series exemplifies cutting-edge technology and engineering excellence, catering to diverse heating needs. Each model is a testament to Beckett’s commitment to energy efficiency, performance, and environmental responsibility, making them suitable choices for both residential and commercial heating applications.