TRUTH B2092A
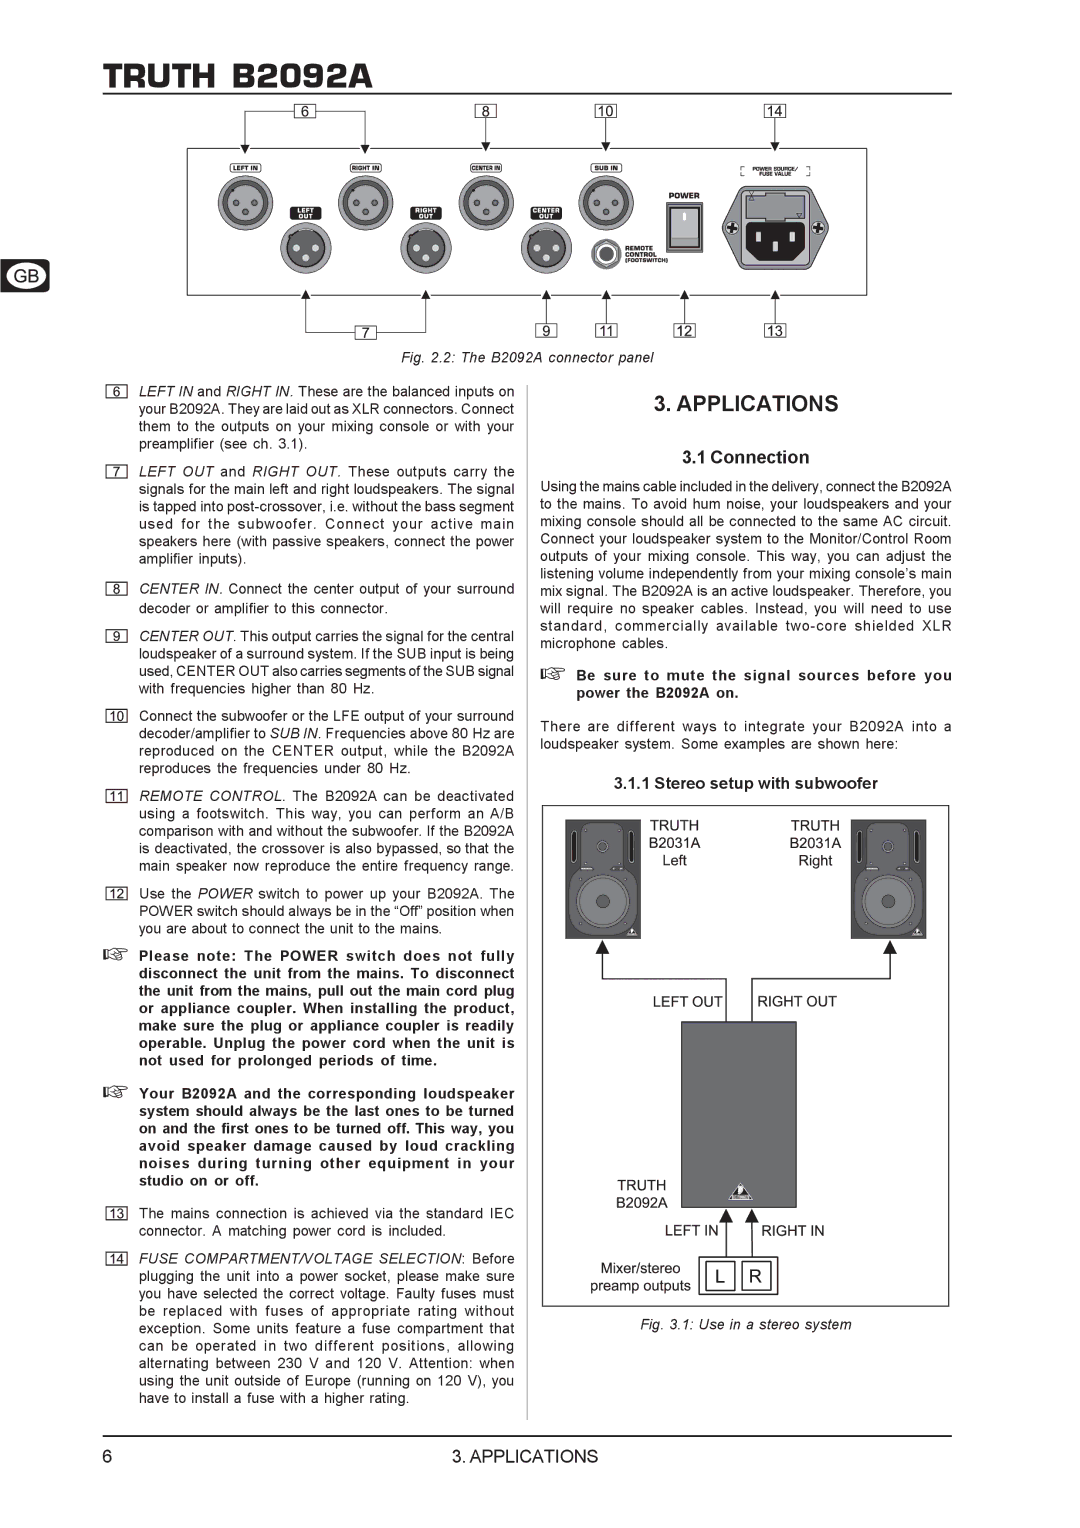
Fig. 2.2: The B2092A connector panel
LEFT IN and RIGHT IN. These are the balanced inputs on your B2092A. They are laid out as XLR connectors. Connect them to the outputs on your mixing console or with your preamplifier (see ch. 3.1).
LEFT OUT and RIGHT OUT. These outputs carry the signals for the main left and right loudspeakers. The signal is tapped into
CENTER IN. Connect the center output of your surround decoder or amplifier to this connector.
CENTER OUT. This output carries the signal for the central loudspeaker of a surround system. If the SUB input is being used, CENTER OUT also carries segments of the SUB signal with frequencies higher than 80 Hz.
Connect the subwoofer or the LFE output of your surround decoder/amplifier to SUB IN. Frequencies above 80 Hz are reproduced on the CENTER output, while the B2092A reproduces the frequencies under 80 Hz.
REMOTE CONTROL. The B2092A can be deactivated using a footswitch. This way, you can perform an A/B comparison with and without the subwoofer. If the B2092A is deactivated, the crossover is also bypassed, so that the main speaker now reproduce the entire frequency range.
Use the POWER switch to power up your B2092A. The POWER switch should always be in the “Off” position when you are about to connect the unit to the mains.
+Please note: The POWER switch does not fully disconnect the unit from the mains. To disconnect the unit from the mains, pull out the main cord plug or appliance coupler. When installing the product, make sure the plug or appliance coupler is readily operable. Unplug the power cord when the unit is not used for prolonged periods of time.
+Your B2092A and the corresponding loudspeaker system should always be the last ones to be turned on and the first ones to be turned off. This way, you avoid speaker damage caused by loud crackling noises during turning other equipment in your studio on or off.
The mains connection is achieved via the standard IEC connector. A matching power cord is included.
FUSE COMPARTMENT/VOLTAGE SELECTION: Before plugging the unit into a power socket, please make sure you have selected the correct voltage. Faulty fuses must be replaced with fuses of appropriate rating without exception. Some units feature a fuse compartment that can be operated in two different positions, allowing alternating between 230 V and 120 V. Attention: when using the unit outside of Europe (running on 120 V), you have to install a fuse with a higher rating.
3. APPLICATIONS
3.1 Connection
Using the mains cable included in the delivery, connect the B2092A to the mains. To avoid hum noise, your loudspeakers and your mixing console should all be connected to the same AC circuit. Connect your loudspeaker system to the Monitor/Control Room outputs of your mixing console. This way, you can adjust the listening volume independently from your mixing console’s main mix signal. The B2092A is an active loudspeaker. Therefore, you will require no speaker cables. Instead, you will need to use standard, commercially available
+Be sure to mute the signal sources before you power the B2092A on.
There are different ways to integrate your B2092A into a loudspeaker system. Some examples are shown here:
3.1.1 Stereo setup with subwoofer
Fig. 3.1: Use in a stereo system
6 | 3. APPLICATIONS |