PREPARE EL SITIO PARA LA INSTALACION

PREPARE EL SITIO PARA LA INSTALACION

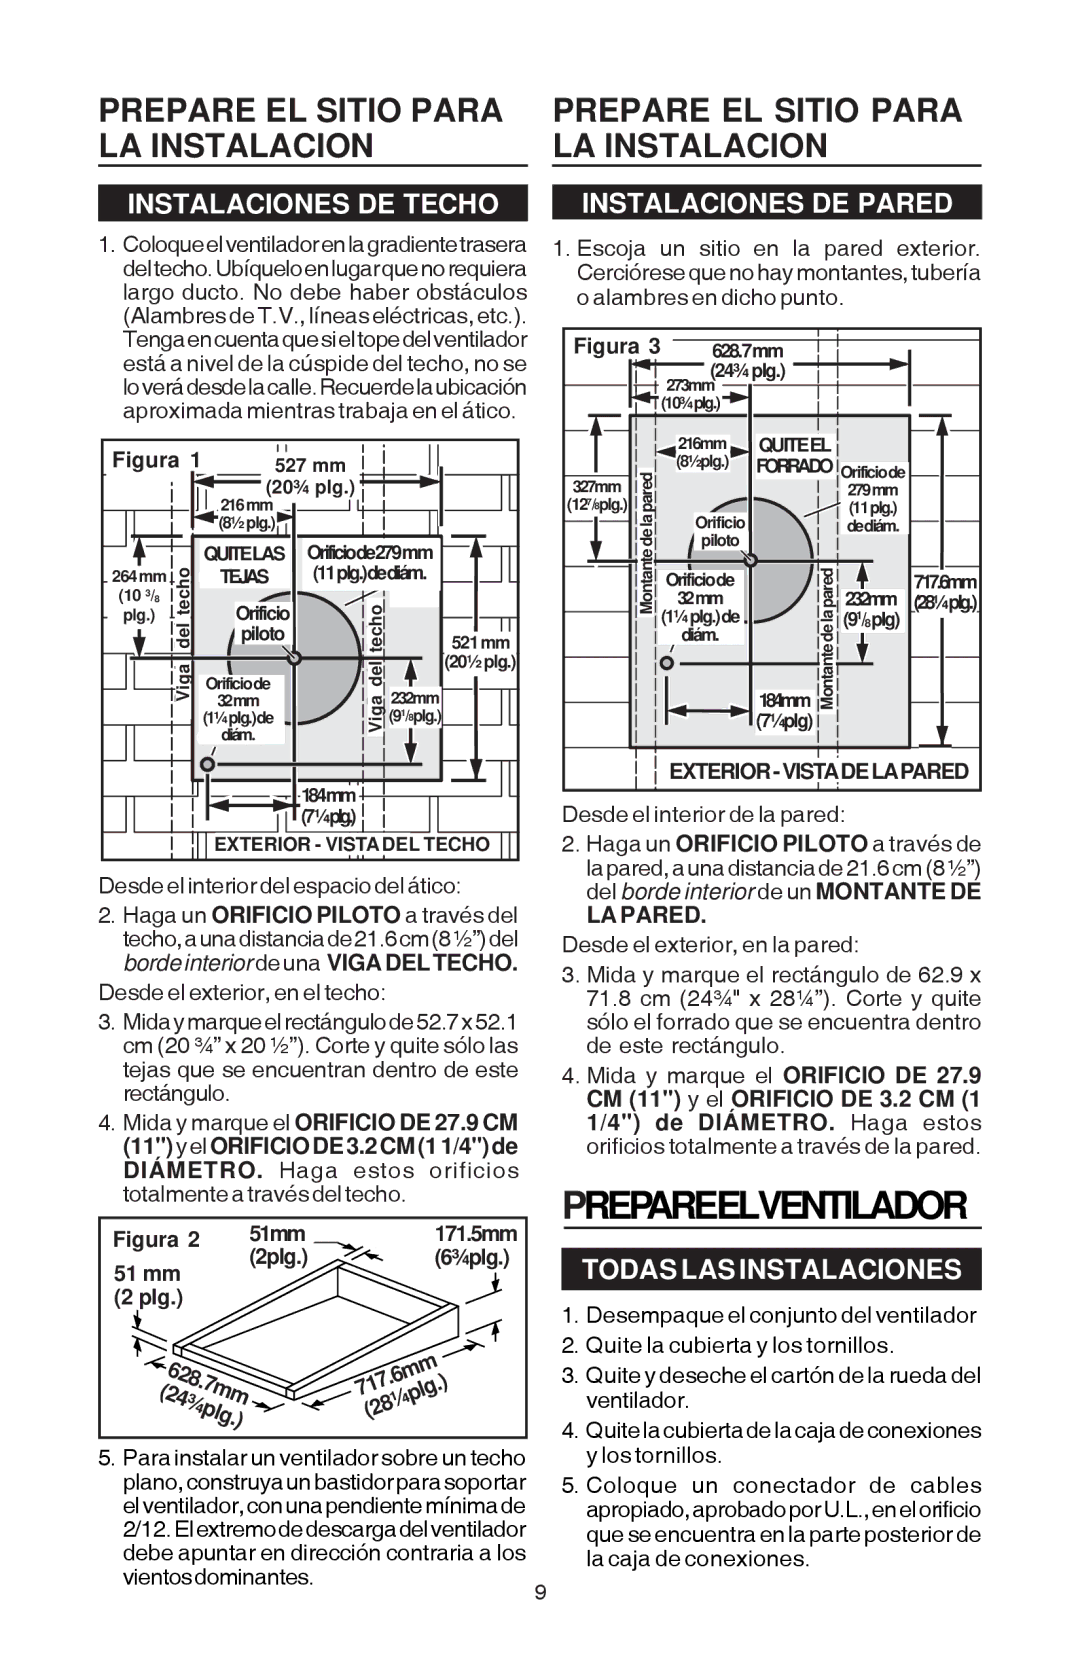
INSTALACIONES DE TECHO

INSTALACIONES DE PARED

1. Coloqueelventiladorenlagradientetrasera

1. Escoja un sitio en la pared exterior.

deltecho.Ubíqueloenlugarquenorequiera

Cerciórese que no hay montantes, tubería

largo ducto. No debe haber obstáculos

o alambres en dicho punto.


(Alambres de T.V., líneas eléctricas, etc.).


Tengaencuentaquesieltopedelventilador

Figura 3

628.7mm


está a nivel de la cúspide del techo, no se


24¾"25"


loverádesdelacalle.Recuerdelaubicación


273mm(24¾ plg.)


10¾"


aproximada mientras trabaja en el ático.


(10¾plg.)


216mm

REMOVE


Figura 1

527 mm


8½"

QUITEEL


(8½plg.)

FORRADO


SIDING

Orificiode


20¾"

327mm

pilotoHole


(20¾ plg.)

paredladellWStud


11"279mmdia.


12 /8"


216mm


(127/8plg.)


hole


8½"


OrificioP lot


(11plg.)


(8½ plg.)


dediám.


VigadeltechoRoofRafter


QUITELASREMOVE

Orificiode279 mm

Montante


(7¼plg) MontantedelaparedWallStud


(1¼1¼"plg.)de

VigadeltechoRoofRafter (9 /8plg.)


264mm


11"


SHINGLES

(11 plg.)dediám.


Orificiode


717.6mm28¼"

(1033/8


TEJAS

dia.


232mm

10 /8"


hole


32mm


(28¼plg.)

plg.)


OrificioPilot


(1¼1¼"plg.)de


1

/8"


1


pilotoHole

521mm


diadiám. hole.


(9 /8plg)


Orificiode

(20½20½"plg.)


232mm


184mm


32mm


11/8"


7¼"


diadiám. hole.


EXTERIOR-VISTADELAPARED


OUTSIDE - WALL VIEW


184mm


7¼"

Desde el interior de la pared:


(7¼plg.)


Haga un ORIFICIO PILOTO a través de


EXTERIOR - VISTADEL TECHO


2.


OUTSIDE - ROOF VIEW


lapared,aunadistanciade21.6cm(8½”)

Desde el interior del espacio del ático:


del borde interior de un MONTANTE DE

2. Haga un ORIFICIO PILOTO a través del

LA PARED.

techo,aunadistanciade21.6cm(8½”)del

Desde el exterior, en la pared:

borde interior de una VIGADELTECHO.

3. Mida y marque el rectángulo de 62.9 x

Desde el exterior, en el techo:


71.8 cm (24¾" x 28¼”). Corte y quite

3. Midaymarqueelrectángulode52.7x52.1

sólo el forrado que se encuentra dentro

cm (20 ¾” x 20 ½”). Corte y quite sólo las

de este rectángulo.

tejas que se encuentran dentro de este

4. Mida y marque el ORIFICIO DE 27.9

rectángulo.


CM (11") y el ORIFICIO DE 3.2 CM (1

4. Mida y marque el ORIFICIO DE 27.9 CM

1/4") de DIÁMETRO. Haga estos

(11")yelORIFICIODE3.2CM(11/4")de

orificios totalmente a través de la pared.

DIÁMETRO. Haga

estos

orificios


totalmente a través del techo.


PREPAREELVENTILADOR

Figura 2

51mm

2"

171.5mm


51 mm

(2plg.)


(6¾plg.)

TODAS LAS INSTALACIONES


(2 plg.)


6¾"

1. Desempaque el conjunto del ventilador

2"


2. Quite la cubierta y los tornillos.

628.


28¼".

.)


3. Quite y deseche el cartón de la rueda del

24¾"


6mm


717


7mm


(24¾plg


(28¼plg

ventilador.

.)


4. Quite la cubierta de la caja de conexiones


5. Para instalar un ventilador sobre un techo

y los tornillos.

plano,construyaunbastidorparasoportar

5. Coloque un conectador de cables

elventilador,conunapendientemínimade

apropiado,aprobadoporU.L.,enelorificio

2/12.Elextremodedescargadelventilador

que se encuentra en la parte posterior de

debe apuntar en dirección contraria a los

la caja de conexiones.

vientosdominantes.


9


Page 9
Image 9
Best EB6, EB9 manual Prepare EL Sitio Para LA Instalacion, Instalaciones DE Techo Instalaciones DE Pared

EB6, EB9 specifications

The Best EB9 and EB6 models represent a remarkable leap in the world of electric bikes, designed to cater to the needs of urban commuters and outdoor enthusiasts alike. These models stand out for their blend of performance, technology, and user-friendly features.

The EB9 showcases a robust design with a lightweight aluminum frame, making it both sturdy and easy to maneuver. It is equipped with a powerful 500W motor that delivers impressive torque, enabling riders to effortlessly conquer hills and rough terrains. The bike's maximum speed can reach up to 28 mph, allowing for fast commuting without sacrificing safety. Additionally, the EB9 boasts a long-lasting 48V lithium-ion battery, providing a range of up to 60 miles on a single charge, which is perfect for long-distance trips or extended adventures.

On the other hand, the EB6 is tailored more towards casual riders and those who prefer a smoother ride. It features a 350W motor that offers support up to 20 mph, striking a balance between speed and efficiency. The EB6 comes with an adjustable seat and ergonomic handlebars that enhance comfort during long rides. Its 36V battery is designed for a range of approximately 40 miles, making it suitable for daily commutes and leisurely weekend rides.

Both models incorporate advanced technologies such as pedal assist and throttle mode, providing riders with options based on their preferences. Users can easily switch between different levels of assistance, allowing for a customizable riding experience. Furthermore, both the EB9 and EB6 are equipped with hydraulic disc brakes, ensuring reliable stopping power in any weather condition.

Safety features are also a priority, with integrated lights for visibility and reflectors positioned strategically around the bike. The inclusion of a durable suspension system in both models enhances ride quality, absorbing shocks from uneven paths.

In conclusion, the Best EB9 and EB6 are exceptional electric bikes that cater to a wide range of riders. Their innovative features, combined with advanced technology, make them ideal choices for those seeking efficiency and performance in their daily cycling endeavors. Whether commuting in the city or exploring nature, these bikes provide an outstanding riding experience.