AS385Pub10000001628 4/4/05 2:40 PM Page 4

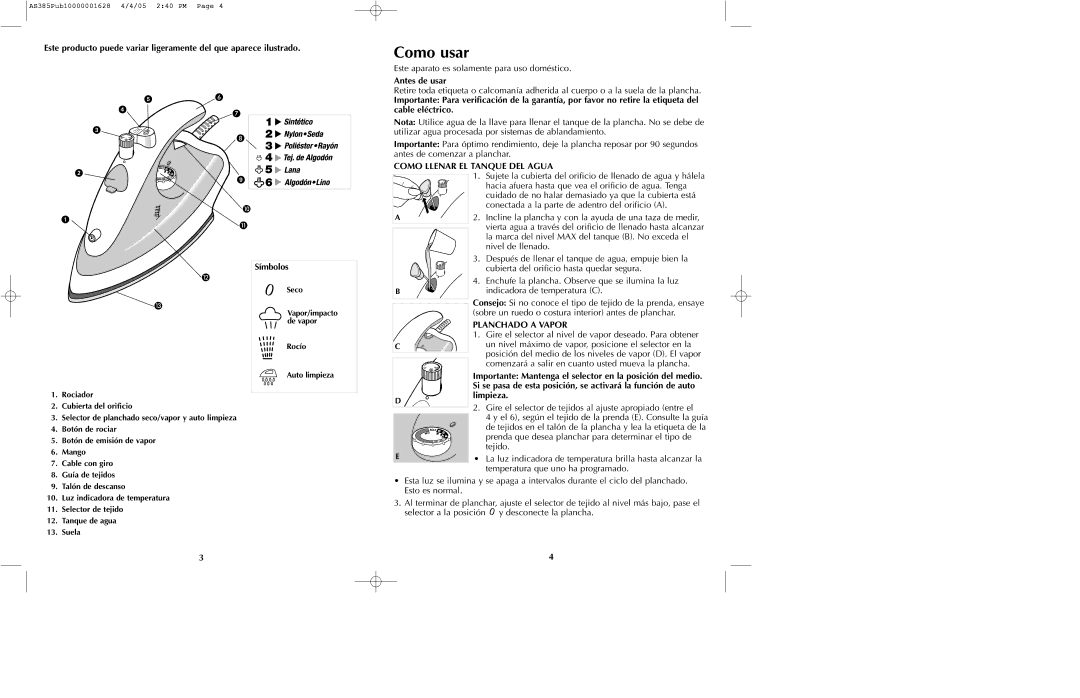
Este producto puede variar ligeramente del que aparece ilustrado.

Como usar

Este aparato es solamente para uso doméstico.

Antes de usar

Retire toda etiqueta o calcomanía adherida al cuerpo o a la suela de la plancha.

Importante: Para verificación de la garantía, por favor no retire la etiqueta del cable eléctrico.

Nota: Utilice agua de la llave para llenar el tanque de la plancha. No se debe de utilizar agua procesada por sistemas de ablandamiento.

Importante: Para óptimo rendimiento, deje la plancha reposar por 90 segundos antes de comenzar a planchar.

COMO LLENAR EL TANQUE DEL AGUA

1.Rociador

2.Cubierta del orificio

3.Selector de planchado seco/vapor y auto limpieza

4.Botón de rociar

5.Botón de emisión de vapor

6.Mango

7.Cable con giro

8.Guía de tejidos

9.Talón de descanso

10.Luz indicadora de temperatura

11.Selector de tejido

12.Tanque de agua

13.Suela

Símbolos

Seco

Vapor/impacto de vapor

Rocío

Auto limpieza


1.

Sujete la cubierta del orificio de llenado de agua y hálela


hacia afuera hasta que vea el orificio de agua. Tenga


cuidado de no halar demasiado ya que la cubierta está


conectada a la parte de adentro del orificio (A).

A

2.

Incline la plancha y con la ayuda de una taza de medir,


vierta agua a través del orificio de llenado hasta alcanzar


la marca del nivel MAX del tanque (B). No exceda el


nivel de llenado.


3.

Después de llenar el tanque de agua, empuje bien la


cubierta del orificio hasta quedar segura.


4.

Enchufe la plancha. Observe que se ilumina la luz

B


indicadora de temperatura (C).


Consejo: Si no conoce el tipo de tejido de la prenda, ensaye


(sobre un ruedo o costura interior) antes de planchar.


PLANCHADO A VAPOR


1.

Gire el selector al nivel de vapor deseado. Para obtener

C


un nivel máximo de vapor, posicione el selector en la


posición del medio de los niveles de vapor (D). El vapor


comenzará a salir en cuanto usted mueva la plancha.


Importante: Mantenga el selector en la posición del medio.


Si se pasa de esta posición, se activará la función de auto

D

limpieza.


2.Gire el selector de tejidos al ajuste apropiado (entre el

4 y el 6), según el tejido de la prenda (E). Consulte la guía

de tejidos en el talón de la plancha y lea la etiqueta de la prenda que desea planchar para determinar el tipo de tejido.

E

• La luz indicadora de temperatura brilla hasta alcanzar la


temperatura que uno ha programado.

Esta luz se ilumina y se apaga a intervalos durante el ciclo del planchado. Esto es normal.

3.Al terminar de planchar, ajuste el selector de tejido al nivel más bajo, pase el selector a la posición y desconecte la plancha.

3

4

Page 3
Image 3
Black & Decker AS385 manual Antes de usar, Como Llenar EL Tanque DEL Agua, Símbolos, Planchado a Vapor, Limpieza

AS385 specifications

The Black & Decker AS385 is a versatile and powerful tool designed specifically for home DIY enthusiasts and professionals alike. This compact, yet robust, 12V cordless automatic screw-driver is perfect for a wide range of applications, from assembling furniture and installing shelves to hanging pictures and securing loose fixtures.

One of the standout features of the AS385 is its lightweight and ergonomic design. Weighing in at a manageable size, this screwdriver allows for extended use without causing discomfort. The soft-grip handle ensures a firm and comfortable grip, reducing the risk of fatigue during prolonged tasks.

Equipped with a variable speed motor, the Black & Decker AS385 offers enhanced control for users. This feature enables precise adjustments to be made depending on the material and type of screw being used. The forward and reverse switch allows users to easily toggle between driving screws in and out, providing added convenience during operation.

A key highlight of the AS385 is its integrated rechargeable battery, which delivers an impressive runtime. The 12V battery provides enough power for numerous applications, and with the included charger, users can quickly recharge for continued use. This cordless design enhances mobility, allowing users to work in various locations without the hassle of tangled cords or limited reach.

The AS385 also comes with a built-in LED work light. This practical feature illuminates the workspace, making it easier to see what you are working on, especially in dimly lit environments. The tool's compact size allows it to reach tight spaces, making it an essential addition to any toolbox.

Moreover, the Black & Decker AS385 includes a magnetic bit holder, ensuring that bits are securely in place during operation. This feature also makes it easy to change out bits quickly, allowing users to switch between different tasks with minimal downtime. The tool comes with a variety of commonly used bits, making it ready for immediate use right out of the box.

In summary, the Black & Decker AS385 combines power, versatility, and user-friendly design, making it an ideal choice for anyone looking to streamline their DIY projects. With its state-of-the-art technology, comfortable handling, and practical features, this cordless screwdriver proves to be a valuable ally for both novices and seasoned craftsmen. Whether you are tackling small home repairs or larger projects, the AS385 is a reliable tool that helps get the job done efficiently and effectively.