AS385Pub10000001628 4/4/05 2:40 PM Page 10

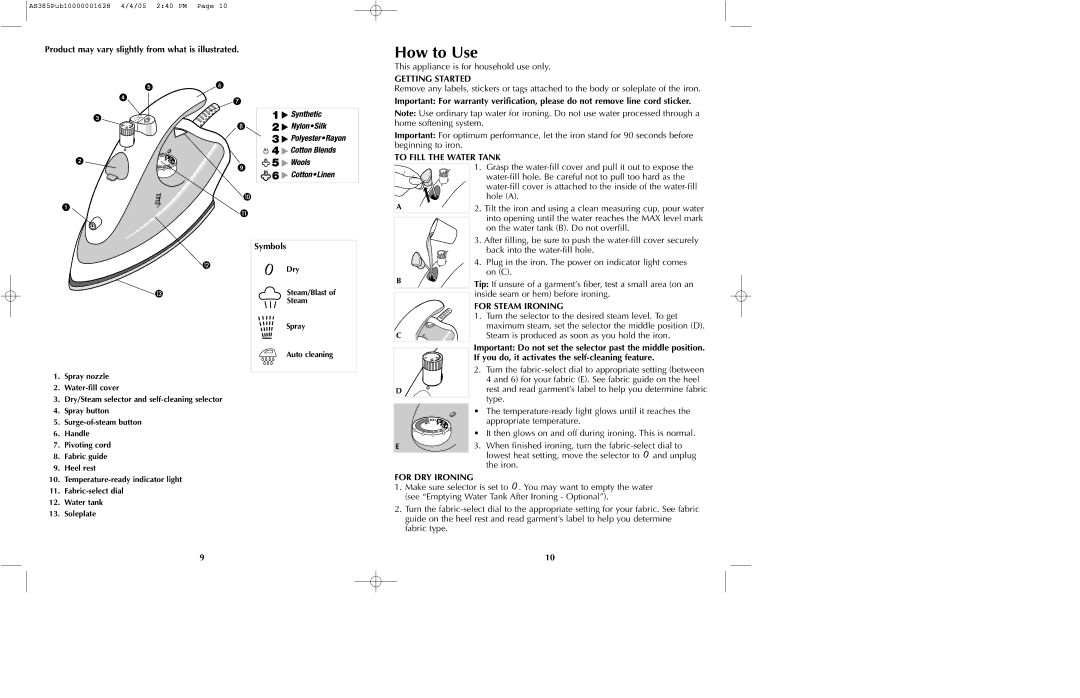
Product may vary slightly from what is illustrated.

Symbols

Dry

Steam/Blast of

Steam

Spray

Auto cleaning

1.Spray nozzle

2.Water-fill cover

3.Dry/Steam selector and self-cleaning selector

4.Spray button

5.Surge-of-steam button

6.Handle

7.Pivoting cord

8.Fabric guide

9.Heel rest

10.Temperature-ready indicator light

11.Fabric-select dial

12.Water tank

13.Soleplate

How to Use

This appliance is for household use only.

GETTING STARTED

Remove any labels, stickers or tags attached to the body or soleplate of the iron.

Important: For warranty verification, please do not remove line cord sticker.

Note: Use ordinary tap water for ironing. Do not use water processed through a home softening system.

Important: For optimum performance, let the iron stand for 90 seconds before beginning to iron.

TO FILL THE WATER TANK


1.

Grasp the water-fill cover and pull it out to expose the


water-fill hole. Be careful not to pull too hard as the


water-fill cover is attached to the inside of the water-fill


hole (A).

A

2. Tilt the iron and using a clean measuring cup, pour water


into opening until the water reaches the MAX level mark


on the water tank (B). Do not overfill.


3. After filling, be sure to push the water-fill cover securely


back into the water-fill hole.


4. Plug in the iron. The power on indicator light comes

B


on (C).

Tip: If unsure of a garment’s fiber, test a small area (on an


inside seam or hem) before ironing.


FOR STEAM IRONING


1. Turn the selector to the desired steam level. To get


maximum steam, set the selector the middle position (D).

C


Steam is produced as soon as you hold the iron.


Important: Do not set the selector past the middle position.


If you do, it activates the self-cleaning feature.

2. Turn the fabric-select dial to appropriate setting (between 4 and 6) for your fabric (E). See fabric guide on the heel

D rest and read garment’s label to help you determine fabric type.


The temperature-ready light glows until it reaches the


appropriate temperature.


It then glows on and off during ironing. This is normal.

E

3.

When finished ironing, turn the fabric-select dial to


lowest heat setting, move the selector to and unplug


the iron.

FOR DRY IRONING

1.Make sure selector is set to . You may want to empty the water (see “Emptying Water Tank After Ironing - Optional”).

2.Turn the fabric-select dial to the appropriate setting for your fabric. See fabric guide on the heel rest and read garment’s label to help you determine fabric type.

9

10

Page 6
Image 6
Black & Decker AS385 manual Getting Started, To Fill the Water Tank, For Steam Ironing, For DRY Ironing

AS385 specifications

The Black & Decker AS385 is a versatile and powerful tool designed specifically for home DIY enthusiasts and professionals alike. This compact, yet robust, 12V cordless automatic screw-driver is perfect for a wide range of applications, from assembling furniture and installing shelves to hanging pictures and securing loose fixtures.

One of the standout features of the AS385 is its lightweight and ergonomic design. Weighing in at a manageable size, this screwdriver allows for extended use without causing discomfort. The soft-grip handle ensures a firm and comfortable grip, reducing the risk of fatigue during prolonged tasks.

Equipped with a variable speed motor, the Black & Decker AS385 offers enhanced control for users. This feature enables precise adjustments to be made depending on the material and type of screw being used. The forward and reverse switch allows users to easily toggle between driving screws in and out, providing added convenience during operation.

A key highlight of the AS385 is its integrated rechargeable battery, which delivers an impressive runtime. The 12V battery provides enough power for numerous applications, and with the included charger, users can quickly recharge for continued use. This cordless design enhances mobility, allowing users to work in various locations without the hassle of tangled cords or limited reach.

The AS385 also comes with a built-in LED work light. This practical feature illuminates the workspace, making it easier to see what you are working on, especially in dimly lit environments. The tool's compact size allows it to reach tight spaces, making it an essential addition to any toolbox.

Moreover, the Black & Decker AS385 includes a magnetic bit holder, ensuring that bits are securely in place during operation. This feature also makes it easy to change out bits quickly, allowing users to switch between different tasks with minimal downtime. The tool comes with a variety of commonly used bits, making it ready for immediate use right out of the box.

In summary, the Black & Decker AS385 combines power, versatility, and user-friendly design, making it an ideal choice for anyone looking to streamline their DIY projects. With its state-of-the-art technology, comfortable handling, and practical features, this cordless screwdriver proves to be a valuable ally for both novices and seasoned craftsmen. Whether you are tackling small home repairs or larger projects, the AS385 is a reliable tool that helps get the job done efficiently and effectively.