Product may vary slightly from what is illustrated.
![]()
![]()
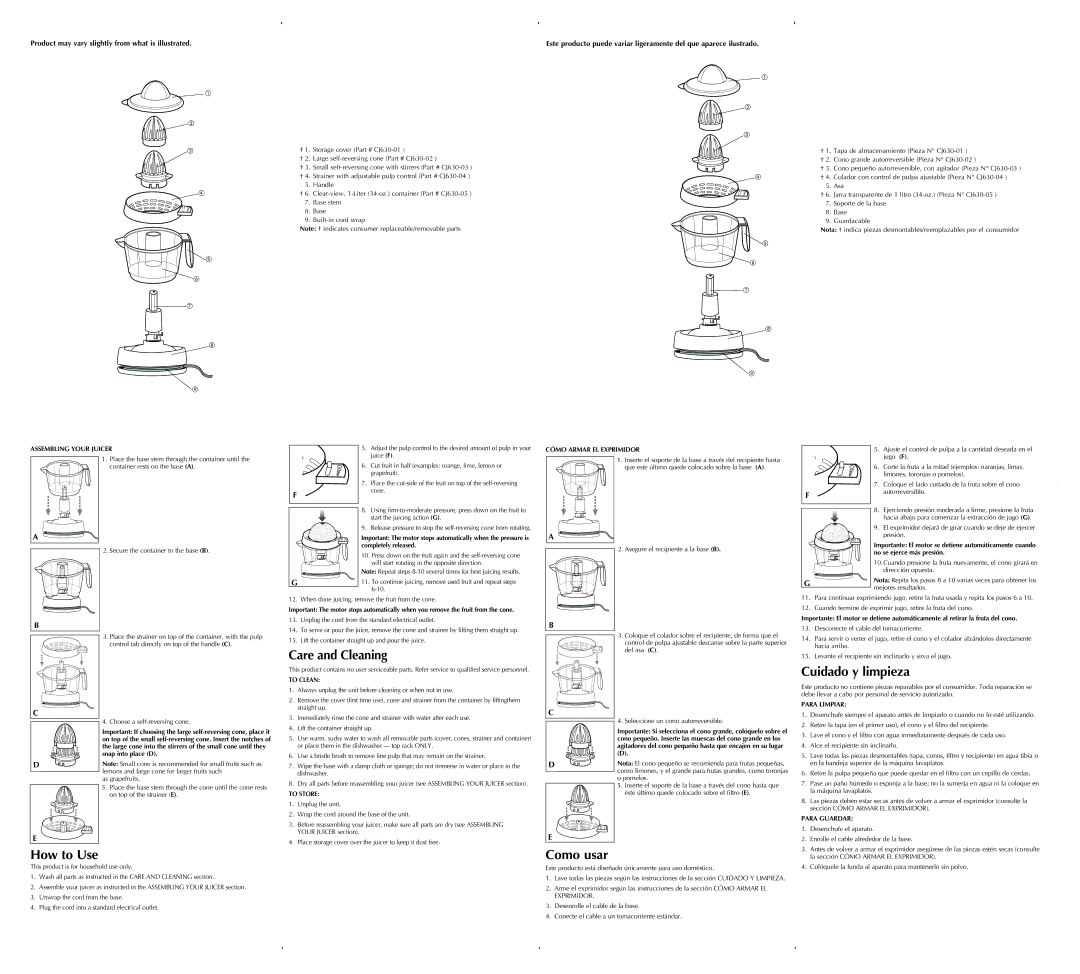
†1. Storage cover (Part #
†2. Large
†3. Small
†4. Strainer with adjustable pulp control (Part #
5.Handle
†6.
7.Base stem
8.Base
9.
Note: † indicates consumer replaceable/removable parts
Este producto puede variar ligeramente del que aparece ilustrado.
† 1. Tapa de almacenamiento (Pieza N°
† 2. Cono grande autorreversible (Pieza N°
† 3. Cono pequeño autorreversible, con agitador (Pieza N°
† 4. Colador con control de pulpa ajustable (Pieza N°
† 6. Jarra transparente de 1 litro
8. Base
9. Guardacable
Nota: † indica piezas desmontables/reemplazables por el consumidor
![]()
![]()
Assembling your Juicer
5. Adjust the pulp control to the desired amount of pulp in your juice (F).
Cómo armar el exprimidor
5. Ajuste el control de pulpa a la cantidad deseada en el
A
B
C
D
E ![]()
1.Place the base stem through the container until the container rests on the base (A).
2. Secure the container to the base (B).
3.Place the strainer on top of the container, with the pulp control tab directly on top of the handle (C).
4. Choose a
Important: If choosing the large
Note: Small cone is recommended for small fruits such as lemons and large cone for larger fruits such
as grapefruits.
5.Place the base stem through the cone until the cone rests on top of the strainer (E).
6. Cut fruit in half (examples: orange, lime, lemon or grapefruit).
| 7. Place the |
F | cone. |
|
![]() 8. Using
8. Using
start the juicing action (G).
9. Release pressure to stop the
Important: The motor stops automatically when the pressure is completely released.
10. Press down on the fruit again and the
Note: Repeat steps
| G |
| 11. To continue juicing, remove used fruit and repeat steps |
|
|
|
12. When done juicing, remove the fruit from the cone.
Important: The motor stops automatically when you remove the fruit from the cone.
13.Unplug the cord from the standard electrical outlet.
14.To serve or pour the juice, remove the cone and strainer by lifting them straight up.
15.Lift the container straight up and pour the juice.
Care and Cleaning
This product contains no user serviceable parts. Refer service to qualified service personnel.
To Clean:
1.Always unplug the unit before cleaning or when not in use.
2.Remove the cover (first time use), cone and strainer from the container by liftingthem straight up.
3.Immediately rinse the cone and strainer with water after each use.
4.Lift the container straight up.
5.Use warm, sudsy water to wash all removable parts (cover, cones, strainer and container) or place them in the dishwasher — top rack ONLY.
6.Use a bristle brush to remove fine pulp that may remain on the strainer.
7.Wipe the base with a damp cloth or sponge; do not immerse in water or place in the dishwasher.
8.Dry all parts before reassembling your juicer (see Assembling your Juicer section).
To Store:
1.Unplug the unit.
2.Wrap the cord around the base of the unit.
3.Before reassembling your juicer, make sure all parts are dry (see Assembling your Juicer section).
4.Place storage cover over the juicer to keep it dust free.
A
B
C
D
E ![]()
1.Inserte el soporte de la base a través del recipiente hasta que este último quede colocado sobre la base (A).
2. Asegure el recipiente a la base (B).
3.Coloque el colador sobre el recipiente, de forma que el control de pulpa ajustable descanse sobre la parte superior del asa (C).
4. Seleccione un cono autorreversible.
Importante: Si selecciona el cono grande, colóquelo sobre el cono pequeño. Inserte las muescas del cono grande en los agitadores del cono pequeño hasta que encajen en su lugar
(D).
Nota: El cono pequeño se recomienda para frutas pequeñas, como limones, y el grande para frutas grandes, como toronjas o pomelos.
5.Inserte el soporte de la base a través del cono hasta que éste último quede colocado sobre el filtro (E).
jugo (F).
6. Corte la fruta a la mitad (ejemplos: naranjas, limas, limones, toronjas o pomelos).
| 7. Coloque el lado cortado de la fruta sobre el cono |
F | autorreversible. |
|
8. Ejerciendo presión moderada a firme, presione la fruta hacia abajo para comenzar la extracción de jugo (G).
9. El exprimidor dejará de girar cuando se deje de ejercer presión.
Importante: El motor se detiene automáticamente cuando no se ejerce más presión.
10.Cuando presione la fruta nuevamente, el cono girará en dirección opuesta.
G | Nota: Repita los pasos 8 a 10 varias veces para obtener los | |
mejores resultados. | ||
|
11.Para continuar exprimiendo jugo, retire la fruta usada y repita los pasos 6 a 10.
12.Cuando termine de exprimir jugo, retire la fruta del cono.
Importante: El motor se detiene automáticamente al retirar la fruta del cono.
13.Desconecte el cable del tomacorriente.
14.Para servir o verter el jugo, retire el cono y el colador alzándolos directamente hacia arriba.
15.Levante el recipiente sin inclinarlo y sirva el jugo.
Cuidado y limpieza
Este producto no contiene piezas reparables por el consumidor. Toda reparación se debe llevar a cabo por personal de servicio autorizado.
Para limpiar:
1.Desenchufe siempre el aparato antes de limpiarlo o cuando no lo esté utilizando.
2.Retire la tapa (en el primer uso), el cono y el filtro del recipiente.
3.Lave el cono y el filtro con agua inmediatamente después de cada uso.
4.Alce el recipiente sin inclinarlo.
5.Lave todas las piezas desmontables (tapa, conos, filtro y recipiente) en agua tibia o en la bandeja superior de la máquina lavaplatos.
6.Retire la pulpa pequeña que puede quedar en el filtro con un cepillo de cerdas.
7.Pase un paño húmedo o esponja a la base; no la sumerja en agua ni la coloque en la máquina lavaplatos.
8.Las piezas deben estar secas antes de volver a armar el exprimidor (consulte la sección Cómo armar el exprimidor).
Para guardar:
1. | Desenchufe el aparato. |
2. | Enrolle el cable alrededor de la base. |
How to Use
This product is for household use only.
1.Wash all parts as instructed in the Care and Cleaning section.
2.Assemble your juicer as instructed in the Assembling your Juicer section.
3.Unwrap the cord from the base.
4.Plug the cord into a standard electrical outlet.
Como usar
Este producto está diseñado únicamente para uso doméstico.
1.Lave todas las piezas según las instrucciones de la sección Cuidado y limpieza.
2.Arme el exprimidor según las instrucciones de la sección Cómo armar el exprimidor.
3.Desenrolle el cable de la base.
4.Conecte el cable a un tomacorriente estándar.
3. | Antes de volver a armar el exprimidor asegúrese de las piezas estén secas (consulte |
| la sección Cómo armar el exprimidor). |
4. | Colóquele la funda al aparato para mantenerlo sin polvo. |