Product may vary slightly from what is illustrated.
How to Use
This product is for household use only.
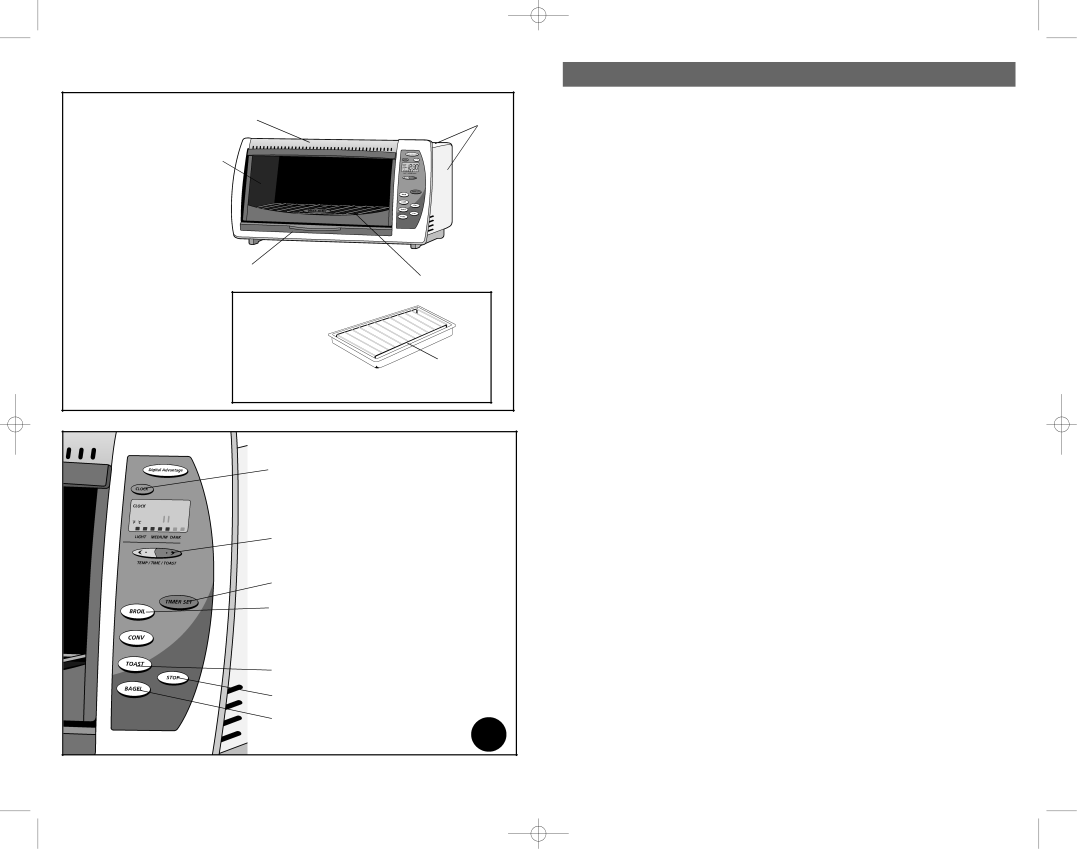
1. ThermaGuard™ Top & Sides 6
2. Digital Control Panel
(see A below for detailed
view)5
† 3. Slide Rack
(Part #
† 4. Removable Crumb Tray
(Part # 174096)
5. Nonstick Interior
6. Vent
1
![]()
![]()
![]()
![]()
![]()
![]() 2
2
Before first use, remove the Slide Rack, Broil Rack and Bake Pan from Oven. Wash in hot, sudsy water, rinse and dry with dishtowel or paper toweling. Replace Slide Rack in Oven.
To Set the Clock:
You must set the clock for the oven to operate.
1.Plug the unit into a standard wall outlet. The digital display will show 12:00 blinking and the word "clock" will appear and blink in the upper left corner of the display.
2.Touch the Clock button, then using the + or - on the Temp/Time/Toast button, set the correct time of day. Touch the Clock button again. The word "clock" will appear steady in the upper left corner. The clock is now set and will keep the correct time.
† Consumer replaceable
4
3
† Bake Pan (Part # ![]()
† Broil Rack (Part #
For Toasting:
The Toast button is pre-set at 4 (medium).
1. | Open Oven door and place bread slices on Slide Rack in Oven; close door. Press the |
| Toast button; the red indicator will light and blink. The digital display will show the |
| number 4 and 4 bars. This is the medium setting. |
2. | Use the + or - from 1 to 7 on the Temp/Time/Toast button for lighter or darker toast. |
3. | Touch the Start button; the red indicator light will change from blinking to steady. |
4. | The leftmost bar in the display will blink, and as toasting progresses, the next bar to the |
| right will blink, and so on until toasting is done. Opening the door during toasting will |
| automatically cancel the toasting cycle. |
5. | When toasting is done, five beeps will sound, the bars in the display will be steady, and |
| the light on the Toast button will go out. The display will return to time of day. |
Detail of Digital Control Panel
Clock
![]() Celsius/Fahrenheit
Celsius/Fahrenheit
![]()
![]()
![]()
![]()
![]()
![]()
![]()
![]()
![]() Digital display
Digital display
Time/Temp/Toast
Bake
![]() Timer
Timer
Broil
![]() Convection
Convection
![]() Start
Start
Toast
Stop
Bagel
A
6. For your convenience, the Oven will remember the last toast setting that was |
programmed. |
For Bagel Setting:
The Bagel button is
1.Open Oven door and place one or more bagel halves on Slide Rack in Oven; close door. Press the Bagel button; the red indicator will light and blink. The digital display will show the numeral 4 and 4 bars. This is the medium setting.
2.Use the + or - from 1 to 7 on the Temp/Time/Toast button for lighter or darker bagels.
3.Touch the Start button; the red indicator light will change from blinking to steady.
4.The leftmost bar in the display will blink, and as the bagel cycle progresses, the next bar to the right will blink, and so on until the cycle is done. Opening the door during toasting will automatically cancel the bagel cycle.
5.When bagel cycle is done, 5 beeps will sound, the bars in the display will be steady, and the light on the Bagel button will go out. The display will return to time of day.
6.For your convenience, the Oven will remember the last bagel setting that was programmed.
For Baking:
The Oven will automatically preheat to the temperature you set for baking. To cancel baking at any time, press the Stop button twice.
1.Press the Bake button; the red indicator will light and blink. The digital display will show 350, and a small F (Fahrenheit) in the lower left corner will blink.
3 | 4 |
