Product may vary slightly from what is illustrated.
How to Use
This appliance is intended for household use only.
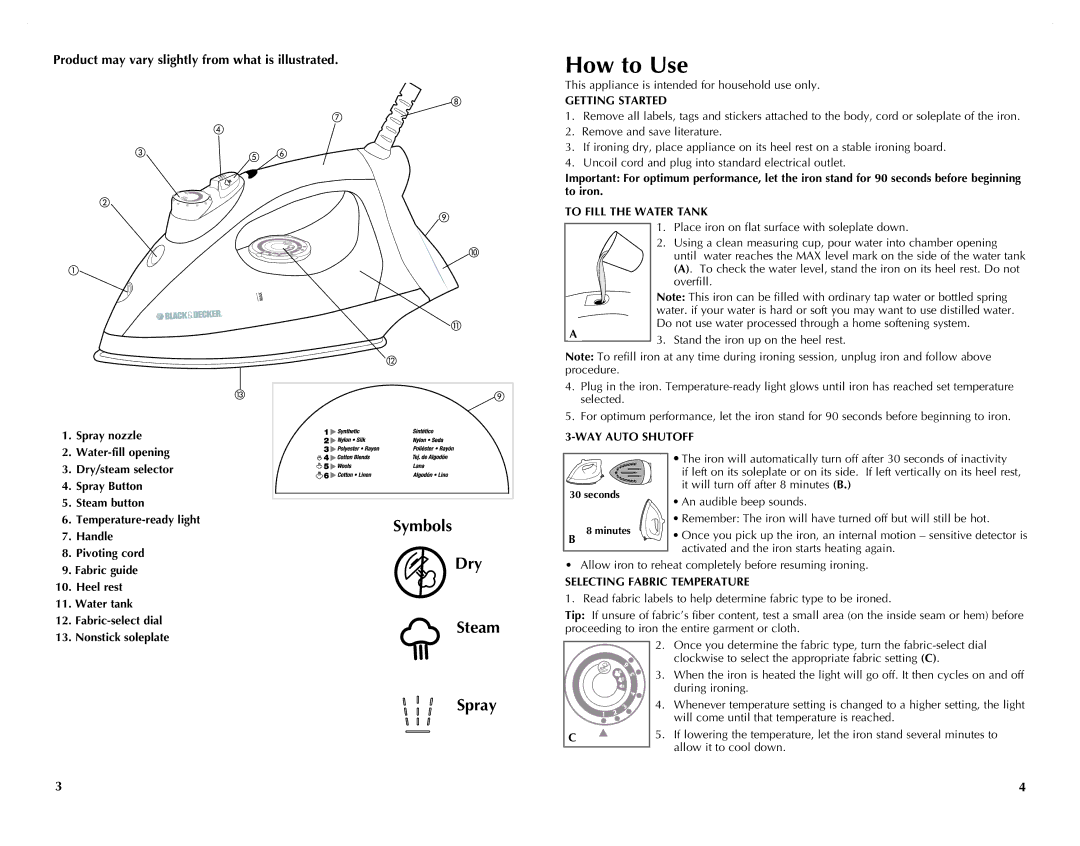
1. Spray nozzle |
GETTING STARTED
1.Remove all labels, tags and stickers attached to the body, cord or soleplate of the iron.
2.Remove and save literature.
3.If ironing dry, place appliance on its heel rest on a stable ironing board.
4.Uncoil cord and plug into standard electrical outlet.
Important: For optimum performance, let the iron stand for 90 seconds before beginning to iron.
TO FILL THE WATER TANK
1.Place iron on flat surface with soleplate down.
2.Using a clean measuring cup, pour water into chamber opening until water reaches the MAX level mark on the side of the water tank
(A). To check the water level, stand the iron on its heel rest. Do not overfill.
|
|
| Note: This iron can be filled with ordinary tap water or bottled spring |
|
|
| water. if your water is hard or soft you may want to use distilled water. |
|
|
| Do not use water processed through a home softening system. |
| A |
| 3. Stand the iron up on the heel rest. |
|
|
|
Note: To refill iron at any time during ironing session, unplug iron and follow above procedure.
4.Plug in the iron.
5.For optimum performance, let the iron stand for 90 seconds before beginning to iron.
3-WAY AUTO SHUTOFF
2. | |
3. | Dry/steam selector |
4. | Spray Button |
5. | Steam button |
6. | |
7. | Handle |
8. | Pivoting cord |
Symbols
30 seconds
B8 minutes
•The iron will automatically turn off after 30 seconds of inactivity
if left on its soleplate or on its side. If left vertically on its heel rest,
it will turn off after 8 minutes (B.)
• An audible beep sounds.
• Remember: The iron will have turned off but will still be hot.
• Once you pick up the iron, an internal motion – sensitive detector is activated and the iron starts heating again.
9. | Fabric guide |
10. | Heel rest |
11. | Water tank |
12. | |
13. | Nonstick soleplate |
Dry
Steam
•Allow iron to reheat completely before resuming ironing.
SELECTING FABRIC TEMPERATURE
1. Read fabric labels to help determine fabric type to be ironed.
Tip: If unsure of fabric’s fiber content, test a small area (on the inside seam or hem) before proceeding to iron the entire garment or cloth.
2. Once you determine the fabric type, turn the
3. When the iron is heated the light will go off. It then cycles on and off during ironing.
Spray
4. Whenever temperature setting is changed to a higher setting, the light will come until that temperature is reached.
|
|
| 5. If lowering the temperature, let the iron stand several minutes to |
| C | ||
|
|
| allow it to cool down. |
|
|
|
3 | 4 |