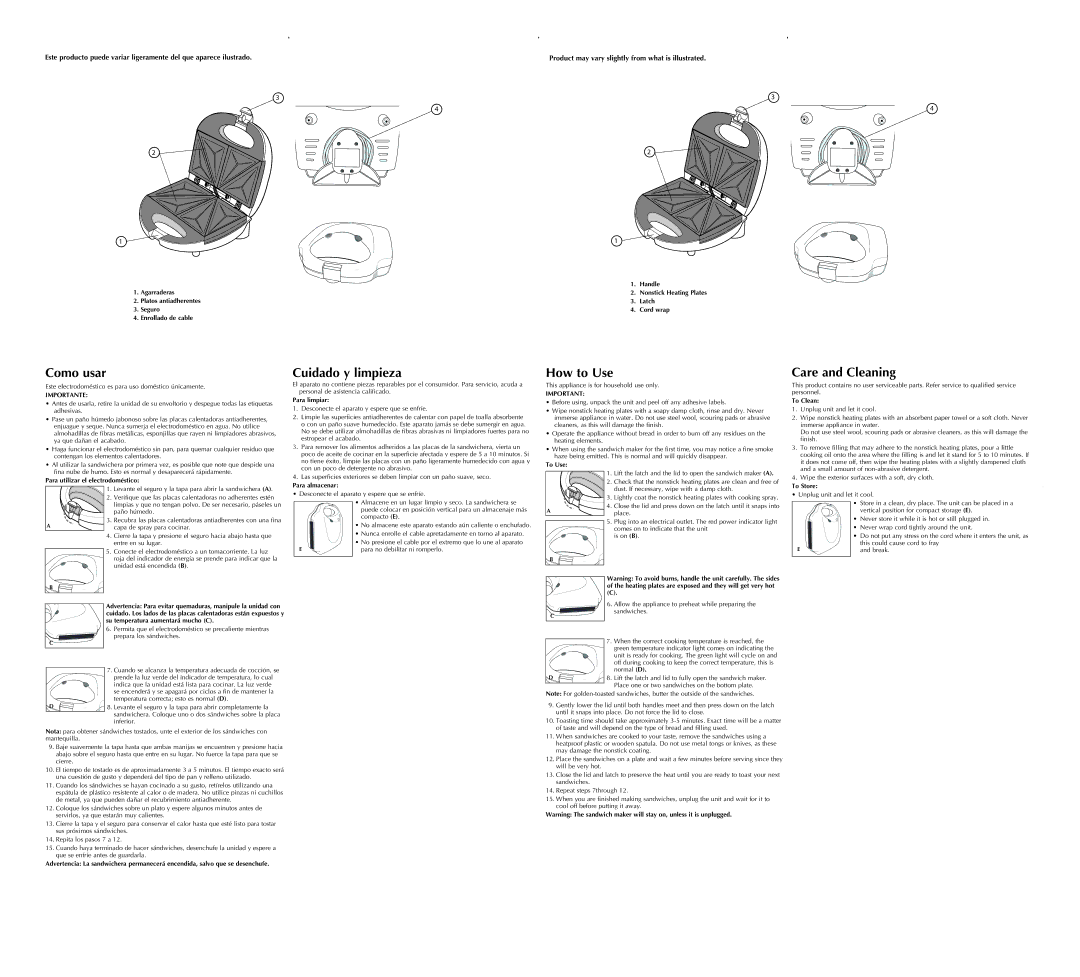
Como usar
Este electrodoméstico es para uso doméstico únicamente.
IMPORTANTE:
•Antes de usarla, retire la unidad de su envoltorio y despegue todas las etiquetas adhesivas.
•Pase un paño húmedo jabonoso sobre las placas calentadoras antiadherentes, enjuague y seque. Nunca sumerja el electrodoméstico en agua. No utilice almohadillas de fibras metálicas, esponjillas que rayen ni limpiadores abrasivos, ya que dañan el acabado.
•Haga funcionar el electrodoméstico sin pan, para quemar cualquier residuo que contengan los elementos calentadores.
•Al utilizar la sandwichera por primera vez, es posible que note que despide una fina nube de humo. Esto es normal y desaparecerá rápidamente.
Para utilizar el electrodoméstico:
1.Levante el seguro y la tapa para abrir la sandwichera (A).
2.Verifique que las placas calentadoras no adherentes estén
limpias y que no tengan polvo. De ser necesario, páseles un paño húmedo.
A | 3. Recubra las placas calentadoras antiadherentes con una fina |
capa de spray para cocinar. |
Cuidado y limpieza
El aparato no contiene piezas reparables por el consumidor. Para servicio, acuda a personal de asistencia calificado.
Para limpiar:
1.Desconecte el aparato y espere que se enfríe.
2.Limpie las superficies antiadherentes de calentar con papel de toalla absorbente o con un paño suave humedecido. Este aparato jamás se debe sumergir en agua. No se debe utilizar almohadillas de fibras abrasivas ni limpiadores fuertes para no estropear el acabado.
3.Para remover los alimentos adheridos a las placas de la sandwichera, vierta un poco de aceite de cocinar en la superficie afectada y espere de 5 a 10 minutos. Si no tiene éxito, limpie las placas con un paño ligeramente humedecido con agua y con un poco de detergente no abrasivo.
4.Las superficies exteriores se deben limpiar con un paño suave, seco.
Para almacenar:
•Desconecte el aparato y espere que se enfríe.
•Almacene en un lugar limpio y seco. La sandwichera se
puede colocar en posición vertical para un almacenaje más compacto (E).
• No almacene este aparato estando aún caliente o enchufado. |
How to Use
This appliance is for household use only.
IMPORTANT:
•Before using, unpack the unit and peel off any adhesive labels.
•Wipe nonstick heating plates with a soapy damp cloth, rinse and dry. Never immerse appliance in water. Do not use steel wool, scouring pads or abrasive cleaners, as this will damage the finish.
•Operate the appliance without bread in order to burn off any residues on the heating elements.
•When using the sandwich maker for the first time, you may notice a fine smoke haze being emitted. This is normal and will quickly disappear.
To Use:
1.Lift the latch and the lid to open the sandwich maker (A).
2.Check that the nonstick heating plates are clean and free of
dust. If necessary, wipe with a damp cloth.
| 3. | Lightly coat the nonstick heating plates with cooking spray. |
A | 4. | Close the lid and press down on the latch until it snaps into |
| place. |
| |
5. Plug into an electrical outlet. The red power indicator light comes on to indicate that the unit
Care and Cleaning
This product contains no user serviceable parts. Refer service to qualified service personnel.
To Clean:
1.Unplug unit and let it cool.
2.Wipe nonstick heating plates with an absorbent paper towel or a soft cloth. Never immerse appliance in water.
Do not use steel wool, scouring pads or abrasive cleaners, as this will damage the finish.
3.To remove filling that may adhere to the nonstick heating plates, pour a little cooking oil onto the area where the filling is and let it stand for 5 to 10 minutes. If it does not come off, then wipe the heating plates with a slightly dampened cloth and a small amount of non-abrasive detergent.
4.Wipe the exterior surfaces with a soft, dry cloth.
To Store:
• Unplug unit and let it cool.
• Store in a clean, dry place. The unit can be placed in a
vertical position for compact storage (E).
• Never store it while it is hot or still plugged in.
• Never wrap cord tightly around the unit. |
4.Cierre la tapa y presione el seguro hacia abajo hasta que entre en su lugar.
5.Conecte el electrodoméstico a un tomacorriente. La luz
roja del indicador de energía se prende para indicar que la unidad está encendida (B).
B
Advertencia: Para evitar quemaduras, manipule la unidad con cuidado. Los lados de las placas calentadoras están expuestos y su temperatura aumentará mucho (C).
• Nunca enrolle el cable apretadamente en torno al aparato. |
• No presione el cable por el extremo que lo une al aparato |
E | para no debilitar ni romperlo. |
is on (B).
Warning: To avoid burns, handle the unit carefully. The sides of the heating plates are exposed and they will get very hot
(C).
6. Allow the appliance to preheat while preparing the sandwiches.
• Do not put any stress on the cord where it enters the unit, as |
E | this could cause cord to fray |
and break. |
6. Permita que el electrodoméstico se precaliente mientras prepara los sándwiches.
C
7. Cuando se alcanza la temperatura adecuada de cocción, se prende la luz verde del indicador de temperatura, lo cual indica que la unidad está lista para cocinar. La luz verde se encenderá y se apagará por ciclos a fin de mantener la temperatura correcta; esto es normal (D).
D | 8. Levante el seguro y la tapa para abrir completamente la |
| sandwichera. Coloque uno o dos sándwiches sobre la placa |
| inferior. |
Nota: para obtener sándwiches tostados, unte el exterior de los sándwiches con mantequilla.
9.Baje suavemente la tapa hasta que ambas manijas se encuentren y presione hacia abajo sobre el seguro hasta que entre en su lugar. No fuerce la tapa para que se cierre.
10. El tiempo de tostado es de aproximadamente 3 a 5 minutos. El tiempo exacto será una cuestión de gusto y dependerá del tipo de pan y relleno utilizado.
11. Cuando los sándwiches se hayan cocinado a su gusto, retírelos utilizando una espátula de plástico resistente al calor o de madera. No utilice pinzas ni cuchillos de metal, ya que pueden dañar el recubrimiento antiadherente.
12. Coloque los sándwiches sobre un plato y espere algunos minutos antes de servirlos, ya que estarán muy calientes.
13. Cierre la tapa y el seguro para conservar el calor hasta que esté listo para tostar sus próximos sándwiches.
14. Repita los pasos 7 a 12.
15. Cuando haya terminado de hacer sándwiches, desenchufe la unidad y espere a que se enfríe antes de guardarla.
Advertencia: La sandwichera permanecerá encendida, salvo que se desenchufe.
7.When the correct cooking temperature is reached, the green temperature indicator light comes on indicating the
unit is ready for cooking. The green light will cycle on and off during cooking to keep the correct temperature, this is normal (D).
D | 8. Lift the latch and lid to fully open the sandwich maker. |
| Place one or two sandwiches on the bottom plate. |
Note: For golden-toasted sandwiches, butter the outside of the sandwiches.
9.Gently lower the lid until both handles meet and then press down on the latch until it snaps into place. Do not force the lid to close.
10. Toasting time should take approximately 3-5 minutes. Exact time will be a matter of taste and will depend on the type of bread and filling used.
11. When sandwiches are cooked to your taste, remove the sandwiches using a heatproof plastic or wooden spatula. Do not use metal tongs or knives, as these may damage the nonstick coating.
12. Place the sandwiches on a plate and wait a few minutes before serving since they will be very hot.
13. Close the lid and latch to preserve the heat until you are ready to toast your next sandwiches.
14. Repeat steps 7through 12.
15. When you are finished making sandwiches, unplug the unit and wait for it to cool off before putting it away.
Warning: The sandwich maker will stay on, unless it is unplugged.