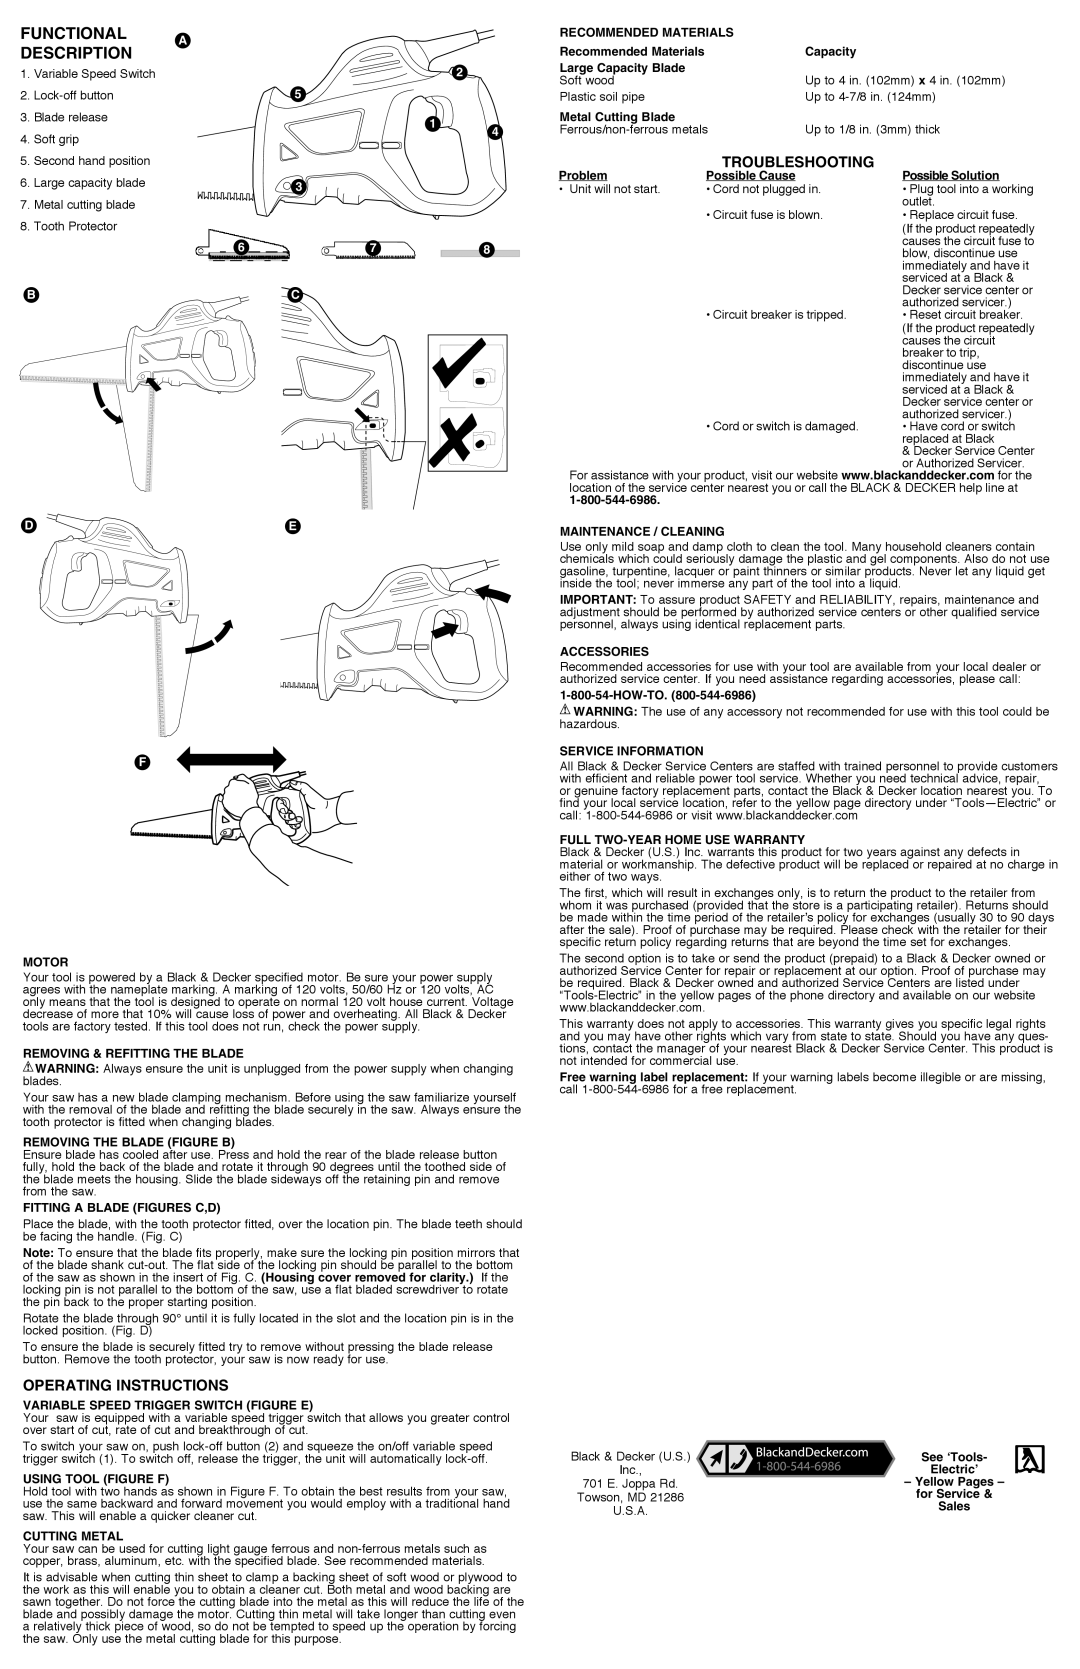
Functional | A | | | |
Description | | | |
| | | |
1. | Variable Speed Switch | | | | 2 |
2. | Lock-off button | | 5 | | |
3. | Blade release | | | 1 | 4 |
4. | Soft grip | | | |
| | | |
5. | Second hand position | | | | |
6. | Large capacity blade | | 3 | | |
7. | Metal cutting blade | | | | |
8. | Tooth Protector | | | | |
| | 6 | 7 | | 8 |
B | | C | | |
D  E
E
F
Motor
Your tool is powered by a Black & Decker specified motor. Be sure your power supply agrees with the nameplate marking. A marking of 120 volts, 50/60 Hz or 120 volts, AC only means that the tool is designed to operate on normal 120 volt house current. Voltage decrease of more that 10% will cause loss of power and overheating. All Black & Decker tools are factory tested. If this tool does not run, check the power supply.
Removing & Refitting the Blade
 WARNING: Always ensure the unit is unplugged from the power supply when changing blades.
Your saw has a new blade clamping mechanism. Before using the saw familiarize yourself with the removal of the blade and refitting the blade securely in the saw. Always ensure the tooth protector is fitted when changing blades.
Removing the Blade (Figure B)
Ensure blade has cooled after use. Press and hold the rear of the blade release button fully, hold the back of the blade and rotate it through 90 degrees until the toothed side of the blade meets the housing. Slide the blade sideways off the retaining pin and remove from the saw.
Fitting a Blade (Figures C,D)
Place the blade, with the tooth protector fitted, over the location pin. The blade teeth should be facing the handle. (Fig. C)
Note: To ensure that the blade fits properly, make sure the locking pin position mirrors that of the blade shank cut-out. The flat side of the locking pin should be parallel to the bottom of the saw as shown in the insert of Fig. C. (Housing cover removed for clarity.) If the locking pin is not parallel to the bottom of the saw, use a flat bladed screwdriver to rotate the pin back to the proper starting position.
Rotate the blade through 90° until it is fully located in the slot and the location pin is in the locked position. (Fig. D)
To ensure the blade is securely fitted try to remove without pressing the blade release button. Remove the tooth protector, your saw is now ready for use.
Operating Instructions
Variable Speed Trigger Switch (Figure E)
Your saw is equipped with a variable speed trigger switch that allows you greater control over start of cut, rate of cut and breakthrough of cut.
To switch your saw on, push lock-off button (2) and squeeze the on/off variable speed trigger switch (1). To switch off, release the trigger, the unit will automatically lock-off.
Using Tool (Figure F)
Hold tool with two hands as shown in Figure F. To obtain the best results from your saw, use the same backward and forward movement you would employ with a traditional hand saw. This will enable a quicker cleaner cut.
Cutting Metal
Your saw can be used for cutting light gauge ferrous and non-ferrous metals such as copper, brass, aluminum, etc. with the specified blade. See recommended materials.
It is advisable when cutting thin sheet to clamp a backing sheet of soft wood or plywood to the work as this will enable you to obtain a cleaner cut. Both metal and wood backing are sawn together. Do not force the cutting blade into the metal as this will reduce the life of the blade and possibly damage the motor. Cutting thin metal will take longer than cutting even a relatively thick piece of wood, so do not be tempted to speed up the operation by forcing the saw. Only use the metal cutting blade for this purpose.
Recommended Materials | |
Recommended Materials | Capacity |
Large Capacity Blade | Up to 4 in. (102mm) x 4 in. (102mm) |
Soft wood |
Plastic soil pipe | Up to 4-7/8 in. (124mm) |
Metal Cutting Blade | Up to 1/8 in. (3mm) thick |
Ferrous/non-ferrous metals |
Troubleshooting
Problem | Possible Cause | Possible Solution |
• Unit will not start. | • Cord not plugged in. | • Plug tool into a working |
| • Circuit fuse is blown. | outlet. |
| • Replace circuit fuse. |
| | (If the product repeatedly |
| | causes the circuit fuse to |
| | blow, discontinue use |
| | immediately and have it |
| | serviced at a Black & |
| | Decker service center or |
| • Circuit breaker is tripped. | authorized servicer.) |
| • Reset circuit breaker. |
| | (If the product repeatedly |
| | causes the circuit |
| | breaker to trip, |
| | discontinue use |
| | immediately and have it |
| | serviced at a Black & |
| | Decker service center or |
| • Cord or switch is damaged. | authorized servicer.) |
| • Have cord or switch |
| | replaced at Black |
| | & Decker Service Center |
| | or Authorized Servicer. |
For assistance with your product, visit our website www.blackanddecker.com for the location of the service center nearest you or call the BLACK & DECKER help line at
1-800-544-6986.
Maintenance / Cleaning
Use only mild soap and damp cloth to clean the tool. Many household cleaners contain chemicals which could seriously damage the plastic and gel components. Also do not use gasoline, turpentine, lacquer or paint thinners or similar products. Never let any liquid get inside the tool; never immerse any part of the tool into a liquid.
IMPORTANT: To assure product SAFETY and RELIABILITY, repairs, maintenance and adjustment should be performed by authorized service centers or other qualified service personnel, always using identical replacement parts.
Accessories
Recommended accessories for use with your tool are available from your local dealer or authorized service center. If you need assistance regarding accessories, please call:
1-800-54-HOW-TO. (800-544-6986)
 WARNING: The use of any accessory not recommended for use with this tool could be hazardous.
Service Information
All Black & Decker Service Centers are staffed with trained personnel to provide customers with efficient and reliable power tool service. Whether you need technical advice, repair, or genuine factory replacement parts, contact the Black & Decker location nearest you. To find your local service location, refer to the yellow page directory under “Tools—Electric” or call: 1-800-544-6986 or visit www.blackanddecker.com
Full Two-Year Home Use Warranty
Black & Decker (U.S.) Inc. warrants this product for two years against any defects in material or workmanship. The defective product will be replaced or repaired at no charge in either of two ways.
The first, which will result in exchanges only, is to return the product to the retailer from whom it was purchased (provided that the store is a participating retailer). Returns should be made within the time period of the retailer’s policy for exchanges (usually 30 to 90 days after the sale). Proof of purchase may be required. Please check with the retailer for their specific return policy regarding returns that are beyond the time set for exchanges.
The second option is to take or send the product (prepaid) to a Black & Decker owned or authorized Service Center for repair or replacement at our option. Proof of purchase may be required. Black & Decker owned and authorized Service Centers are listed under “Tools-Electric” in the yellow pages of the phone directory and available on our website www.blackanddecker.com.
This warranty does not apply to accessories. This warranty gives you specific legal rights and you may have other rights which vary from state to state. Should you have any ques- tions, contact the manager of your nearest Black & Decker Service Center. This product is not intended for commercial use.
Free warning label replacement: If your warning labels become illegible or are missing, call 1-800-544-6986 for a free replacement.
Black & Decker (U.S.) | See ‘Tools- |
Inc., | Electric’ |
701 E. Joppa Rd. | – Yellow Pages – |
Towson, MD 21286 | for Service & |
U.S.A. | Sales |
|