POWER SCRUBBER
INSTRUCTION MANUAL
Catalog No. PKS100
THANK YOU FOR CHOOSING BLACK & DECKER!
GO TO WWW.BLACKANDDECKER.COM/NEWOWNER
TO REGISTER YOUR NEW PRODUCT.
BEFORE RETURNING THIS PRODUCT
FOR ANY REASON PLEASE CALL
1-800-544-6986
BEFORE YOU CALL, HAVE THE CATALOG No. AND DATE CODE AVAILABLE. IN MOST CASES, A
BLACK & DECKER REPRESENTATIVE CAN RESOLVE THE PROBLEM OVER THE PHONE. IF YOU HAVE A
SUGGESTION OR COMMENT, GIVE US ACALL. YOUR FEEDBACK IS VITALTO BLACK & DECKER.
Key Information You Should Know
•When immersing scrubber in water, do not cover the unit in more than 1 foot of water. Do not leave the scrubber immersed for more than
5 minutes.
•Use only with AA alkaline batteries.
SAVE THIS MANUAL FOR FUTURE REFERENCE.
CONSERVEZ CE MODE D'EMPLOI POUR UN USAGE ULTÉRIEUR. VEA LA VERSIÓN EN ESPAÑOL EN LA CONTRAPORTADA.
MANUAL DE OPERACIONES, CENTROS DE SERVICIO Y PÓLIZA DE GARANTÍA. ADVERTENCIA: LEA ESTE MANUAL DE INSTRUCCIONES ANTES DE USAR EL PRODUCTO.
Catalog Number: PKS100 | FORM NO. 478949-00 REV. 2 | PRINTED IN CHINA |
Copyright © 2006 Black & Decker | | (OCT. ‘06) |
 WARNING: Important Safety Warnings and Instructions
When using electrical appliances, basic safety precautions should always be followed, including the following:
PLEASE READ AND UNDERSTAND ALL INSTRUCTIONS CAREFULLY BEFORE USING THE UNIT.
 WARNING: Some cleaning products contain chemicals known to the State of California to cause cancer, birth defects or other reproductive harm. When using the scrubber, be sure to read cleaning product labels for any Proposition 65 warnings.
Follow directions on containers of all such products.
 WARNING: INSTRUCTIONS PERTAINING TO A RISK OF FIRE, ELECTRIC SHOCK, OR INJURY TO PERSONS
•Close supervision is necessary when any appliance is used by or near children. Do not allow to be used as a toy.
•Do not operate in the presence of explosives and/or flammable fumes or liquids.
•This product is not a beauty aid. Do not use on any part of the body.
•Always wear eye protection when using the scrubber with irritating substances.
You may also want to use rubber gloves. Read and follow manufacturer’s instructions on the cleaning agent you use.
•Always store unit indoors.
•Keep hair, loose clothing, and all parts of body away from moving parts.
•Do not insert attachments/accessories when unit is running.
•The power scrubber is only to be immersed in water and only with the battery holder fully inserted.
•Store out of reach of children.
•This appliance is intended for household use only and not for commercial or industrial use.
•Use only as described in this manual. Use only Black & Decker recommended attachments.
•Do not contact moving parts.
SAVE THESE INSTRUCTIONS
BATTERY INSTALLATION
Remove the battery holder by pulling the ring as shown in Figure 1. Insert four fresh alkaline AA batteries making sure to match (+) and (-) terminals correctly and reinstall the battery holder. The battery holder assembly will only fit back into the tool one way. If it does not seem to fit properly, don’t force it. Rotate it one half way around and try it again. Ensure that the battery holder is inserted all the way.
 WARNING: Batteries can explode, or leak, and can cause injury or fire. To reduce this risk:
•Carefully follow all instructions and warnings on the battery label and package.
•Always insert batteries correctly with regard to polarity (+ and -), marked on the battery and the equipment.
•Do not short battery terminals.
•Do not charge batteries.
•Do not mix old and new batteries. Replace all of them at the same time with new batteries of the same brand and type.
•Remove dead batteries immediately and dispose of per local codes.
•Do not dispose of batteries in fire.
•Keep batteries out of reach of children.
•Remove batteries if the device will not be used for several months.
•Transporting batteries can possibly cause fires if the battery terminals inadvertently come in contact with conductive materials such as keys, coins, hand tools and the like. The US Department of Transportation Hazardous Material Regulations (HMR) actually prohibit transporting batteries in commerce or on airplanes (i.e. packed in suitcases and carryon luggage) UNLESS they are properly protected from short circuits. So when transporting individual batteries, make sure that the battery terminals are protected and well insulated from materials that could contact them and cause a short circuit.
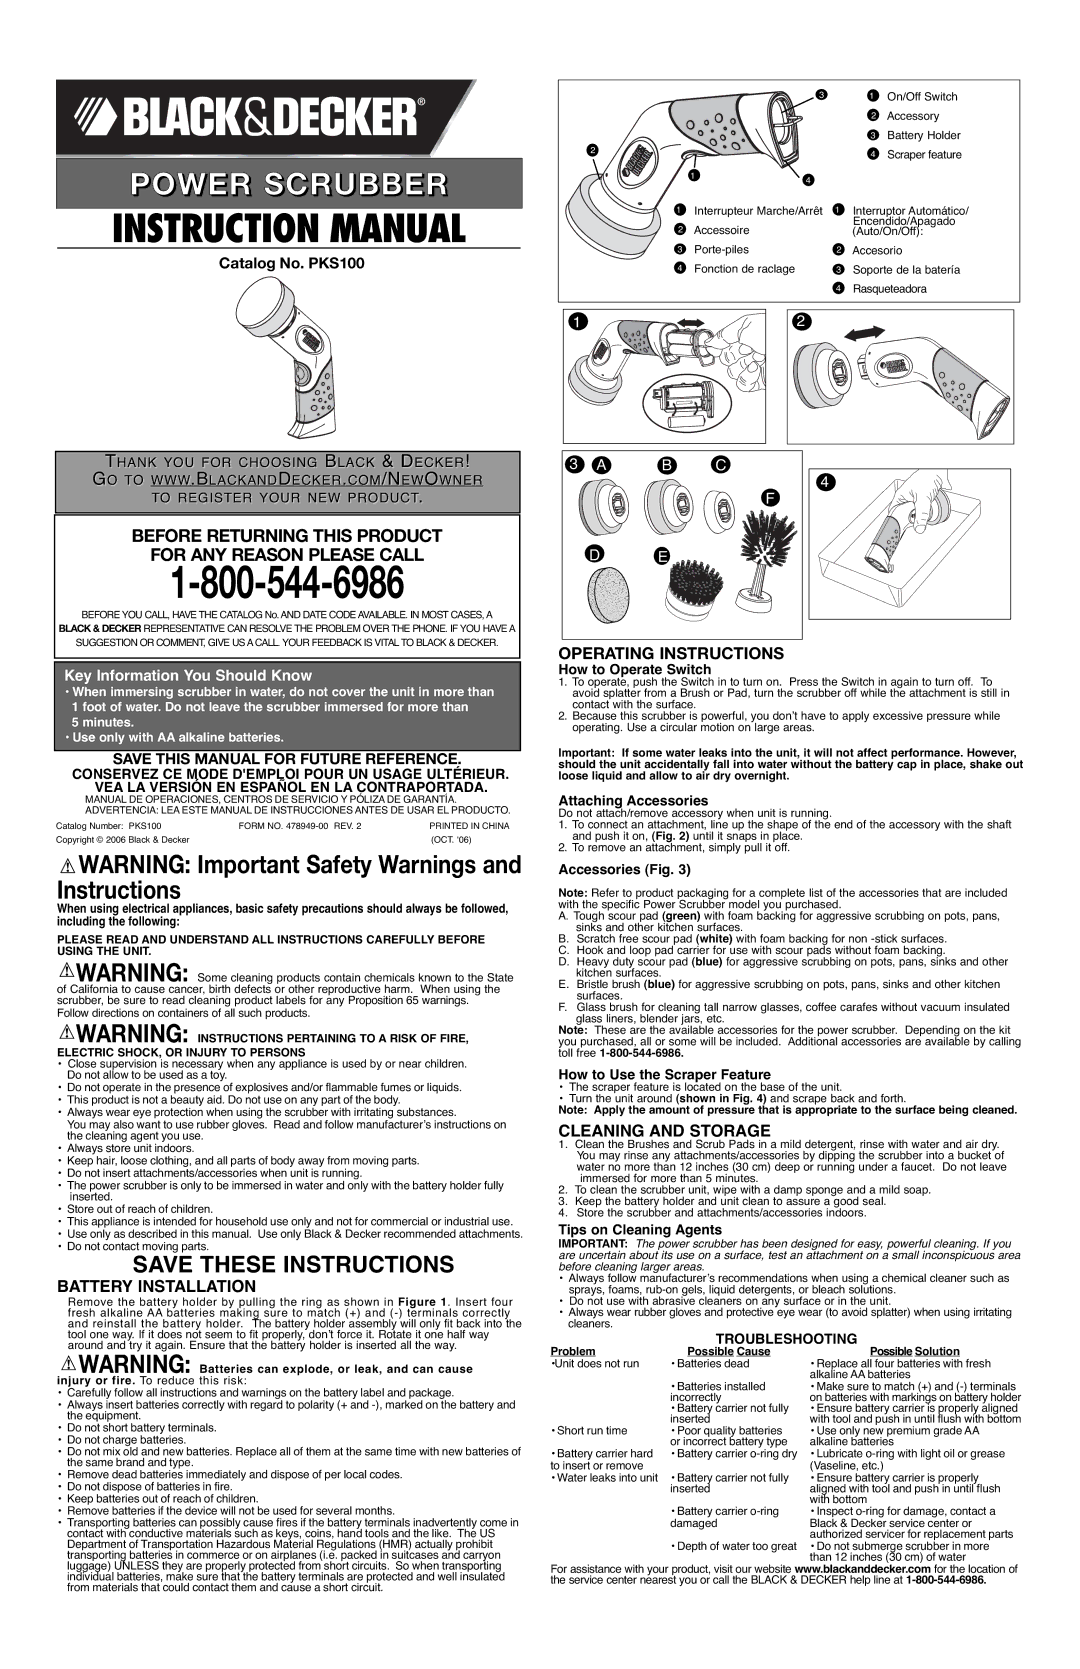
| | 3 | | 1 | On/Off Switch |
| | | | 2 | Accessory |
| | | | 3 | Battery Holder |
2 | | | | 4 | Scraper feature |
| | | |
| 1 | 4 | | | |
| | | | |
1 | Interrupteur Marche/Arrêt | 1 | Interruptor Automático/ |
2 | Accessoire | | | Encendido/Apagado |
| | (Auto/On/Off): |
3 | Porte-piles | | 2 | Accesorio |
4 | Fonction de raclage | | 3 | Soporte de la batería |
| | | 4 | Rasqueteadora |
OPERATING INSTRUCTIONS
How to Operate Switch
1.To operate, push the Switch in to turn on. Press the Switch in again to turn off. To avoid splatter from a Brush or Pad, turn the scrubber off while the attachment is still in contact with the surface.
2.Because this scrubber is powerful, you don’t have to apply excessive pressure while operating. Use a circular motion on large areas.
Important: If some water leaks into the unit, it will not affect performance. However, should the unit accidentally fall into water without the battery cap in place, shake out loose liquid and allow to air dry overnight.
Attaching Accessories
Do not attach/remove accessory when unit is running.
1.To connect an attachment, line up the shape of the end of the accessory with the shaft and push it on, (Fig. 2) until it snaps in place.
2.To remove an attachment, simply pull it off.
Accessories (Fig. 3)
Note: Refer to product packaging for a complete list of the accessories that are included with the specific Power Scrubber model you purchased.
A.Tough scour pad (green) with foam backing for aggressive scrubbing on pots, pans, sinks and other kitchen surfaces.
B.Scratch free scour pad (white) with foam backing for non -stick surfaces.
C.Hook and loop pad carrier for use with scour pads without foam backing.
D.Heavy duty scour pad (blue) for aggressive scrubbing on pots, pans, sinks and other kitchen surfaces.
E.Bristle brush (blue) for aggressive scrubbing on pots, pans, sinks and other kitchen surfaces.
F.Glass brush for cleaning tall narrow glasses, coffee carafes without vacuum insulated glass liners, blender jars, etc.
Note: These are the available accessories for the power scrubber. Depending on the kit you purchased, all or some will be included. Additional accessories are available by calling toll free 1-800-544-6986.
How to Use the Scraper Feature
•The scraper feature is located on the base of the unit.
•Turn the unit around (shown in Fig. 4) and scrape back and forth.
Note: Apply the amount of pressure that is appropriate to the surface being cleaned.
CLEANING AND STORAGE
1.Clean the Brushes and Scrub Pads in a mild detergent, rinse with water and air dry. You may rinse any attachments/accessories by dipping the scrubber into a bucket of water no more than 12 inches (30 cm) deep or running under a faucet. Do not leave immersed for more than 5 minutes.
2.To clean the scrubber unit, wipe with a damp sponge and a mild soap.
3.Keep the battery holder and unit clean to assure a good seal.
4.Store the scrubber and attachments/accessories indoors.
Tips on Cleaning Agents
IMPORTANT: The power scrubber has been designed for easy, powerful cleaning. If you are uncertain about its use on a surface, test an attachment on a small inconspicuous area before cleaning larger areas.
•Always follow manufacturer’s recommendations when using a chemical cleaner such as sprays, foams, rub-on gels, liquid detergents, or bleach solutions.
•Do not use with abrasive cleaners on any surface or in the unit.
•Always wear rubber gloves and protective eye wear (to avoid splatter) when using irritating cleaners.
TROUBLESHOOTING
Problem | Possible Cause | Possible Solution |
•Unit does not run | • Batteries dead | • Replace all four batteries with fresh |
| | alkaline AA batteries |
| • Batteries installed | • Make sure to match (+) and (-) terminals |
| incorrectly | on batteries with markings on battery holder |
| • Battery carrier not fully | • Ensure battery carrier is properly aligned |
| inserted | with tool and push in until flush with bottom |
• Short run time | • Poor quality batteries | • Use only new premium grade AA |
| or incorrect battery type | alkaline batteries |
• Battery carrier hard | • Battery carrier o-ring dry | • Lubricate o-ring with light oil or grease |
to insert or remove | | (Vaseline, etc.) |
• Water leaks into unit | • Battery carrier not fully | • Ensure battery carrier is properly |
| inserted | aligned with tool and push in until flush |
| | with bottom |
| • Battery carrier o-ring | • Inspect o-ring for damage, contact a |
| damaged | Black & Decker service center or |
| | authorized servicer for replacement parts |
| • Depth of water too great | • Do not submerge scrubber in more |
| | than 12 inches (30 cm) of water |
For assistance with your product, visit our website www.blackanddecker.com for the location of the service center nearest you or call the BLACK & DECKER help line at 1-800-544-6986.