Installing The Wall Hook
Note: It is highly recommend to hang the Sweep and Collect on the provided hook or similar device to prevent damage to the broom head.
Firmly attach the provided wall hook to the wall so it will not pull out. It should be mounted at a minimum height of 54”(137 cm) to its’ bottom to ensure the broom head does not touch the floor. (Fig. 8a) Use the hardware provided only if hanging on conventional hollow wall construction such as sheetrock over studs. If not, use the appropriate fasteners for the particular wall material.
Operation
 WARNING: Do not use the Sweep and Collect without the dirt cup in place.
Note: The Sweep and Collect is to be used for pick up of dry debris on hard floors only. Avoid picking up pieces of string and similar material to prevent binding of the beater bar.
How to Operate
•To change from sweep (Fig. 2) to collect mode (Fig. 3), push the button in the end of the handle (Fig. 4a) and rotate the handle towards the broom bristles as shown in Fig. 4b. At this point, the beater bar should start turning.
Note: During collection mode, the beater bar can be momentarily stopped by pushing the button in the end of the handle.
•Roll the unit back and forth over the pile of debris to collect it into the dirt cup. For best pick up performance, the broom head bristles should be facing away from the dirt pile as shown above (Fig. 4c).
•To change back to sweep mode, rotate handle back into slot in housing (Fig. 5a) until it latches (Fig.5b) and you hear a “click” sound (Fig. 5c).To make it easier to return the handle to the sweep position, the button in the end of the handle can be pressed. Atthis point,the beater bar should stop turning.
“CLICK”
Emptying The Dirt Cup
Note: The unit needs to be in sweep mode (Fig. 2) before the dirt cup can be removed. It is important not to use excessive force to remove the dirt cup. If the dirt cup seems stuck in the housing, follow the “Unclogging the Unit” procedure.
1.Remove the dirt cup from unit by pulling straight up as shown. Do not push on emptying button when pulling out. (Fig. 6a)
2.Hold the dirt cup over a garbage container and empty by completely depressing emptying button and shaking moderately. (Fig. 6b)
3.Release the button and push the dirt cup back into the motorized dust pan until flush with top surface.
Unclogging the Unit
Note: Dirt cup door mechanism must be free of debris to fully close and allow removal of the dirt cup.
1.Remove batteries from the unit.
2.Rotate handle to change to collect mode. (Fig. 3)
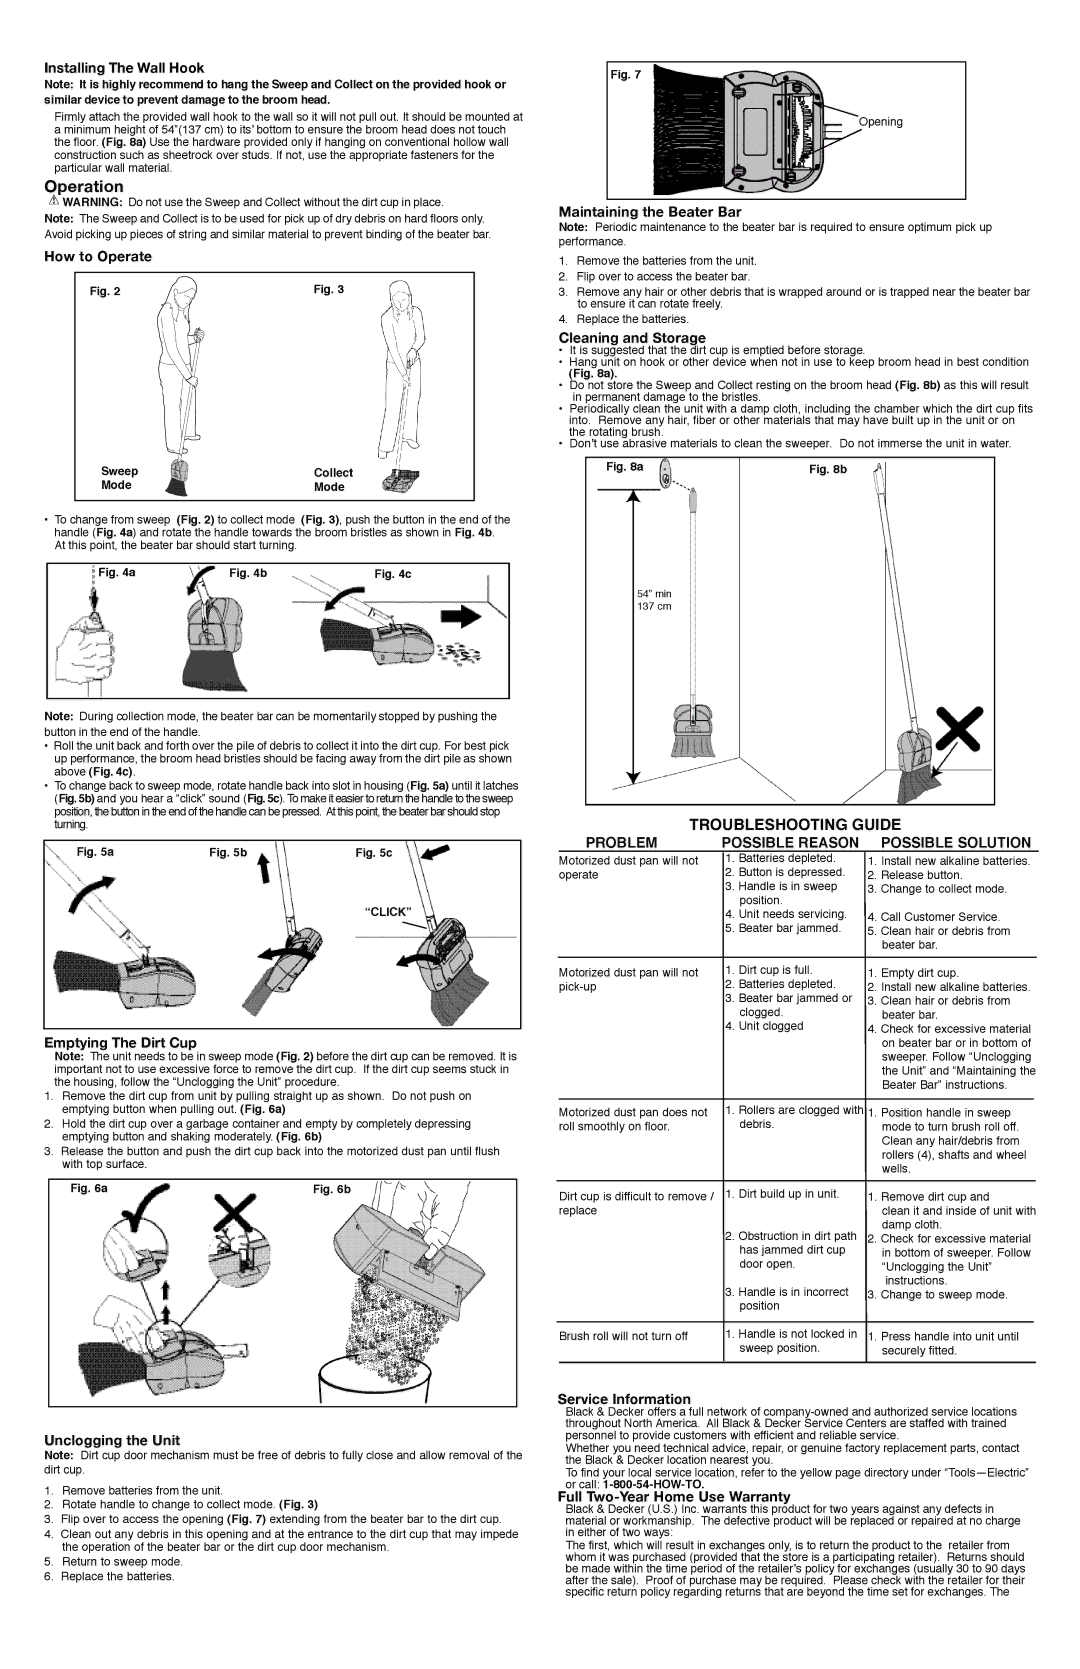
3.Flip over to access the opening (Fig. 7) extending from the beater bar to the dirt cup.
4.Clean out any debris in this opening and at the entrance to the dirt cup that may impede the operation of the beater bar or the dirt cup door mechanism.
5.Return to sweep mode.
6.Replace the batteries.
Fig. 7
Opening
Maintaining the Beater Bar
Note: Periodic maintenance to the beater bar is required to ensure optimum pick up performance .
1.Remove the batteries from the unit.
2.Flip over to access the beater bar.
3.Remove any hair or other debris that is wrapped around or is trapped near the beater bar to ensure it can rotate freely.
4.Replace the batteries.
Cleaning and Storage
•It is suggested that the dirt cup is emptied before storage.
•Hang unit on hook or other device when not in use to keep broom head in best condition
(Fig. 8a).
•Do not store the Sweep and Collect resting on the broom head (Fig. 8b) as this will result in permanent damage to the bristles.
•Periodically clean the unit with a damp cloth, including the chamber which the dirt cup fits into. Remove any hair, fiber or other materials that may have built up in the unit or on the rotating brush.
•Don’t use abrasive materials to clean the sweeper. Do not immerse the unit in water.
54” min 137 cm
TROUBLESHOOTING GUIDE
| PROBLEM | POSSIBLE REASON | | | POSSIBLE SOLUTION |
| Motorized dust pan will not | | 1. | Batteries depleted. | | | | | | |
| | 1. | Install new alkaline batteries. |
| operate | | 2. | Button is depressed. | | 2. | Release button. |
| | | 3. | Handle is in sweep | | 3. | Change to collect mode. |
| | | | position. | | | | | | |
| | | 4. | Unit needs servicing. | | 4. | Call Customer Service. |
| | | 5. | Beater bar jammed. | | 5. | Clean hair or debris from |
| | | | | | | beater bar. | |
| Motorized dust pan will not | | 1. | Dirt cup is full. | | 1. | Empty dirt cup. |
| pick-up | | 2. | Batteries depleted. | | 2. | Install new alkaline batteries. |
| | | 3. | Beater bar jammed or | | 3. | Clean hair or debris from |
| | | 4. | clogged. | | 4. | beater bar. |
| | | Unit clogged | | Check for excessive material |
| | | | | | | on beater bar or in bottom of |
| | | | | | | sweeper. Follow “Unclogging |
| | | | | | | the Unit” and “Maintaining the |
| | | | | | | Beater Bar” instructions. |
| | | | | | | | |
| Motorized dust pan does not | | 1. | Rollers are clogged with | | 1. | Position handle in sweep |
| roll smoothly on floor. | | | debris. | | | mode to turn brush roll off. |
| | | | | | | Clean any hair/debris from |
| | | | | | | rollers (4), shafts and wheel |
| | | | | | | wells. | |
| Dirt cup is difficult to remove / | | 1. | Dirt build up in unit. | | 1. | Remove dirt cup and |
| replace | | | | | | clean it and inside of unit with |
| | | 2. | Obstruction in dirt path | | 2. | damp cloth. |
| | | | Check for excessive material |
| | | | has jammed dirt cup | | | in bottom of sweeper. Follow |
| | | | door open. | | | “Unclogging the Unit” |
| | | 3. | Handle is in incorrect | | 3. | instructions. |
| | | | Change to sweep mode. |
| | | | position | | | | | | |
| | | | | | | | |
| Brush roll will not turn off | | 1. | Handle is not locked in | | 1. | Press handle into unit until |
| | | | sweep position. | | | securely fitted. |
| | | | | | | | | | |
| | | | | | | | | | |
Service Information
Black & Decker offers a full network of company-owned and authorized service locations throughout North America. All Black & Decker Service Centers are staffed with trained personnel to provide customers with efficient and reliable service.
Whether you need technical advice, repair, or genuine factory replacement parts, contact the Black & Decker location nearest you.
To find your local service location, refer to the yellow page directory under “Tools—Electric” or call: 1-800-54-HOW-TO.
Full Two-Year Home Use Warranty
Black & Decker (U.S.) Inc. warrants this product for two years against any defects in material or workmanship. The defective product will be replaced or repaired at no charge in either of two ways:
The first, which will result in exchanges only, is to return the product to the retailer from whom it was purchased (provided that the store is a participating retailer). Returns should be made within the time period of the retailer’s policy for exchanges (usually 30 to 90 days after the sale). Proof of purchase may be required. Please check with the retailer for their specific return policy regarding returns that are beyond the time set for exchanges. The