duallie sun shield instructions
(800)
Congratulations on your purchase of the BOB Sun Shield. It is designed to protect your child’s delicate eyes and skin from heat, glare, and ultraviolet (UVA/UVB) rays.
It also provides protection from wind and flying insects. Proper installation and care will provide years of reliable service.
Before attempting to use or attach your new Sun Shield, read and understand these instructions completely to insure proper assembly and operation. If you are unclear on any point, contact your dealer or BOB before use.
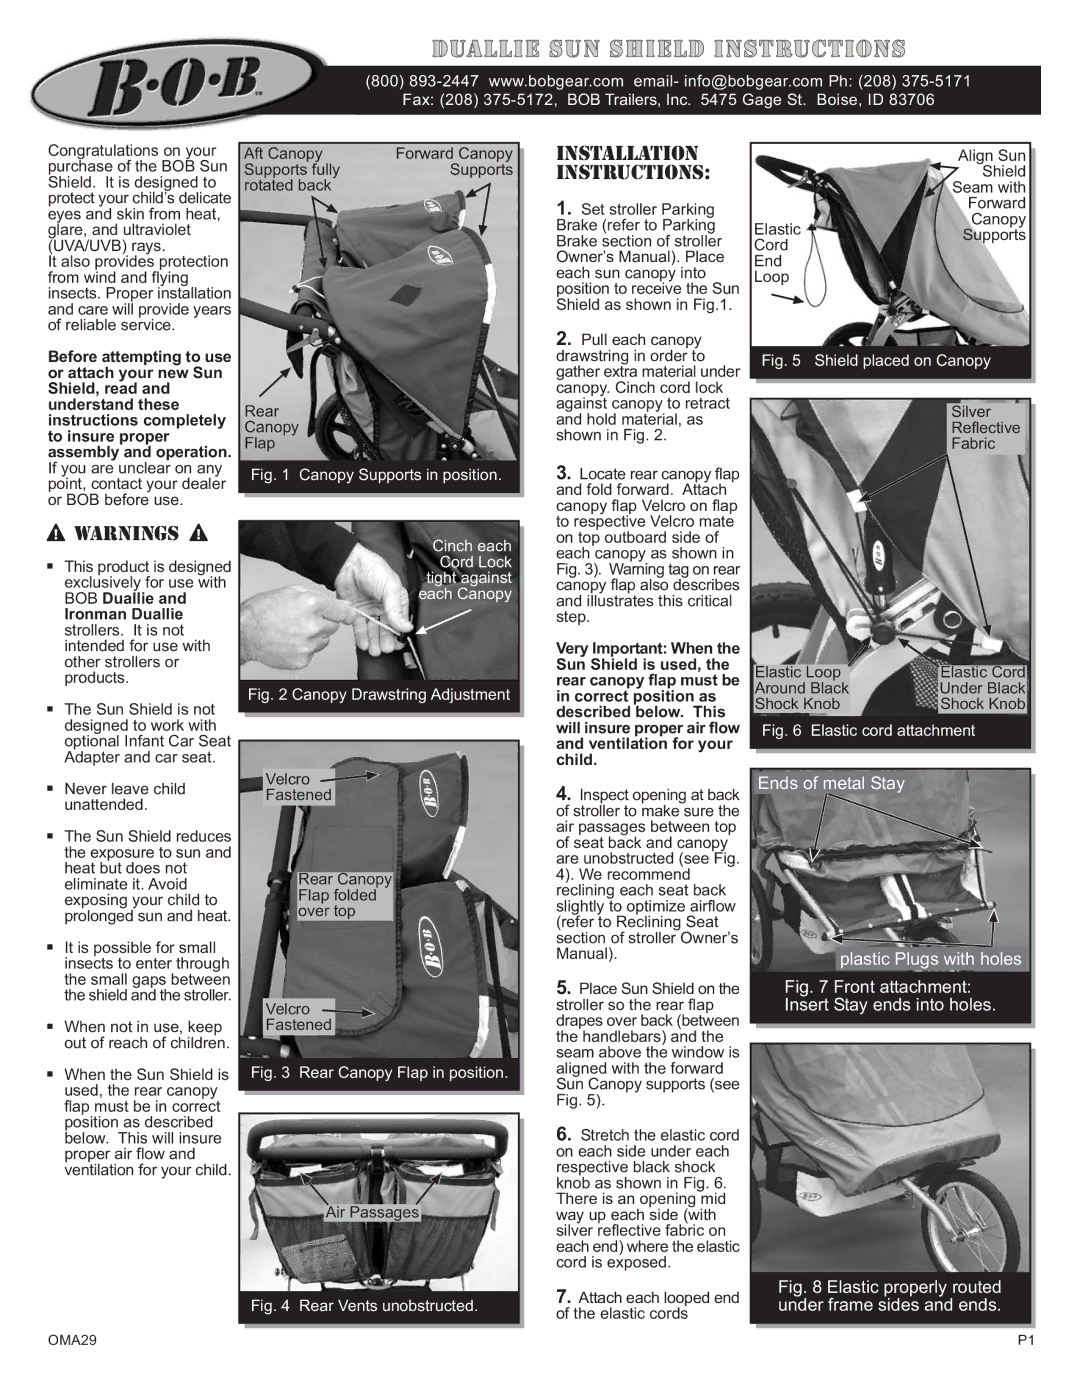
Aft Canopy | Forward Canopy |
Supports fully | Supports |
rotated back |
|
Rear
Canopy
Flap
Fig. 1 Canopy Supports in position.
INSTALLATION INSTRUCTIONS:
1. Set stroller Parking |
Brake (refer to Parking |
Brake section of stroller |
Owner’s Manual). Place |
each sun canopy into |
position to receive the Sun |
Shield as shown in Fig.1. |
2. Pull each canopy |
drawstring in order to |
gather extra material under |
canopy. Cinch cord lock |
against canopy to retract |
and hold material, as |
shown in Fig. 2. |
3. Locate rear canopy flap |
and fold forward. Attach |
canopy flap Velcro on flap |
to respective Velcro mate |
| Align Sun | |
| Shield | |
| Seam with | |
| Forward | |
Elastic | Canopy | |
Supports | ||
Cord | ||
| ||
End |
| |
Loop |
|
Fig. 5 Shield placed on Canopy
Silver
Reflective
Fabric
![]() Warnings
Warnings ![]()
.This product is designed exclusively for use with BOB Duallie and
Ironman Duallie strollers. It is not intended for use with other strollers or products.
.The Sun Shield is not designed to work with optional Infant Car Seat Adapter and car seat.
.Never leave child unattended.
.The Sun Shield reduces the exposure to sun and heat but does not eliminate it. Avoid exposing your child to prolonged sun and heat.
.It is possible for small insects to enter through the small gaps between the shield and the stroller.
.When not in use, keep out of reach of children.
.When the Sun Shield is used, the rear canopy flap must be in correct position as described below. This will insure proper air flow and ventilation for your child.
Cinch each Cord Lock tight against each Canopy
Fig. 2 Canopy Drawstring Adjustment
Velcro
Fastened
Rear Canopy Flap folded over top
Velcro
Fastened
Fig. 3 Rear Canopy Flap in position.
Air Passages
Fig. 4 Rear Vents unobstructed.
on top outboard side of |
each canopy as shown in |
Fig. 3). Warning tag on rear |
canopy flap also describes |
and illustrates this critical |
step. |
Very Important: When the Sun Shield is used, the rear canopy flap must be in correct position as described below. This will insure proper air flow and ventilation for your child.
4.Inspect opening at back of stroller to make sure the air passages between top of seat back and canopy are unobstructed (see Fig. 4). We recommend reclining each seat back slightly to optimize airflow (refer to Reclining Seat section of stroller Owner’s Manual).
5.Place Sun Shield on the stroller so the rear flap drapes over back (between the handlebars) and the seam above the window is aligned with the forward Sun Canopy supports (see Fig. 5).
6.Stretch the elastic cord on each side under each respective black shock knob as shown in Fig. 6. There is an opening mid way up each side (with silver reflective fabric on each end) where the elastic cord is exposed.
7.Attach each looped end of the elastic cords
|
|
| |
Elastic Loop | |||
| Elastic Cord | ||
Around Black |
| Under Black | |
Shock Knob |
| Shock Knob |
Fig. 6 Elastic cord attachment
Ends of metal Stay
plastic Plugs with holes
Fig. 7 Front attachment: Insert Stay ends into holes.
Fig. 8 Elastic properly routed under frame sides and ends.
OMA29 | P1 |