Figure G - Image in mirror

NOTE: Be sure all wiring is unpowered before routing.

Route wiring (for wire size see Section 4.0) through the mounting plate wire entrance (see Figure B), leaving enough to properly wire the transmitter.

Route the wiring through the transmitter’s wire entrance.

Slide the transmitter onto the mounting plate. Tighten with the mounting plate-to-unit screws.

Repeat this complete mounting procedure for the receiver. Be sure to mount the receiver in direct-line-of sight with the transmitter.

4.0 Wiring

Only apply power after all connections have been made and inspected.

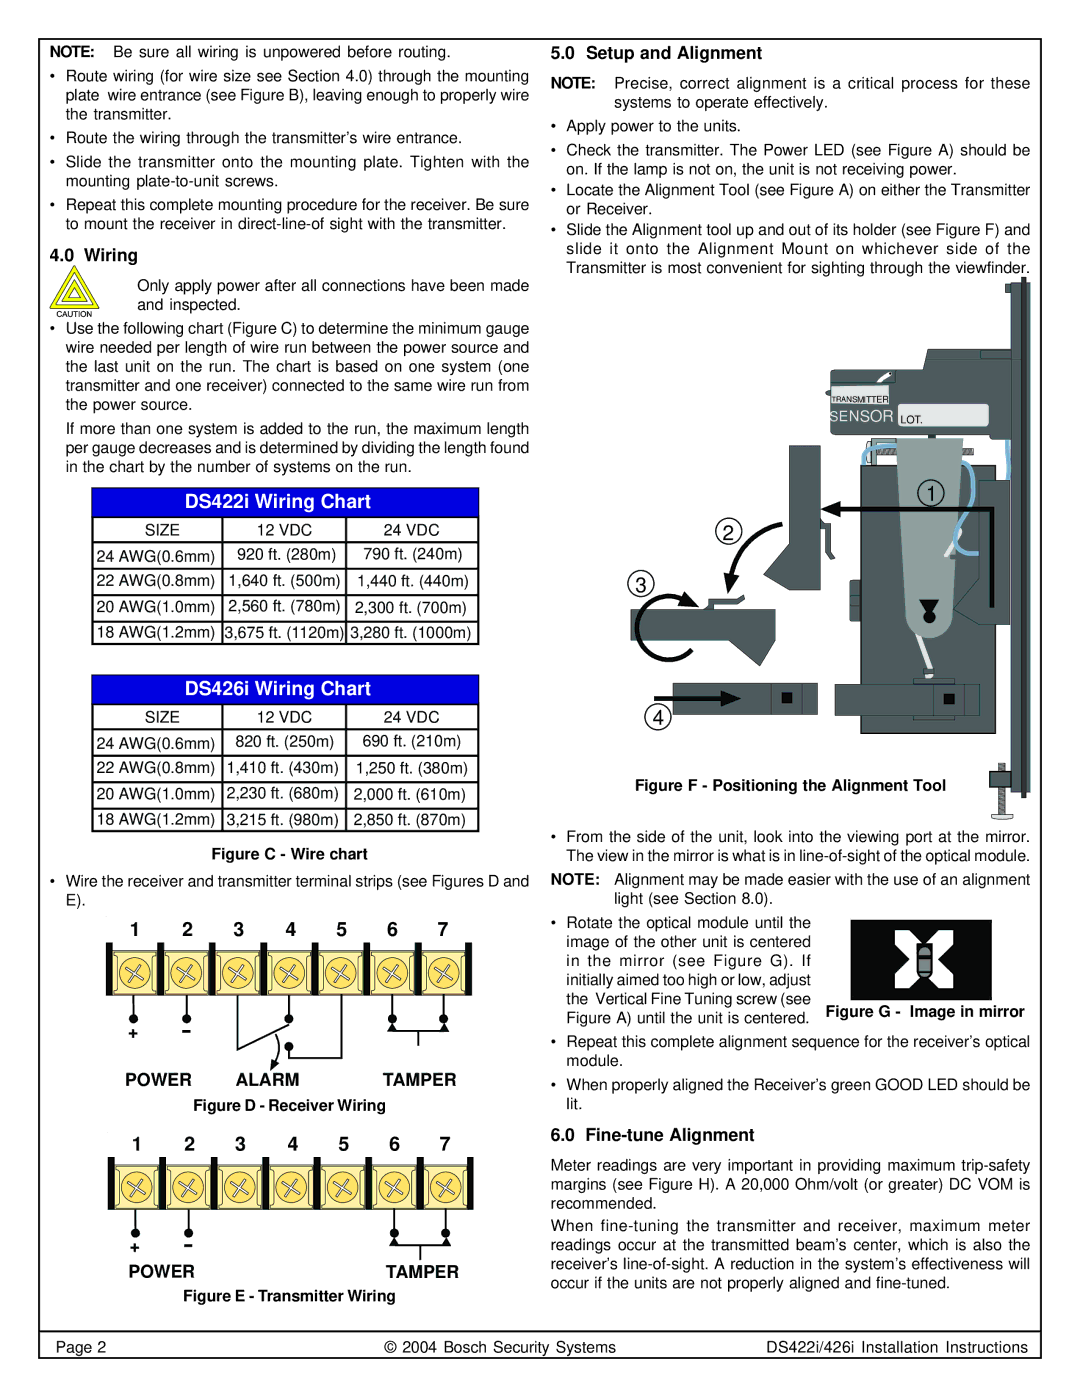
Use the following chart (Figure C) to determine the minimum gauge wire needed per length of wire run between the power source and the last unit on the run. The chart is based on one system (one transmitter and one receiver) connected to the same wire run from the power source.

If more than one system is added to the run, the maximum length per gauge decreases and is determined by dividing the length found in the chart by the number of systems on the run.

DS422i Wiring Chart

SIZE

12 VDC

24 VDC

24 AWG(0.6mm)

920 ft. (280m)

790 ft. (240m)


22 AWG(0.8mm)

1,640 ft. (500m)

1,440 ft. (440m)


20 AWG(1.0mm)

2,560 ft. (780m)

2,300 ft. (700m)


18 AWG(1.2mm)

3,675 ft. (1120m)

3,280 ft. (1000m)

DS426i Wiring Chart

SIZE

12 VDC

24 VDC


24 AWG(0.6mm)

820 ft. (250m)

690 ft. (210m)


22 AWG(0.8mm)

1,410 ft. (430m)

1,250 ft. (380m)


20 AWG(1.0mm)

2,230 ft. (680m)

2,000 ft. (610m)


18 AWG(1.2mm)

3,215 ft. (980m)

2,850 ft. (870m)

Figure C - Wire chart

Wire the receiver and transmitter terminal strips (see Figures D and E).

1

2

3

4

5

6

7


+

POWER

ALARM

TAMPER

Figure D - Receiver Wiring

5.0 Setup and Alignment

NOTE: Precise, correct alignment is a critical process for these systems to operate effectively.

Apply power to the units.

Check the transmitter. The Power LED (see Figure A) should be on. If the lamp is not on, the unit is not receiving power.

Locate the Alignment Tool (see Figure A) on either the Transmitter or Receiver.

Slide the Alignment tool up and out of its holder (see Figure F) and slide it onto the Alignment Mount on whichever side of the Transmitter is most convenient for sighting through the viewfinder.

TRANSMITTER

SENSOR LOT.

1

2

3

4

Figure F - Positioning the Alignment Tool

From the side of the unit, look into the viewing port at the mirror. The view in the mirror is what is in line-of-sight of the optical module.

NOTE: Alignment may be made easier with the use of an alignment light (see Section 8.0).

• Rotate the optical module until the image of the other unit is centered in the mirror (see Figure G). If initially aimed too high or low, adjust the Vertical Fine Tuning screw (see Figure A) until the unit is centered.

Repeat this complete alignment sequence for the receiver’s optical module.

When properly aligned the Receiver’s green GOOD LED should be lit.

1

2

3

4

5

6

7


+

POWERTAMPER

Figure E - Transmitter Wiring

6.0 Fine-tune Alignment

Meter readings are very important in providing maximum trip-safety margins (see Figure H). A 20,000 Ohm/volt (or greater) DC VOM is recommended.

When fine-tuning the transmitter and receiver, maximum meter readings occur at the transmitted beam’s center, which is also the receiver’s line-of-sight. A reduction in the system’s effectiveness will occur if the units are not properly aligned and fine-tuned.

Page 2

© 2004 Bosch Security Systems

DS422i/426i Installation Instructions

Page 2
Image 2
Bosch Appliances DS426I, DS422I installation instructions Wiring, Setup and Alignment, Fine-tune Alignment

DS426I, DS422I specifications

Bosch Appliances has long been synonymous with quality and innovation in the realm of home appliances. Among its impressive lineup, the Bosch DS426I and DS422I dishwashers stand out for their blend of functionality, efficiency, and advanced technology, making them ideal choices for modern kitchens.

The Bosch DS426I offers a spacious interior and can accommodate up to 14 place settings, making it perfect for larger families or those who frequently entertain. Its sleek design not only enhances the kitchen aesthetics but also features a fully integrated control panel that allows for seamless operation. The dishwasher operates quietly, with a noise level of just 44 dBA, ensuring that you can run it at any time without disturbing the household.

One of the key features of the DS426I is its efficient cleaning performance. The PrecisionWash system utilizes intelligent sensors that constantly scan and check the progress of dishes throughout the cycle, adjusting the wash’s intensity as needed for optimal cleaning results. This technology ensures that even heavily soiled items come out spotless.

The Bosch DS422I, while slightly smaller, maintains a high level of performance and efficiency. It also accommodates 12 place settings, suitable for medium households. It features Bosch’s renowned EcoSilence Drive motor, which is not only energy-efficient but also delivers powerful cleaning without excess noise, operating at an impressive 44 dBA.

Both models come equipped with the ActiveWater technology, designed to optimize water usage while maintaining excellent cleaning efficacy. This means that users can enjoy sparkling dishes while being environmentally conscious. Additionally, both models feature multiple wash cycles and options, including a quick 30-minute wash for when you need clean dishes in a hurry.

Another significant characteristic is the easy loading and unloading provided by the RackMatic system, which allows the top rack to be adjusted to three different heights, improving flexibility when accommodating larger items. The stainless steel tub is not only durable but also enhances energy efficiency by providing better insulation.

In terms of safety, both the DS426I and DS422I feature Bosch’s AquaStop leak protection system, giving homeowners peace of mind against water damage.

In conclusion, the Bosch DS426I and DS422I dishwashers exemplify the brand’s commitment to quality and innovation. With their advanced cleaning technologies, quiet operation, efficient water usage, and flexibility, they are exceptional additions to any kitchen, promising to make dishwashing a hassle-free experience.