| D | B Bedienung | |
| B.1 Erste Inbetriebnahme | ||
|
| 1. Schalten Sie das Radio mit kleiner Lautstärke ein. | |
|
| 2. Nach der Funktionskontrolle der einzelnen Lautsprecher stellen Sie | |
eine etwas höhere Lautstärke am Radio ein. Justieren Sie jetzt gegebenenfalls | |||
mittels der | |||
Das Lautstärkeverhältnis von Front- und | |||
Subwoofers, lässt sich nun mit den entsprechenden | |||
Bedienelemente) justieren. | |||
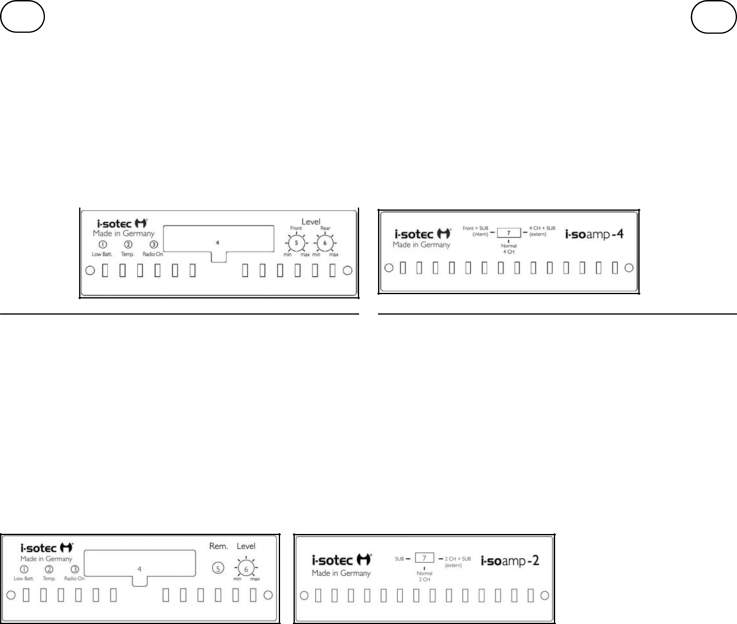
B.2 Bedienelemente und Anschlüsse | |||
1. | Betriebsanzeige (Radio ON) GRÜN | ||
2. | Unterspannungsanzeige (Low Batt.) GELB | ||
3. | Übertemperaturanzeige (Temp.) ROT | ||
4. | Systemstecker (Strom, Lautsprecher Ein- und Ausgänge) | ||
5. | Lautstärkeregler Front | ||
6. | Lautstärkeregler Rear oder Subwoofer in der Front + Subwoofer Betriebsart | ||
7. | Wahlschalter |
| |
für Betriebsart
C Bedienung i-soamp-2
C.1 Erste Inbetriebnahme
1. Schalten Sie das Radio mit kleiner Lautstärke ein.
2. Nach der Funktionskontrolle der einzelnen Lautsprecher stellen Sie eine etwas höhere Lautstärke am Radio ein. Justieren Sie jetzt gegebenenfalls mittels der
C.2 Bedienelemente und Anschlüsse
1. Betriebsanzeige (Radio ON) GRÜN
2. Unterspannungsanzeige (Low Batt.) GELB
3. Übertemperaturanzeige (Temp.) ROT
4. Systemstecker (Strom, Lautsprecher Ein- und Ausgänge)
5.
6. Lautstärkeregler Front oder Subwoofer
7. Wahlschalter für Betriebsart
B User’s Guide
B.1. OPERATING THE EQUIPMENT FOR THE FIRST TIME UK 1. Turn on the radio with the volume set at low.
2. After checking the operation of the individual loudspeakers, set the volume of the radio a little higher. If appropriate, now use the level adjuster of the power amplifier to adjust the basic volume of the loudspeakers. The volume ratio of the front and rear loudspeakers as well as the subwoofer can now be adjusted with the corresponding level adjusters (see operating elements).
B.2 OPERATING ELEMENTS and CONNECTIONS
1. Undervoltage indicator (low batt.) YELLOW
2. Excess temperature indicator (temp.) RED
3. Power indicator (radio ON) GREEN
4. System plug for power, loudspeaker input and output
5. Loudspeaker control front
6. Loudspeaker control rear or subwoofer in front + subwoofer operating mode 7. Selector switch for operating mode
C User’s Guide
1. OPERATING THE EQUIPMENT FOR THE FIRST TIME 1. Turn on the radio with the volume set at low.
2. After checking the operation of the individual loudspeakers, set the volume of the radio a little higher. If appropriate, now use the level adjuster of the power amplifier to adjust the basic volume of the loudspeakers. The volume ratio of the front and rear loudspeakers as well as the subwoofer can now be adjusted with the corresponding level adjusters (see operating elements).
2. OPERATING ELEMENTS and CONNECTIONS
1. Undervoltage indicator (low batt.) YELLOW
2. Excess temperature indicator (temp.) RED
3. Power indicator (radio ON) GREEN
4. System plug for power, loudspeaker input and output
5. Remote input for connecting to the
which cannot switch on the
6. Loudspeaker control rear or subwoo- fer in the front + subwoofer operating mode
7. Selector switch for operating mode
