CONTROL PANEL SETTINGS & FEATURES
OPERATING INSTRUCTIONS
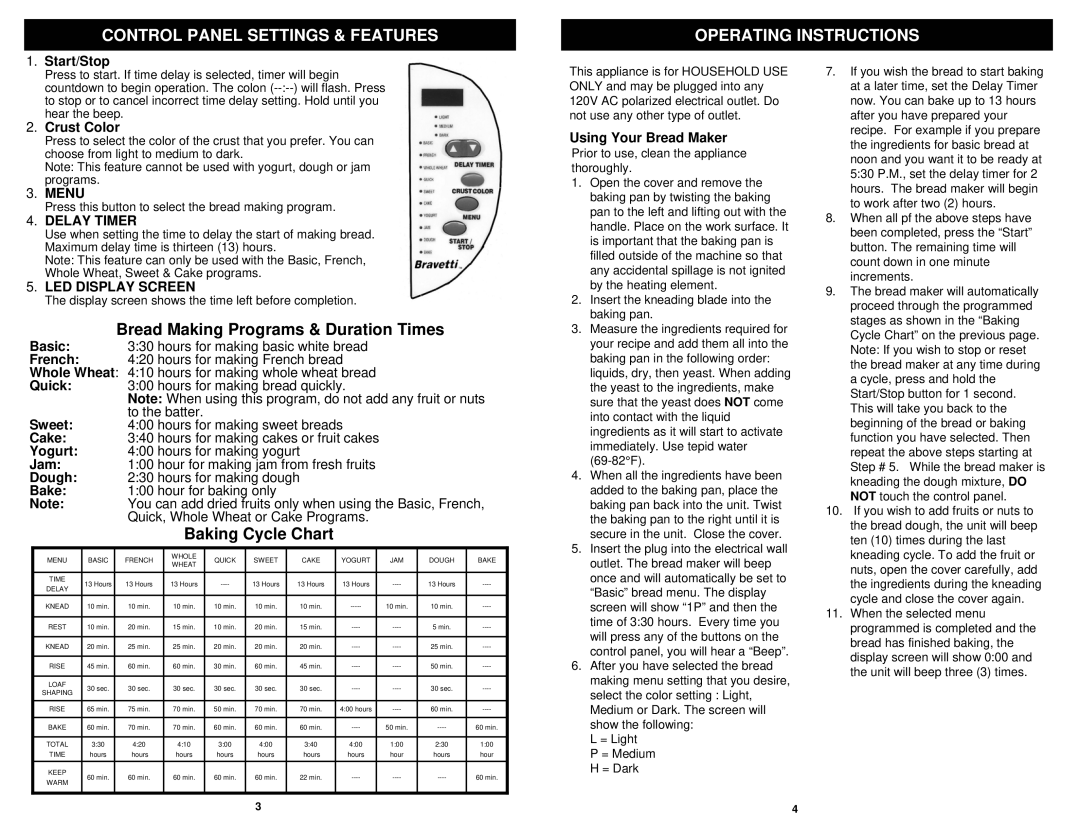
1.Start/Stop
Press to start. If time delay is selected, timer will begin countdown to begin operation. The colon
2.Crust Color
Press to select the color of the crust that you prefer. You can choose from light to medium to dark.
Note: This feature cannot be used with yogurt, dough or jam programs.
3.MENU
Press this button to select the bread making program.
4.DELAY TIMER
Use when setting the time to delay the start of making bread. Maximum delay time is thirteen (13) hours.
Note: This feature can only be used with the Basic, French, Whole Wheat, Sweet & Cake programs.
5.LED DISPLAY SCREEN
The display screen shows the time left before completion.
Bread Making Programs & Duration Times
Basic: 3:30 hours for making basic white bread
French: 4:20 hours for making French bread
Whole Wheat: 4:10 hours for making whole wheat bread
Quick: 3:00 hours for making bread quickly.
Note: When using this program, do not add any fruit or nuts to the batter.
Sweet: 4:00 hours for making sweet breads
Cake: 3:40 hours for making cakes or fruit cakes
Yogurt: 4:00 hours for making yogurt
Jam: 1:00 hour for making jam from fresh fruits
Dough: 2:30 hours for making dough
Bake: 1:00 hour for baking only
Note: You can add dried fruits only when using the Basic, French, Quick, Whole Wheat or Cake Programs.
Baking Cycle Chart
MENU | BASIC | FRENCH | WHOLE | QUICK | SWEET | CAKE | YOGURT | JAM | DOUGH | BAKE | |
WHEAT | |||||||||||
|
|
|
|
|
|
|
|
|
| ||
|
|
|
|
|
|
|
|
|
|
| |
TIME | 13 Hours | 13 Hours | 13 Hours | 13 Hours | 13 Hours | 13 Hours | 13 Hours | ||||
DELAY | |||||||||||
|
|
|
|
|
|
|
|
|
| ||
KNEAD | 10 min. | 10 min. | 10 min. | 10 min. | 10 min. | 10 min. | 10 min. | 10 min. | |||
|
|
|
|
|
|
|
|
|
|
| |
REST | 10 min. | 20 min. | 15 min. | 10 min. | 20 min. | 15 min. | 5 min. | ||||
|
|
|
|
|
|
|
|
|
|
| |
KNEAD | 20 min. | 25 min. | 25 min. | 20 min. | 20 min. | 20 min. | 25 min. | ||||
|
|
|
|
|
|
|
|
|
|
| |
RISE | 45 min. | 60 min. | 60 min. | 30 min. | 60 min. | 45 min. | 50 min. | ||||
|
|
|
|
|
|
|
|
|
|
| |
LOAF | 30 sec. | 30 sec. | 30 sec. | 30 sec. | 30 sec. | 30 sec. | 30 sec. | ||||
SHAPING | |||||||||||
|
|
|
|
|
|
|
|
|
| ||
|
|
|
|
|
|
|
|
|
|
| |
RISE | 65 min. | 75 min. | 70 min. | 50 min. | 70 min. | 70 min. | 4:00 hours | 60 min. | |||
|
|
|
|
|
|
|
|
|
|
| |
BAKE | 60 min. | 70 min. | 70 min. | 60 min. | 60 min. | 60 min. | 50 min. | 60 min. | |||
|
|
|
|
|
|
|
|
|
|
| |
TOTAL | 3:30 | 4:20 | 4:10 | 3:00 | 4:00 | 3:40 | 4:00 | 1:00 | 2:30 | 1:00 | |
TIME | hours | hours | hours | hours | hours | hours | hours | hour | hours | hour | |
|
|
|
|
|
|
|
|
|
|
| |
KEEP | 60 min. | 60 min. | 60 min. | 60 min. | 60 min. | 22 min. | 60 min. | ||||
WARM | |||||||||||
|
|
|
|
|
|
|
|
|
| ||
|
|
|
|
|
|
|
|
|
|
|
This appliance is for HOUSEHOLD USE ONLY and may be plugged into any 120V AC polarized electrical outlet. Do not use any other type of outlet.
Using Your Bread Maker
Prior to use, clean the appliance thoroughly.
1.Open the cover and remove the baking pan by twisting the baking pan to the left and lifting out with the handle. Place on the work surface. It is important that the baking pan is filled outside of the machine so that any accidental spillage is not ignited by the heating element.
2.Insert the kneading blade into the baking pan.
3.Measure the ingredients required for your recipe and add them all into the baking pan in the following order: liquids, dry, then yeast. When adding the yeast to the ingredients, make sure that the yeast does NOT come into contact with the liquid ingredients as it will start to activate immediately. Use tepid water
4.When all the ingredients have been added to the baking pan, place the baking pan back into the unit. Twist the baking pan to the right until it is secure in the unit. Close the cover.
5.Insert the plug into the electrical wall outlet. The bread maker will beep once and will automatically be set to “Basic” bread menu. The display screen will show “1P” and then the time of 3:30 hours. Every time you will press any of the buttons on the control panel, you will hear a “Beep”.
6.After you have selected the bread making menu setting that you desire, select the color setting : Light, Medium or Dark. The screen will show the following:
L = Light
P = Medium H = Dark
7.If you wish the bread to start baking at a later time, set the Delay Timer now. You can bake up to 13 hours after you have prepared your recipe. For example if you prepare the ingredients for basic bread at noon and you want it to be ready at 5:30 P.M., set the delay timer for 2 hours. The bread maker will begin to work after two (2) hours.
8.When all pf the above steps have been completed, press the “Start” button. The remaining time will count down in one minute increments.
9.The bread maker will automatically proceed through the programmed stages as shown in the “Baking Cycle Chart” on the previous page. Note: If you wish to stop or reset the bread maker at any time during a cycle, press and hold the Start/Stop button for 1 second. This will take you back to the beginning of the bread or baking function you have selected. Then repeat the above steps starting at Step # 5. While the bread maker is kneading the dough mixture, DO NOT touch the control panel.
10.If you wish to add fruits or nuts to the bread dough, the unit will beep ten (10) times during the last kneading cycle. To add the fruit or nuts, open the cover carefully, add the ingredients during the kneading cycle and close the cover again.
11.When the selected menu programmed is completed and the bread has finished baking, the display screen will show 0:00 and the unit will beep three (3) times.
3
4