Convection Baking

Convection baking is very consistent and even. The oven heats quickly, so preheating is not necessary or desirable. The fan circulates the hot air around the food making baked goods rise quickly and evenly. With this oven, you have the option of four (4) convection settings. We recommend using the “LO” to MED” settings for small roasts or baking cookies/cakes and the “HI” to “MAX” settings for larger roasts or for rotisserie cooking.

Bake your favorite cookies, cakes, pies, brownies, etc. The bakeware that will fit in your oven are up to 10 inches in width. We do not recommend the use of oven roasting bags or glass containers in the oven. Never use plastic, cardboard, paper or anything similar in the oven.

Operation

Place the wire rack in the lowest or middle Rack Support Guide depending on the height of the pan or according to the recipe.

Place pan with item(s) to be baked on the wire rack.

Turn the Function Control to Convection Baking.

Turn the Time Control to position “Stay On”.

You have the option of using the convection with this function. If you want to use the convection fan, turn the Convection Control Knob to “LO”, “MED”, “HI” or “MAX” setting. If you do not want the convection fan to work, set the Convection Control Knob to the “Off” position.

When baking is complete, turn the Time Control to “OFF” as well as the Convention Control Knob to the “Off” position if it was being used.

Positioning of the Wire Racks

Cookies - Use bottom and middle Support Guides.

Layer Cakes - Use bottom Support Guide only (bake one at a time). Pies - Use bottom Support Guide.

Baking on 2 Racks

Two racks of cookies can be baked at the same time, however it is necessary to rotate them (i.e. move the top to the bottom and the bottom to the top) halfway to through the baking time if you are NOT using the convection fan. If you are using the convection fan feature, then you do NOT need to rotate.

Baking Cookies

For baking cookies, we suggest adjusting baking temperature and using a cookie sheet placed on the wire rack. Also, using parchment paper on a cookie sheet might prove helpful when baking certain types of cookies.

1.Use parchment paper on cookie sheet so cookies will not stick.

2.Cookie sheets, baking times and temperatures may differ from those necessary when using other baking materials.

Note: Convection air is superheated and it circulates around the food, so it cooks food up to 25% faster. When baking your favorite recipes or packaged goods, follow recipe instructions remembering not to preheat. Check the baked goods a few minutes before the shortest recommended baking time.

Baking Guide

Follow the package or recipe instructions for baking times and temperature.

6

Rotisserie Cooking

We recommend that you do not cook a roast larger than 4-5 lbs. on the Rotisserie Skewer. Chicken should be bound in string to prevent the chicken legs or wings from unraveling during roasting and so that rotisserie assembly will rotate smoothly. For best results we recommend that you preheat the oven for 15 minutes on 450°.

Operation

Set temperature control to 450°F.

Turn Function Control Knob to Convection Baking.

Turn Convection Control Knob to desired fan speed (LO - MED – HI – MAX).

Insert the meat or poultry that you are going to cook onto the rotisserie skewer making sure that the meat or poultry is secured tightly onto the skewer with the skewer clamps and thumbscrews. Make sure that the meat or poultry is centered onto the skewer.

Insert the pointed end of the Rotisserie Skewer into the drive socket located on the right hand side of the oven wall. Make sure that the square end of the Rotisserie Skewer rests on the Rotisserie Skewer Support located on the left hand side of the oven wall.

Slide the Broil/Drip Pan onto the lowest position to catch the food drippings.

Turn the Time Control Knob to the “Stay On” position.

Push the Rotisserie On/Off Switch to the “On” position.

When the cooking is completed, turn the Time Control Knob to the “Off” position.

Remove the Rotisserie Skewer from the oven by placing the hooks of the Rotisserie Handle under the grooves on either side of the Rotisserie Skewer. Remove the left side of the Rotisserie Skewer first by lifting up and out. Then pull the Rotisserie Skewer out of the drive socket and carefully remove the roast from the oven.

Take the meat or poultry off the Rotisserie Skewer and place on a cutting board or platter.

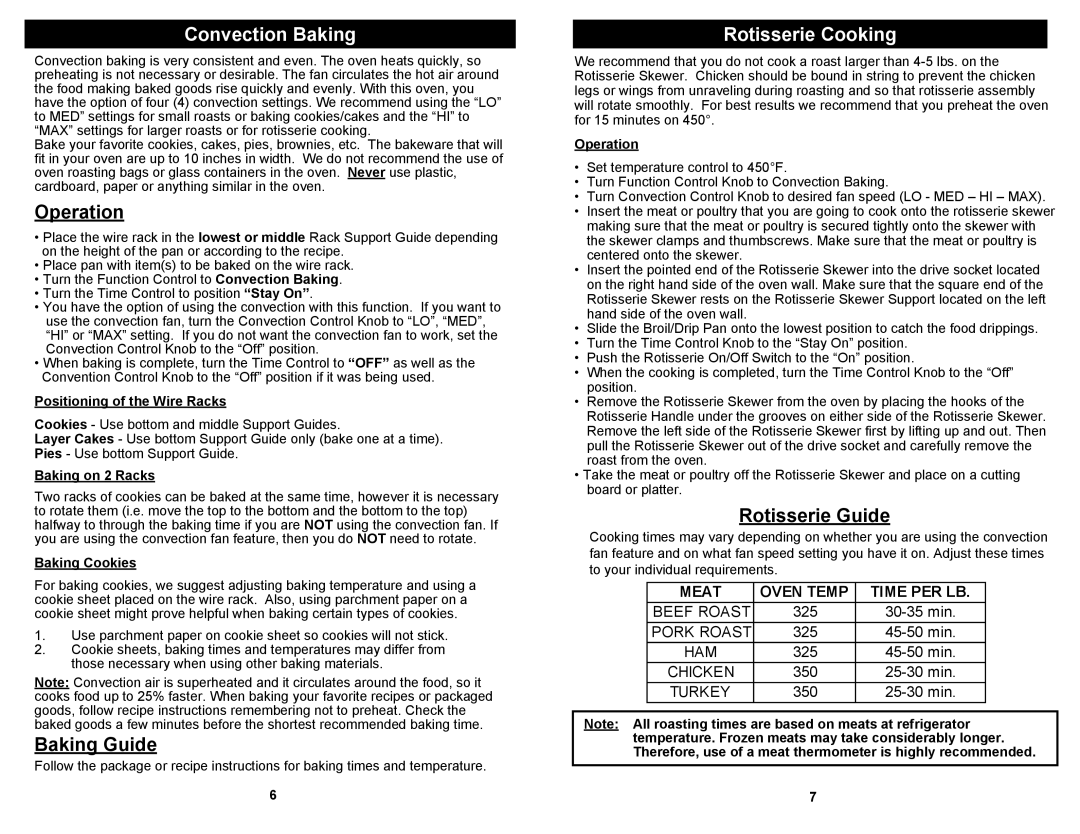
Rotisserie Guide

Cooking times may vary depending on whether you are using the convection fan feature and on what fan speed setting you have it on. Adjust these times to your individual requirements.

MEAT

OVEN TEMP

TIME PER LB.

BEEF ROAST

325

30-35 min.

PORK ROAST

325

45-50 min.

HAM

325

45-50 min.

CHICKEN

350

25-30 min.

TURKEY

350

25-30 min.

Note: All roasting times are based on meats at refrigerator temperature. Frozen meats may take considerably longer. Therefore, use of a meat thermometer is highly recommended.

7

Page 8
Image 8
Bravetti JO287H Convection Baking, Baking Guide, Rotisserie Cooking, Rotisserie Guide, Meat Oven Temp Time PER LB

JO287H specifications

The Bravetti JO287H is a versatile and user-friendly kitchen appliance designed to elevate the home cooking experience. This unit stands out for its unique combination of features that cater to a variety of cooking styles, making it a valuable addition to any kitchen.

At the heart of the Bravetti JO287H is its multi-functionality. This appliance is designed to fulfill multiple roles, allowing users to bake, broil, and prepare a range of dishes all in one compact device. The convenience of having an oven, toaster, and broiler in a single unit not only saves space but also simplifies meal preparation.

The Bravetti JO287H boasts an impressive capacity, making it suitable for both small and large meal preparations. Whether you're baking a batch of cookies or roasting a whole chicken, this appliance is equipped to handle it all. The adjustable racks provide flexibility in cooking large items or multiple trays simultaneously, ensuring that you can make the most of your meal prep.

One of the standout features of the Bravetti JO287H is its user-friendly design. The control panel is intuitive, featuring easy-to-understand dials and settings that allow users to customize their cooking experience. This includes options for different cooking temperatures and times, giving you the ability to achieve perfect results every time.

Furthermore, the Bravetti JO287H incorporates advanced heating technologies that promote even cooking and browning. The powerful heating elements ensure that your food cooks thoroughly and achieves the perfect texture and flavor. This feature is particularly beneficial for those who value quality and precision in their cooking.

In terms of construction, the Bravetti JO287H is built with durable materials designed to withstand the rigors of daily use. The glass door provides visibility into the cooking process, allowing you to monitor your food without opening the door and losing heat.

Safety is also a key consideration in the design of the Bravetti JO287H. The appliance is equipped with features like an automatic shut-off and cool-touch housing, ensuring that even novice cooks can operate it safely.

In summary, the Bravetti JO287H offers a blend of versatility, user-friendly controls, and advanced cooking technologies. Its spacious interior, combined with durable construction and safety features, makes it an ideal choice for both casual cooks and culinary enthusiasts looking to expand their capabilities in the kitchen. Whether you're baking, broiling, or toasting, this appliance is poised to deliver delicious results every time.