In-Ground Post Assembly

NOTICE: Assemble and install patio base before assem- bling grill.

The SS48G and BL48G In-Ground Posts are only for use with Broilmaster Gas Grills. Before proceeding with installation read your Owner’s Manual for the proper location and minimum clear- ances to combustible materials for your grill and in-ground post.

Verify that all parts listed in the exploded view of this product have been included before beginning this installation.

Recommended Tools:

Drill/Driver

Two adjustable wrenches or a socket set

A medium Phillips screwdriver

Pipe thread sealer or Teflon tape (for gas connections)

Soapy water solution (to test for leaks)

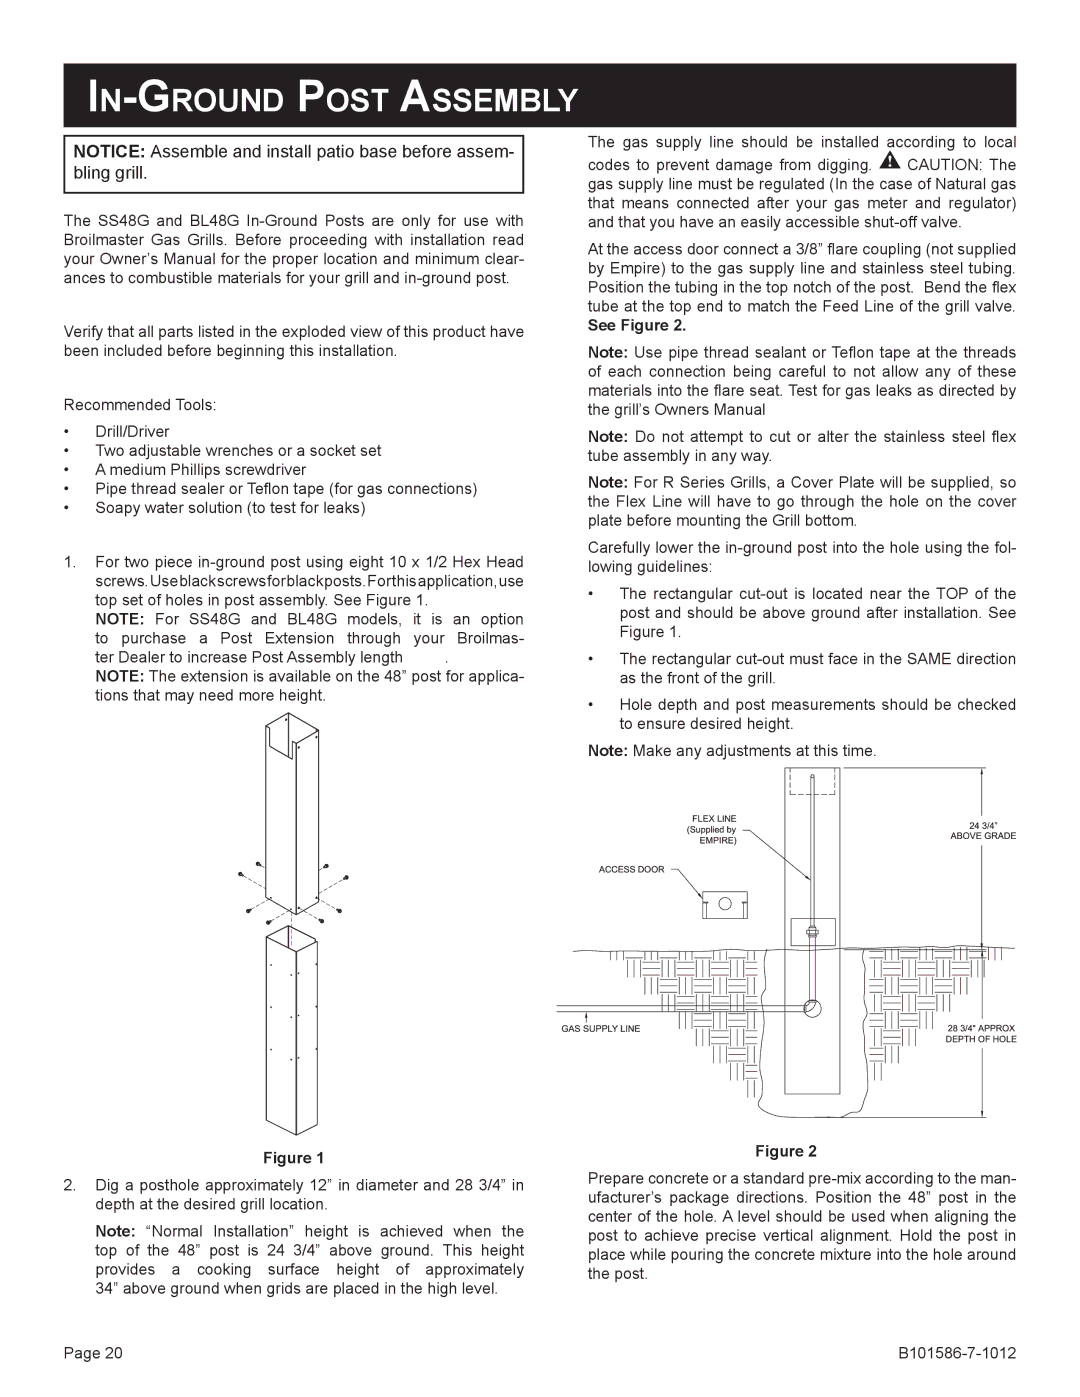
1.For two piece in-ground post using eight 10 x 1/2 Hex Head screws.Useblackscrewsforblackposts.Forthisapplication,use top set of holes in post assembly. See Figure 1.

NOTE: For SS48G and BL48G models, it is an option to purchase a Post Extension through your Broilmas-

ter Dealer to increase Post Assembly length .

NOTE: The extension is available on the 48” post for applica- tions that may need more height.

Figure 1

2.Dig a posthole approximately 12” in diameter and 28 3/4” in depth at the desired grill location.

Note: “Normal Installation” height is achieved when the top of the 48” post is 24 3/4” above ground. This height provides a cooking surface height of approximately 34” above ground when grids are placed in the high level.

The gas supply line should be installed according to local

codes to prevent damage from digging. CAUTION: The gas supply line must be regulated (In the case of Natural gas that means connected after your gas meter and regulator) and that you have an easily accessible shut-off valve.

At the access door connect a 3/8” flare coupling (not supplied by Empire) to the gas supply line and stainless steel tubing. Position the tubing in the top notch of the post. Bend the flex tube at the top end to match the Feed Line of the grill valve.

See Figure 2.

Note: Use pipe thread sealant or Teflon tape at the threads of each connection being careful to not allow any of these materials into the flare seat. Test for gas leaks as directed by the grill’s Owners Manual

Note: Do not attempt to cut or alter the stainless steel flex tube assembly in any way.

Note: For R Series Grills, a Cover Plate will be supplied, so the Flex Line will have to go through the hole on the cover plate before mounting the Grill bottom.

Carefully lower the in-ground post into the hole using the fol- lowing guidelines:

The rectangular cut-out is located near the TOP of the post and should be above ground after installation. See Figure 1.

The rectangular cut-out must face in the SAME direction as the front of the grill.

Hole depth and post measurements should be checked to ensure desired height.

Note: Make any adjustments at this time.

Figure 2

Prepare concrete or a standard pre-mix according to the man- ufacturer’s package directions. Position the 48” post in the center of the hole. A level should be used when aligning the post to achieve precise vertical alignment. Hold the post in place while pouring the concrete mixture into the hole around the post.

Page 20

B101586-7-1012

Page 20
Image 20
Broilmaster SS48G-1, DCB1-2, SS26P-1, PCB1-2, BL26P-1, B101652 owner manual In-Ground Post Assembly, See Figure

PCB1-2, DCB1-2, SS48G-1, BL26P-1, B101652 specifications

The Broilmaster B101586-4-0112, along with its variants BL26P-1, SS48G-1, DCB1-2, and PCB1-2, represents a premium line of outdoor grilling equipment designed to enhance the backyard cooking experience. These grills are well-regarded for their combination of performance, durability, and innovative features, making them a popular choice among grilling enthusiasts.

One of the standout features of the Broilmaster B101586-4-0112 is its high-quality stainless steel construction. This material not only adds to the grill's aesthetic appeal but also ensures longevity and resistance to corrosion, even in harsh weather conditions. The grill's robust build is complemented by a heavy-duty cooking surface, which increases heat distribution and allows for perfectly cooked meals every time.

The BL26P-1 is designed with versatility in mind, featuring multiple cooking zones. This allows users to simultaneously grill different types of food at varying heat levels, making it perfect for gatherings and parties. The grill also includes adjustable burners, enabling precise temperature control for both direct and indirect grilling methods.

The SS48G-1 model highlights advanced cooking technology with its infrared burner system. This technology reduces cooking time while ensuring that food retains its moisture and flavor, resulting in juicy and tender dishes. Additionally, the stainless steel heat tent aids in even heat distribution, preventing flare-ups and enhancing overall cooking performance.

For those looking for convenience, the DCB1-2 offers electronic ignition and built-in temperature gauges, making it easier than ever to achieve the perfect cook. The grill's easy-to-clean porcelain-coated grates save time on maintenance, allowing users to spend more time enjoying their grilled creations.

The PCB1-2 further enhances user experience with its side burner feature, which is ideal for preparing sauces or side dishes while grilling. This integration of features exemplifies Broilmaster's commitment to providing a comprehensive grilling solution.

In conclusion, the Broilmaster B101586-4-0112 and its accompanying models BL26P-1, SS48G-1, DCB1-2, and PCB1-2 stand out in the crowded market of outdoor grills. With their durable construction, advanced grilling technologies, and user-friendly features, they cater to both novice cooks and seasoned grill masters seeking quality and versatility in their outdoor cooking experience. Whether hosting a barbecue or enjoying a quiet dinner, these grills offer the performance and reliability that every grill enthusiast desires.