Color Laser Printer
Quick Setup Guide
Read the "Safety Sheet" first to ensure that you use this printer safely. Read this "Quick Setup Guide" before you set up the printer.
![]() Before you can use the printer, you must set up the hardware and install the driver.
Before you can use the printer, you must set up the hardware and install the driver.
![]() Identify the operating system on your computer (Windows® 95 / 98 / Me, Windows NT® 4.0, Windows® 2000 / XP or Macintosh®).
Identify the operating system on your computer (Windows® 95 / 98 / Me, Windows NT® 4.0, Windows® 2000 / XP or Macintosh®).
![]() The interface cable is not a standard accessory. Please purchase the appropriate interface cable for the interface you intend to use (Parallel, USB or Network). Most existing parallel cables support
The interface cable is not a standard accessory. Please purchase the appropriate interface cable for the interface you intend to use (Parallel, USB or Network). Most existing parallel cables support
![]() If you are an Administrator: Configure your network printer settings referring to the reverse side of this sheet.
If you are an Administrator: Configure your network printer settings referring to the reverse side of this sheet.
Carton Components
Carton components may differ from one country to another.
Save all packing materials and the printer carton. They should be used when shipping the printer.
| Quick Setup Guide Windows® | Macintosh® | AC power cord |
(including User's | Driver Installation Guide | Driver Installation Guide |
|
Guide) |
|
|
|
Oil bottle | Fuser cleaner | OPC belt cartridge | Oil syringe |
Printer
Toner cartridges (Black, Cyan, Magenta and Yellow)
What is Included on the CD-ROM
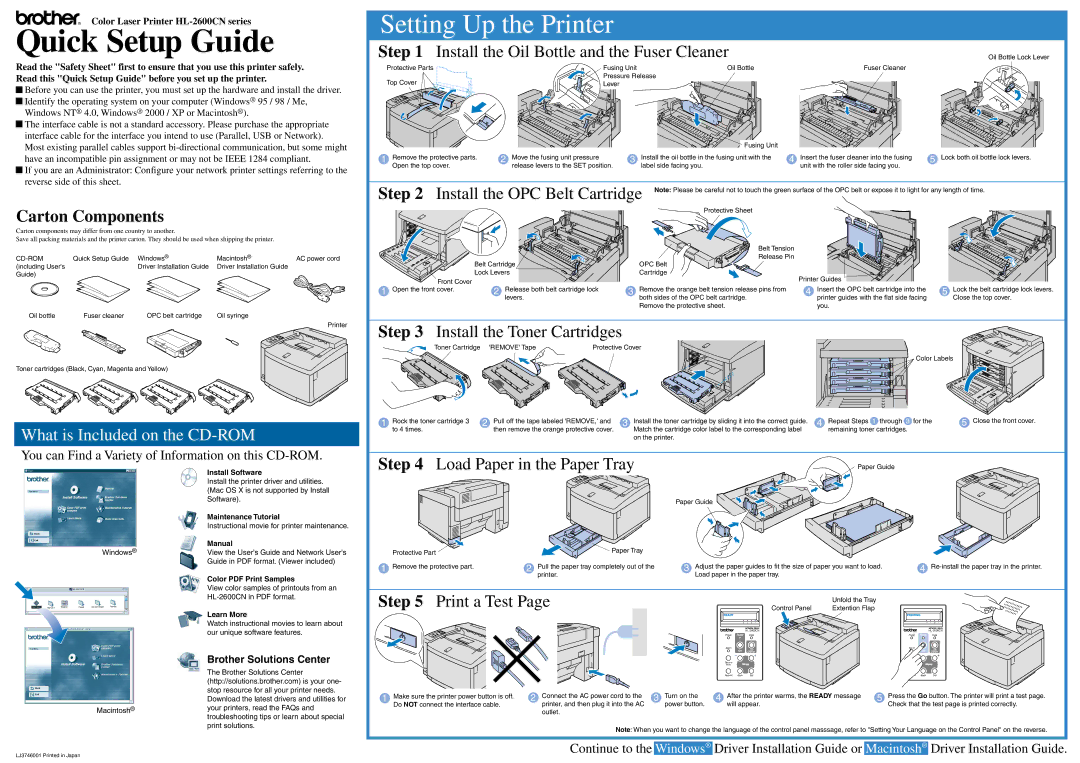
Setting Up the Printer
Step 1 | Install the Oil Bottle and the Fuser Cleaner | Oil Bottle Lock Lever | |
Protective Parts | Fusing Unit | Oil Bottle | Fuser Cleaner |
Top Cover | Pressure Release |
|
|
Lever |
|
| |
|
| Fusing Unit |
|
|
1 Remove the protective parts. | 2 Move the fusing unit pressure | 3 Install the oil bottle in the fusing unit with the | 4 Insert the fuser cleaner into the fusing | 5 Lock both oil bottle lock levers. |
Open the top cover. | release levers to the SET position. | label side facing you. | unit with the roller side facing you. |
|
Step 2 Install the OPC Belt Cartridge Note: Please be careful not to touch the green surface of the OPC belt or expose it to light for any length of time. Protective Sheet![]()
|
| Belt Tension |
|
|
|
| Release Pin |
|
|
| Belt Cartridge | OPC Belt |
|
|
| Lock Levers | Cartridge | Printer Guides |
|
Front Cover |
|
|
| |
|
|
|
| |
1 Open the front cover. | 2 Release both belt cartridge lock | 3 Remove the orange belt tension release pins from | 4 Insert the OPC belt cartridge into the | 5 Lock the belt cartridge lock levers. |
| levers. | both sides of the OPC belt cartridge. | printer guides with the flat side facing | Close the top cover. |
|
| Remove the protective sheet. | you. |
|
Step 3 Install the Toner Cartridges
Toner Cartridge 'REMOVE' Tape | Protective Cover |
|
|
| Color Labels |
| K | K |
| Y | Y |
| M | M |
| C | C |
1 Rock the toner cartridge 3 | 2 Pull off the tape labeled 'REMOVE,' and | 3 Install the toner cartridge by sliding it into the correct guide. | 4 Repeat Steps 1 through 3 for the | 5 Close the front cover. |
to 4 times. | then remove the orange protective cover. | Match the cartridge color label to the corresponding label | remaining toner cartridges. |
|
|
| on the printer. |
|
|
You can Find a Variety of Information on this
Step 4 Load Paper in the Paper Tray
Paper Guide
Windows®
Install Software
Install the printer driver and utilities. (Mac OS X is not supported by Install Software).
Maintenance Tutorial
Instructional movie for printer maintenance.
Manual
View the User's Guide and Network User's Guide in PDF format. (Viewer included)
Color PDF Print Samples
Protective Part | Paper Tray |
| |
1 Remove the protective part. | 2 Pull the paper tray completely out of the |
| printer. |
Paper Guide
3 Adjust the paper guides to fit the size of paper you want to load. | 4 |
Load paper in the paper tray. |
|
Macintosh®
View color samples of printouts from an
Learn More
Watch instructional movies to learn about our unique software features.
Brother Solutions Center
The Brother Solutions Center (http://solutions.brother.com) is your one- stop resource for all your printer needs. Download the latest drivers and utilities for your printers, read the FAQs and troubleshooting tips or learn about special print solutions.
Step 5 | Print a Test Page |
|
|
| Control Panel | Extention Flap |
|
|
| |
|
|
|
|
|
|
| Unfold the Tray |
|
|
|
|
|
|
|
| K | C M Y |
|
| K | C M Y |
|
|
|
|
|
| NETWORK READY |
|
|
| NETWORK READY |
|
|
|
|
|
|
|
|
| ||
|
|
|
| Power | Ready | Data |
| Power | Ready | Data |
|
|
|
| Alarm | Go | Job |
| Alarm | Go | Job |
|
|
|
|
|
|
| ||||
|
|
|
|
| Cancel |
|
| Cancel | ||
|
|
|
| Secure |
|
|
| Secure |
|
|
|
|
|
|
|
|
|
|
| ||
|
|
|
| Reprint | Back | Set |
| Reprint | Back | Set |
1 Make sure the printer power button is off. | 2 Connect the AC power cord to the | 3 Turn on the | 4 After the printer warms, the READY message | 5 Press the Go button. The printer will print a test page. | ||||||
Do NOT connect the interface cable. | printer, and then plug it into the AC | power button. | will appear. |
| Check that the test page is printed correctly. | |||||
outlet.
Note: When you want to change the language of the control panel masssage, refer to "Setting Your Language on the Control Panel" on the reverse.
Continue to the Windows® Driver Installation Guide or Macintosh® Driver Installation Guide.
LJ3746001 Printed in Japan