LA9490001
Printed in China
Imprimé en Chine
Gedruckt in China
Gedrukt in China
Stampato in Cina
®
|
| ENGLISH |
|
|
| |
| Before using the | |||||
55 | leaflet, and then keep it in a handy place for | |||||
future reference. With this machine, use only | ||||||
tape cassettes bearing the |
| logo. For a | ||||
| ||||||
TAPE | ||||||
list of the tape cassettes that | be used with | |||||
can | ||||||
this machine, refer to Accessories at the bot- tom of this page.
FRANÇAIS
Veuillez lire ce mode d’emploi avant d’utiliser votre
marque  avec cet appareil. Pour une liste des cas-
TAPE
settes de ruban qui peuvent être utilisées avec cet appareil,
Les indications d’afficheur LCD en langue anglaise, qui sont reprises entre parentheses, sont destinées aux utilisateurs du modèle suisse et belge.
DEUTSCH
Bitte lesen Sie diese Anleitung vor der Verwen- dung des
mit dem |
| ||
TAPE | |||
|
|
Die in Klammern angegebenen englischsprachi- gen Displayangaben richten sich an die Benut- zer des schweizerischen Modells.
NEDERLANDS
Lees deze gebruiksaanwijzing aandachtig door voordat u de
raat alleen lintcassettes met het |
| han- | |
TAPE | |||
|
|
delsmerk. Zie Accessoires onderaan op deze bladzijde voor een lijst van de
ITALIANO
Prima di usare la
Con questa macchina usare solo cassette nastro
con il marchio |
| . Per una lista delle cas- | |
TAPE | |||
|
|
sette nastro utilizzabili con questa macchina, vedere Accessori in fondo a questa pagina.
ENGLISH
The stylish and portable
Declaration of Conformity
We BROTHER INDUSTRIES, LTD.
EMC: EN 55022 1998 Class B EN 55024 1998
and follows the provisions of the Electromagnetic Compatibility Directive 89/336/EEC (as amended by 91/263/EEC and 92/31/EEC).
Issued by: BROTHER INDUSTRIES, LTD. Personal & Home Company Development Dept.
Care and precautions
•Clean the machine using only a soft, dry cloth.
•Use only AAA-size (LR03) batteries.
•Do not expose the machine or the tape cassettes to high temperatures, high humidity, or excessive dust.
•If you do not intend to use the machine for an extended period of time, remove the batteries.
•Do not touch the tape cutter button while printing.
• Do not touch the cutter blade.
• Do not block the tape exit slot. (Fig. 1).
•Do not put labels in your mouth.
• Do not affix labels to skin.
Fig. 1
Installing/replacing batteries
1)Remove the back cover by pressing in the rough area at the top end of the machine and pulling off the cover. (Fig. 2).
2)If a tape cassette is already installed, remove it.
For details on removing the tape cassette, refer to Installing/changing the tape cassette.
3)If batteries are already installed, remove them.
4)Insert four new
Be sure that the two batteries on the left side of the
Always replace all four batteries at the same time using brand new ones.
5)Insert the tape cassette.
For details on inserting the tape cassette, refer to Installing/changing the tape cassette.
6)Attach the back cover by inserting the two hooks on the bottom end of the cover into the matching slots on the bottom end of the machine, then pushing down firmly on the cover until it snaps into place.
Back cover
Cache arrière
Rückwand
Achterklep
Coperchio posteriore
Fig. 2 | Right side | Left side |
| Côté gauche | |
| Côté droit | |
| Linke Seite | |
| Rechte Seite | |
| Linkerkant | |
| Rechterkant | |
| Lato sinistro | |
| Lato destro | |
|
| |
|
| Fig. 3 |
Installing/changing the tape cassette
1)Remove the back cover by pressing in the rough area at the top end of the machine and pulling off the cover.
2)If a tape cassette is already installed, remove it by pulling it straight out.
3)Make sure that the end of the tape feeds under the tape guides as shown below. (Fig. 4)
If you are installing a new tape cassette, be sure to remove the paper tab.
4)Insert the tape cassette, making sure that it snaps into place.
Make sure that the tape cassette fits properly around the two guides in the cassette compartment. (Fig. 5)
5)Attach the back cover by inserting the two hooks on the bottom end of the cover into the matching slots on the bottom end of the machine, then pushing down firmly on the cover until it snaps into place. (Fig. 6)
The amount of tape remaining in the cassette is visible through the window in the back of the
When green tape is fed out, the tape cassette is empty.
CAUTION
•Be sure to use only the tape cassettes listed in Accessories. The following tape cas- settes can NOT be used with the
Guides |
| |
Guidess | Tape cutter button | |
Führungen | ||
Levier de coupe du ruban | ||
Geleiders | ||
Bandabschneider | ||
Guide | ||
Lintsnijknop | ||
| ||
| Tasto taglierina |
Fig. 4 | Fig. 5 | |
Tape guides |
| |
Guides de ruban |
| |
Bandführungen |
| |
Lintgeleiders | Fig. 6 | |
Guide del nastro | ||
|
Cleaning the print head
When dust accumulates on the print head, blank horizontal lines appear through the printed label. If this occurs, clean the print head.
1)Turn off the
2)Remove the back cover by pressing in the rough area at the top end of the machine and pulling off the cover, and then remove the tape cassette.
3)Use a dry cotton swab to gently wipe the print head and the rubber pinch roller with an
4)Insert the tape cassette, and then attach the back cover by inserting the two hooks on the bottom end of the cover into the matching slots on the bottom end of the machine, then pushing down firmly on the cover until it snaps into place.
5)Turn on the machine, enter some text, and then press R.
6)If blank lines still appear in the printed label, repeat steps 1 through 4 using a cotton swab dipped in isopropyl (rubbing) alcohol.
Thermal print head | Rubber pinch roller |
Tête d’impression thermique | Galet presseur en caoutchouc |
Thermodruckkopf | Gummiandruckwalze |
Thermische printkop | Rubberen aandrukrol |
Testina di stampa termica | Rullino premi nastro di |
| gomma |
Fig. 7
Accessories
The following accessories are available for the PT-55.
Cassettes with | 12 mm | 9 mm |
Black characters on white adhesive | ||
Red characters on white adhesive | ||
Blue characters on white adhesive | ||
Black characters on blue adhesive | ||
Black characters on yellow adhesive | ||
Cassettes with | 12 mm | 9 mm |
Black characters on white adhesive | ||
Tapes supplies may differ by country. |
|
|
General description |
|
|
Tape exit slot | ||
Underline indicator | Frame indicator |
|
Style indicator | Label length indicator | |
Tape cutter button | Display |
|
Uppercase indicator | Power key |
|
Numerals indicator | Left/right arrow key | |
Function key | Enter key |
|
Print key | Character keys |
|
Back space key | Uppercase/lowercase mode key | |
Numeral mode/1 key | Space/0 key |
|
Symbol key |
|
|
Basic operations |
|
|
• Turning on/off the |
|
|
To turn the
The
• Selecting the input mode
An indicator on the left side of the display shows the current input mode. If there is no indicator, lowercase letters can be typed in when a character key is pressed. If the indicator appears beside a, uppercase letters can be typed in, and if the indicator appears beside n, numerals will be typed in. To switch to the uppercase or lowercase input modes, press A until the desired input mode is indicated. To enter the numerals input mode, press 1once. When the
• Entering characters
To enter lowercase and uppercase letters, continue pressing the key for the desired letter until the letter is displayed, and then press L, lor r. To enter numerals, press the key for the desired number.
If the input of a letter is not finalised, for example by pressing L, lor r, the label cannot be printed, the text cannot be formatted or a symbol cannot be added.
The characters shown below are available with the various keys and input modes:
Chart 1
Key |
| Lowercase letters |
| Uppercase letters | Numerals |
1 |
|
|
|
| 1 |
2 | a b c ä á à â ã å æ ç | A B C Ä Á À Â Ã Å Æ Ç | 2 | ||
3 | d e f ë é è ê | D E F Ë É È Ê | 3 | ||
4 | g h | i ï í ì î | G H I | Ï Í Ì Î | 4 |
5 | j k | l | J K L |
| 5 |
6 | m n o ñ ö ó ò ô õ ø œ | M N O Ñ Ö Ó Ò Ô Õ Ø Œ | 6 | ||
7 | p q r s | P Q R | S | 7 | |
8 | t u v ü ú ù û | T U V Ü Ú Ù Û | 8 | ||
9 | w x y z ÿ | W X Y Z | 9 | ||
0 | Space |
| Space |
| 0 |
• Entering a space
To add a space to your text, make sure that the indicator does not appear beside n (numerals), and then press 0.
• Adding a second line of text
To end the first line of text and start the second, press L. The marker |
|
| appears to the left of |
the cursor.
To change a message back to a single line, delete the marker |
|
| . (For details on deleting the |
marker, refer to Deleting a character.) |
|
|
|
|
|
|
• Moving the cursor
You can move the cursor (_) to view or edit parts of the text to the left or right of the 6 characters shown in the display.
To move the cursor to the left, press l; to move the cursor to the right, press r. Move the cursor several characters in a row by holding down the key for the desired direction.
• Deleting a character
To delete a character, press C. The character to the left of the cursor is deleted. To continue deleting characters, hold down Cuntil all of the desired characters are deleted. To delete a character in the middle of the text, move the cursor below the character to the right of the one to be deleted before pressing C.
• Clearing all text and formats
To clear the current text and selected formats, press F, press lor runtil "CLEAR" is dis- played, and then press L. All text is erased, and the text size, style, underline/frame and label length return to their default settings, and the input mode is reset to uppercase letters.
• Entering a symbol
To enter a symbol, press @. The first row of symbols appears. Continue pressing @until the row containing the desired symbol is displayed, presslor runtil the cursor is posi- tioned under the desired symbol, and then press L. Your text reappears in the display with the selected symbol added to it.
To return to the current text without adding a symbol, press C. The symbols shown below are available in the following order:
Chart 2
– _ / \ : ; . , ' " ! ? @ & # ∗ % • + ⋅ ⎟ ± = §  ¿ ij ∼
( ) [ ] < > | ← → ↑ ↓ | ° $ £ Fr | ª º |
ß ∝ | ♥ ★ | ✏ |
|
• Printing
To print out the entered text, press R. The message "PRINT" appears while printing.
Do not press the tape cutter button while printing, as this will cause the tape to jam.
• Cutting off labels
Cut off the label that is fed from the tape exit slot by pressing in the tape cutter button.
Formatting the text
To format the text by changing the text size or style, adding underlining/framing/shading or specifying the label length, press F, press l or runtil the desired function (SIZE, STYLE, FRAME or LENGTH) is displayed, and then press L. Next, press l, r, or F until the desired setting is displayed, and then press L. The selected formatting is applied to the entire text. For more details about each function, refer to the appropriate section below. To return to the current text without changing the formatting, press C.
• Text size
The following five text sizes are available:
SIZE1SIZE2SIZE3SIZE4 (default)SIZE5
• Text style
The following nine text styles are available:
NORM | OUTL (outline) | BOLD |
SHAD (shadow) | ITAL (italic) | IT+O (italic + outline) |
IT+B (italic + bold) | IT+S (italic + shadow) | VERT |
When a text style other than NORM (normal) is selected, the indicator below bcomes on.
• Underlining/framing/shading
The following frame settings are available:
TEXT (default) | UNDL (underline) | BOX1 |
BOX2 | BOX3 | BOX4 |
BOX5 | BOX6 | BOX7 |
When UNDL is selected, the indicator belowccomes on. When a setting other than TEXT or UNDL is selected, the indicator below dcomes on. The underlining/framing/shading is not printed if the VERT (vertical) style is selected.
• Label length
If L OFF was selected, the length of the label will adjust automatically according to the length
of the entered text. If L ON was selected, the current label length setting in millimetres appears. Press lor ror use the character keys to enter the desired length between 50 and 300 mm, and then press L. When L ON is selected, the indicator below scomes on.
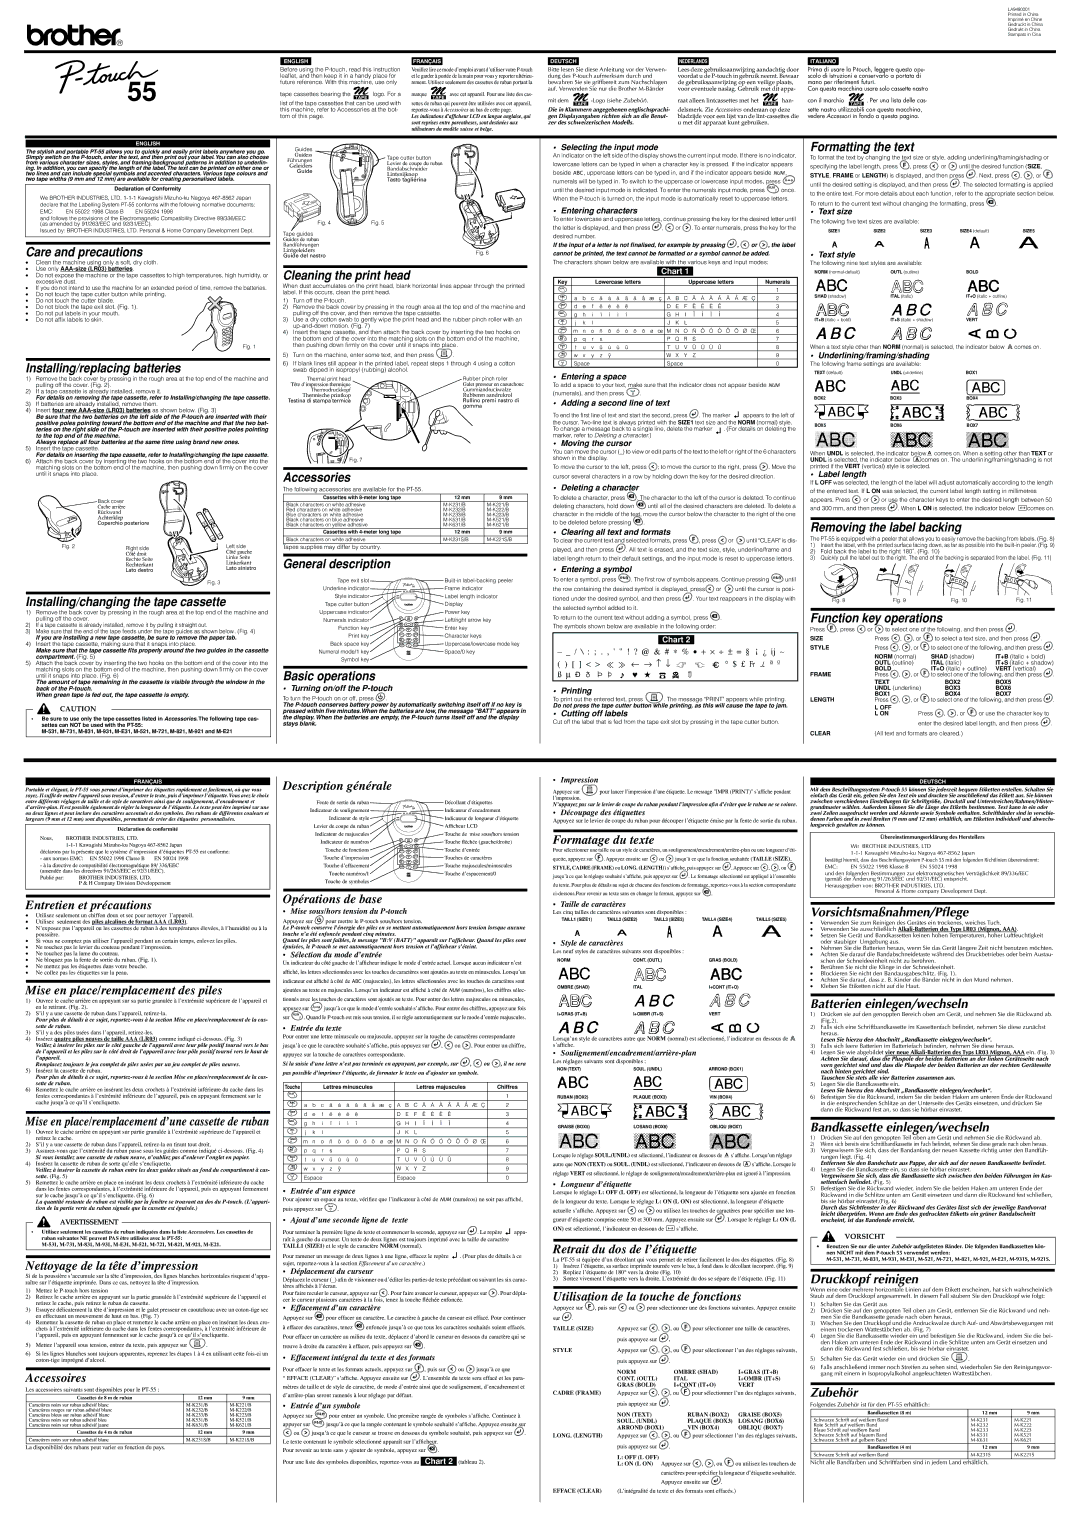
Removing the label backing
The
1)Insert the label, with the printed surface facing down, as far as possible into the
2)Fold back the label to the right 180˚. (Fig. 10)
3)Quickly pull the label out to the right. The end of the backing is separated from the label. (Fig. 11)
Fig. 8Fig. 9Fig. 10Fig. 11
Function key operations
Press F, press lor rto select one of the following, and then press L.
SIZE | Press l, r, or Fto select a text size, and then press L. | |||
STYLE | Press l, r, or Fto select one of the following, and then press L. | |||
| NORM (normal) |
| SHAD (shadow) | IT+B (italic + bold) |
| OUTL (outline) |
| ITAL (italic) | IT+S (italic + shadow) |
| BOLD |
| IT+O (italic + outline) | VERT (vertical) |
FRAME | Press l, r, or Fto select one of the following, and then press L. | |||
| TEXT |
| BOX2 | BOX5 |
| UNDL (underline) | BOX3 | BOX6 | |
| BOX1 |
| BOX4 | BOX7 |
LENGTH | Press l, r, or Fto select one of the following, and then press L. | |||
| L OFF | Press l, r, or For use the character key to | ||
| L ON | |||
|
| enter the desired label length, and then press L. | ||
CLEAR | (All text and formats are cleared.) |
| ||
FRANÇAIS
Portable et élégant, le
| Déclaration de conformité |
Nous, | BROTHER INDUSTRIES, LTD. |
|
déclarons par la présente que le système d’impression d’étiquettes
- à la directive de compatibilité électromagnétique 89/ 336/EEC (amendée dans les directives 91/263/EEC et 92/31/EEC).
Publié par: | BROTHER INDUSTRIES, LTD. |
| P & H Company Division Développement |
Entretien et précautions
•Utilisez seulement un chiffon doux et sec pour nettoyer l’appareil.
•Utilisez seulement des piles alcalines de format AAA (LR03).
•N’exposez pas l’appareil ou les cassettes de ruban à des températures élevées, à l’humidité ou à la poussière.
•Si vous ne comptez pas utiliser l’appareil pendant un certain temps, enlevez les piles.
•Ne touchez pas le levier du couteau pendant l’impression.
•Ne touchez pas la lame du couteau.
•Ne bloquez pas la fente de sortie du ruban. (Fig. 1).
•Ne mettez pas les étiquettes dans votre bouche.
•Ne collez pas les étiquettes sur la peau.
Mise en place/remplacement des piles
1)Ouvrez le cache arrière en appuyant sur sa partie granulée à l’extrémité supérieure de l’appareil et en le retirant. (Fig. 2).
2)S’il y a une cassette de ruban dans l’appareil,
Pour plus de détails à ce sujet,
3)S’il y a des piles usées dans l’appareil,
4)Insérez quatre piles neuves de taille AAA (LR03) comme indiqué
Veillez à insérer les piles sur le côté gauche de l’appareil avec leur pôle positif tourné vers le bas de l’appareil et les piles sur le côté droit de l’appareil avec leur pôle positif tourné vers le haut de l’appareil.
Remplacez toujours le jeu complet de piles usées par un jeu complet de piles neuves.
5)Insérez la cassette de ruban.
Pour plus de détails à ce sujet,
6)Remettez le cache arrière en insérant les deux crochets à l’extrémité inférieure du cache dans les fentes correspondantes à l’extrémité inférieure de l’appareil, puis en appuyant fermement sur le cache jusqu’à ce qu’il s’encliquette.
Mise en place/remplacement d’une cassette de ruban
1)Ouvrez le cache arrière en appuyant sur partie granulée à l’extrémité supérieure de l’appareil et retirez le cache.
2)S’il y a une cassette de ruban dans l’appareil,
3)
Si vous installez une cassette de ruban neuve, n’oubliez pas d’enlever l’onglet en papier.
4)Insérez la cassette de ruban de sorte qu’elle s’encliquette.
Veillez à insérer la cassette de ruban entre les deux guides situés au fond du compartiment à cas- sette. (Fig. 5)
5)Remettez le cache arrière en place en insérant les deux crochets à l’extrémité inférieure du cache dans les fentes correspondantes, à l’extrémité inférieure de l’appareil, puis en appuyant fermement sur le cache jusqu’à ce qu’il s’encliquette. (Fig. 6)
La quantité restante de ruban est visible par la fenêtre se trouvant au dos du
AVERTISSEMENT
•Utilisez seulement les cassettes de ruban indiquées dans la liste Accessoires. Les cassettes de ruban suivantes NE peuvent PAS être utilisées avec le
Nettoyage de la tête d’impression
Si de la poussière s’accumule sur la tête d’impression, des lignes blanches horizontales risquent d’appa- raître sur l’étiquette imprimée. Dans ce cas, nettoyez la tête d’impression.
1)Mettez le
2)Retirez le cache arrière en appuyant sur la partie granulée à l’extrémité supérieure de l’appareil et retirez le cache, puis retirez le ruban de cassette.
3)Essuyez délicatement la tête d’impression et le galet presseur en caoutchouc avec un
4)Remettez la cassette de ruban en place et remettez le cache arrière en place en insérant les deux cro- chets à l’extrémité inférieure du cache dans les fentes correspondantes, à l’extrémité inférieure de l’appareil, puis en appuyant fermement sur le cache jusqu’à ce qu’il s’encliquette.
5)Mettez l’appareil sous tension, entrez du texte, puis appuyez sur R.
6)Si les lignes blanches sont toujours apparentes, reprenez les étapes 1 à 4 en utilisant cette
Accessoires
Les accessoires suivants sont disponibles pour le PT-55 :
Cassettes de 8 m de ruban | 12 mm | 9 mm |
Caractères noirs sur ruban adhésif blanc | ||
Caractères rouges sur ruban adhésif blanc | ||
Caractères bleus sur ruban adhésif blanc | ||
Caractères noirs sur ruban adhésif bleu | ||
Caractères noirs sur ruban adhésif jaune | ||
Cassettes de 4 m de ruban | 12 mm | 9 mm |
|
|
|
Caractères noirs sur ruban adhésif blanc | ||
|
|
|
La disponibilité des rubans peut varier en fonction du pays.
Description générale
Fente de sortie du ruban | Décollant d’étiquettes |
Indicateur de soulignement | Indicateur d’encadrement |
Indicateur de style | Indicateur de longueur d’étiquette |
Levier de coupe du ruban | Afficheur LCD |
Indicateur de majuscules | Touche de mise sous/hors tension |
Indicateur de numéros | Touche fléchée (gauche/droite) |
Touche de fonctions | Touche d’entrée |
Touche d’impression | Touches de caractères |
Touche d’effacement | Touche majuscules/minuscules |
Touche numéros/1 | Touche d’espacement/0 |
Touche de symboles |
|
Opérations de base
• Mise sous/hors tension du P-touch
Appuyez sur Ppour mettre le
Le
Quand les piles sont faibles, le message "B:V (BATT)" apparaît sur l’afficheur. Quand les piles sont épuisées, le
• Sélection du mode d’entrée
Un indicateur du côté gauche de l’afficheur indique le mode d’entrée actuel. Lorsque aucun indicateur n’est affiché, les lettres sélectionnées avec les touches de caractères sont ajoutées au texte en minuscules. Lorsqu’un indicateur est affiché à côté de a(majuscules), les lettres sélectionnées avec les touches de caractères sont ajoutées au texte en majuscules. Lorsqu’un indicateur est affiché à côté de n(numéros), les chiffres sélec- tionnés avec les touches de caractères sont ajoutés au texte. Pour entrer des lettres majuscules ou minuscules, appuyez sur Ajusqu’à ce que le mode d’entrée souhaité s’affiche. Pour entrer des chiffres, appuyez une fois sur 1. Quand le
• Entrée du texte
Pour entrer une lettre minuscule ou majuscule, appuyez sur la touche de caractères correspondante jusqu’à ce que le caractère souhaité s’affiche, puis appuyez sur L, lou r. Pour entrer un chiffre, appuyez sur la touche de caractères correspondante.
Si la saisie d’une lettre n’est pas terminée en appuyant, par exemple, sur L, lou r, il ne sera
pas possible d’imprimer l’étiquette, de formater le texte ou d’ajouter un symbole.
Touche |
|
| Lettres minuscules |
| Lettres majuscules | Chiffres | |||||
|
|
|
|
|
|
|
|
|
|
|
|
1 |
|
|
|
|
|
|
|
|
|
| 1 |
2 | a | b c ä | á à â | ã å æ ç | A B | C Ä | Á À Â | Ã Å Æ Ç | 2 | ||
3 | d e f ë é è ê | D E F Ë É È Ê | 3 | ||||||||
4 | g h | i ï í ì î | G H I | Ï Í Ì Î |
| 4 | |||||
5 | j k | l | J K L |
|
|
| 5 | ||||
6 | m n o ñ ö ó ò ô õ ø œ | M N O Ñ Ö Ó Ò Ô Õ Ø Œ | 6 | ||||||||
7 | p q r s | P Q R | S | 7 | |||||||
8 | t u v ü ú ù û | T U V Ü Ú Ù Û | 8 | ||||||||
9 | w x y z ÿ | W X Y Z | 9 | ||||||||
0 | Espace | Espace |
|
|
| 0 | |||||
• Entrée d’un espace
Pour ajouter un espace au texte, vérifiez que l’indicateur à côté de n(numéros) ne soit pas affiché,
puis appuyez sur 0.
• Ajout d’une seconde ligne de texte
Pour terminer la première ligne de texte et commencer la seconde, appuyez sur L. Le repère ![]()
![]() appa- raît à gauche du curseur. Un texte de deux lignes est toujours imprimé avec la taille de caractère TAILL1 (SIZE1) et le style de caractère NORM (normal).
appa- raît à gauche du curseur. Un texte de deux lignes est toujours imprimé avec la taille de caractère TAILL1 (SIZE1) et le style de caractère NORM (normal).
Pour ramener un message de deux lignes à une ligne, effacez le repère ![]()
![]() . (Pour plus de détails à ce sujet,
. (Pour plus de détails à ce sujet,
• Déplacement du curseur
Déplacez le curseur (_) afin de visionner ou d’éditer les parties de texte précédant ou suivant les six carac- tères affichés à l’écran.
Pour faire reculer le curseur, appuyez sur l. Pour faire avancer le curseur, appuyez sur r. Pour dépla- cer le curseur plusieurs caractères à la fois, tenez la touche fléchée enfoncée.
• Effacement d’un caractère
Appuyez sur Cpour effacer un caractère. Le caractère à gauche du curseur est effacé. Pour continuer
àeffacer des caractères, tenez Cenfoncée jusqu’à ce que tous les caractères souhaités soient effacés. Pour effacer un caractère au milieu du texte, déplacez d’abord le curseur en dessous du caractère qui se trouve à droite du caractère à effacer, puis appuyez sur C.
• Effacement intégral du texte et des formats
Pour effacer le texte et les formats actuels, appuyez sur F, puis sur lou rjusqu’à ce que
“EFFACE (CLEAR)” s’affiche. Appuyez ensuite sur L. L’ensemble du texte sera effacé et les para- mètres de taille et de style de caractère, de mode d’entrée ainsi que de soulignement, d’encadrement et
• Entrée d’un symbole
Appuyez sur @pour entrer un symbole. Une première rangée de symboles s’affiche. Continuez à appuyer sur @jusqu’à ce que la rangée contenant le symbole souhaité s’affiche. Appuyez ensuite sur
lou rjusqu’à ce que le curseur se trouve en dessous du symbole souhaité, puis appuyez sur L. Le texte contenant le symbole sélectionné apparaît sur l’afficheur.
Pour revenir au texte sans y ajouter de symbole, appuyez sur C.
Pour une liste des symboles disponibles,
• Impression
Appuyez sur Rpour lancer l’impression d’une étiquette. Le message "IMPR (PRINT)" s’affiche pendant l’impression.
N’appuyez pas sur le levier de coupe du ruban pendant l’impression afin d’éviter que le ruban ne se coince.
• Découpage des étiquettes
Appuyez sur le levier de coupe du ruban pour découper l’étiquette émise par la fente de sortie du ruban.
Formatage du texte
Pour sélectionner une taille ou un style de caractères, un
• | Taille de caractères |
|
|
| |
Les cinq tailles de caractères suivantes sont disponibles : |
|
| |||
| TAILL1 (SIZE1) | TAILL2 (SIZE2) | TAILL3 (SIZE3) | TAILL4 (SIZE4) | TAILL5 (SIZE5) |
• | Style de caractères |
|
|
| |
Les neuf styles de caractères suivants sont disponibles : |
|
| |||
| NORM | CONT. (OUTL) | GRAS (BOLD) |
| |
| OMBRE (SHAD) | ITAL |
| I+CONT (IT+O) |
|
| I+GRAS (IT+B) | I+OMBR (IT+S) | VERT |
| |
Lorsqu’un style de caractères autre que NORM (normal) est sélectionné, l’indicateur en dessous de b s’affiche.
• Soulignement/encadrement/arrière-plan
Les réglages suivants sont disponibles :
NON (TEXT) | SOUL. (UNDL) | ARROND (BOX1) |
RUBAN (BOX2) | PLAQUE (BOX3) | VIN (BOX4) |
GRAISE (BOX5) | LOSANG (BOX6) | OBLIQU (BOX7) |
Lorsque le réglage SOUL.(UNDL) est sélectionné, l’indicateur en dessous de cs’affiche. Lorsqu’un réglage autre que NON (TEXT) ou SOUL. (UNDL) est sélectionné, l’indicateur en dessous de ds’affiche. Lorsque le réglage VERT est sélectionné, le réglage de
• Longueur d’étiquette
Lorsque le réglage L: OFF (L OFF) est sélectionné, la longueur de l’étiquette sera ajustée en fonction
de la longueur du texte. Lorsque le réglage L: ON (L ON) est sélectionné, la longueur d’étiquette actuelle s’affiche. Appuyez sur lou rou utilisez les touches de caractères pour spécifier une lon- gueur d’étiquette comprise entre 50 et 300 mm. Appuyez ensuite sur L. Lorsque le réglage L: ON (L ON) est sélectionné, l’indicateur en dessous de ss’affiche.
Retrait du dos de l’étiquette
La
1)Insérez l’étiquette, sa surface imprimée tournée vers le bas, à fond dans le décollant incorporé. (Fig. 9)
2)Repliez l’étiquette de 180° vers la droite (Fig. 10)
3)Sortez vivement l’étiquette vers la droite. L’extrémité du dos se sépare de l’étiquette. (Fig. 11)
Utilisation de la touche de fonctions
Appuyez sur F, puis sur lou rpour sélectionner une des fonctions suivantes. Appuyez ensuite
sur L. | Appuyez sur l, r, ou Fpour sélectionner une taille de caractères, | ||
TAILLE (SIZE) | |||
| puis appuyez sur L. |
|
|
STYLE | Appuyez sur l, r, ou Fpour sélectionner l’un des réglages suivants, | ||
| puis appuyez sur L. |
|
|
| NORM | OMBRE (SHAD) | I+GRAS (IT+B) |
| CONT. (OUTL) | ITAL | I+OMBR (IT+S) |
| GRAS (BOLD) | I+CONT (IT+O) | VERT |
CADRE (FRAME) | Appuyez sur l, r, ou Fpour sélectionner l’un des réglages suivants, | ||
| puis appuyez sur L. |
|
|
| NON (TEXT) | RUBAN (BOX2) | GRAISE (BOX5) |
| SOUL. (UNDL) | PLAQUE (BOX3) | LOSANG (BOX6) |
| ARROND (BOX1) | VIN (BOX4) | OBLIQU (BOX7) |
LONG. (LENGTH) | Appuyez sur l, r, ou Fpour sélectionner l’un des réglages suivants, | ||
| puis appuyez sur L. |
|
|
| L: OFF (L OFF) |
|
|
| L: ON (L ON) Appuyez sur l, r, ou Fou utilisez les touchers de | ||
| caractères pour spécifier la longueur d’étiquette souhaitée. | ||
| Appuyez ensuite sur L. |
| |
EFFACE (CLEAR) | (L’intégralité du texte et des formats sont effacés.) |
| |
DEUTSCH
Mit dem Beschriftungssystem
Übereinstimmungserklärung des Herstellers
Wir BROTHER INDUSTRIES, LTD
bestätigt hiermit, dass das Beschriftungssystem
EMC: | EN 55022 1998 Klasse B | EN 55024 1998 |
und den folgenden Bestimmungen zur elektromagnetischen Verträglichkeit 89/336/EEC (gemäß der Änderung 91/263/EEC und 92/31/EEC) entspricht.
Herausgegeben von: BROTHER INDUSTRIES, LTD.
Personal & Home company Development Dept.
Vorsichtsmaßnahmen/Pflege
•Verwenden Sie zum Reinigen des Gerätes ein trockenes, weiches Tuch.
•Verwenden Sie ausschließlich
•Setzen Sie Gerät und Bandkassetten keinen hohen Temperaturen, hoher Luftfeuchtigkeit oder staubiger Umgebung aus.
•Nehmen Sie die Batterien heraus, wenn Sie das Gerät längere Zeit nicht benutzen möchten.
•Achten Sie darauf die Bandabschneidetaste während des Druckbetriebes oder beim Austau- schen der Schneideeinheit nicht zu berühren.
•Berühren Sie nicht die Klinge in der Schneideeinheit.
•Blockieren Sie nicht den Bandausgabeschlitz. (Fig. 1).
•Achten Sie darauf, dass z. B. Kinder die Bänder nicht in den Mund nehmen.
•Kleben Sie Etiketten nicht auf die Haut.
Batterien einlegen/wechseln
1)Drücken sie auf den genoppten Bereich oben am Gerät, und nehmen Sie die Rückwand ab. (Fig.2).
2)Falls sich eine Schriftbandkassette im Kassettenfach befindet, nehmen Sie diese zunächst heraus.
Lesen Sie hierzu den Abschnitt „Bandkassette einlegen/wechseln“.
3)Falls sich leere Batterien im Batteriefach befinden, nehmen Sie diese heraus.
4)Legen Sie wie abgebildet vier neue
Achten Sie darauf, dass die Pluspole der beiden Batterien an der linken Geräteseite nach vorn gerichtet sind und dass die Pluspole der beiden Batterien an der rechten Geräteseite nach hinten gerichtet sind.
Tauschen Sie stets alle vier Batterien zusammen aus.
5)Legen Sie die Bandkassette ein.
Lesen Sie hierzu den Abschnitt „Bandkassette einlegen/wechseln“.
6)Befestigen Sie die Rückwand, indem Sie die beiden Haken am unteren Ende der Rückwand in die entsprechenden Schlitze an der Unterseite des Geräts einsetzen, und drücken Sie dann die Rückwand fest an, so dass sie hörbar einrastet.
Bandkassette einlegen/wechseln
1)Drücken Sie auf den genoppten Teil oben am Gerät und nehmen Sie die Rückwand ab.
2)Wenn sich bereits eine Schriftbandkassette im Fach befindet, nehmen Sie diese gerade nach oben heraus.
3)Vergewissern Sie sich, dass der Bandanfang der neuen Kassette richtig unter den Bandfüh- rungen liegt. (Fig. 4)
Entfernen Sie den Bandschutz aus Pappe, der sich auf der neuen Bandkassette befindet.
4)Legen Sie die Bandkassette ein, so dass sie hörbar einrastet.
Vergewissern Sie sich, dass die Bandkassette sich zwischen den beiden Führungen im Kas- settenfach befindet. (Fig. 5)
5)Befestigen Sie die Rückwand wieder, indem Sie die beiden Haken am unteren Ende der Rückwand in die Schlitze unten am Gerät einsetzen und dann die Rückwand fest schließen, bis sie hörbar einrastet.(Fig. 6)
Durch das Sichtfenster in der Rückwand des Gerätes lässt sich der jeweilige Bandvorrat leicht überprüfen. Wenn am Ende des gedruckten Etiketts ein grüner Bandabschnitt erscheint, ist das Bandende erreicht.
VORSICHT
•Benutzen Sie nur die unter Zubehör aufgelisteten Bänder. Die folgenden Bandkassetten kön- nen NICHT mit dem
Druckkopf reinigen
Wenn eine oder mehrere horizontale Linien auf dem Etikett erscheinen, hat sich wahrscheinlich Staub auf dem Druckkopf angesammelt. In diesem Fall säubern Sie den Druckkopf wie folgt:
1)Schalten Sie das Gerät aus
2)Drücken Sie auf den genoppten Teil oben am Gerät, entfernen Sie die Rückwand und neh- men Sie die Bandkassette gerade nach oben heraus.
3)Wischen Sie den Druckkopf und die Andruckwalze durch Auf- und Abwärtsbewegungen mit einem trockenen Wattestäbchen ab. (Fig. 7)
4)Legen Sie die Bandkassette wieder ein und befestigen Sie die Rückwand, indem Sie die bei- den Haken am unteren Ende der Rückwand in die Schlitze unten am Gerät einsetzen und dann die Rückwand fest schließen, bis sie hörbar einrastet.
5)Schalten Sie das Gerät wieder ein und drücken Sie R.
6)Falls anschließend immer noch Streifen zu sehen sind, wiederholen Sie den Reinigungsvor- gang mit einem in Isopropylalkohol angefeuchteten Wattestäbchen.
Zubehör
Folgendes Zubehör ist für den PT-55 erhältlich:
Bandkassetten (8 m) | 12 mm | 9 mm |
Schwarze Schrift auf weißem Band | ||
Rote Schrift auf weißem Band | ||
Blaue Schrift auf weißem Band | ||
Schwarze Schrift auf blauem Band | ||
Schwarze Schrift auf gelbem Band | ||
Bandkassetten (4 m) | 12 mm | 9 mm |
|
|
|
Schwarze Schrift auf weißem Band |
Nicht alle Bandfarben und Schriftfarben sind in jedem Land erhältlich.