www.brother.com | USER’S GUIDE |

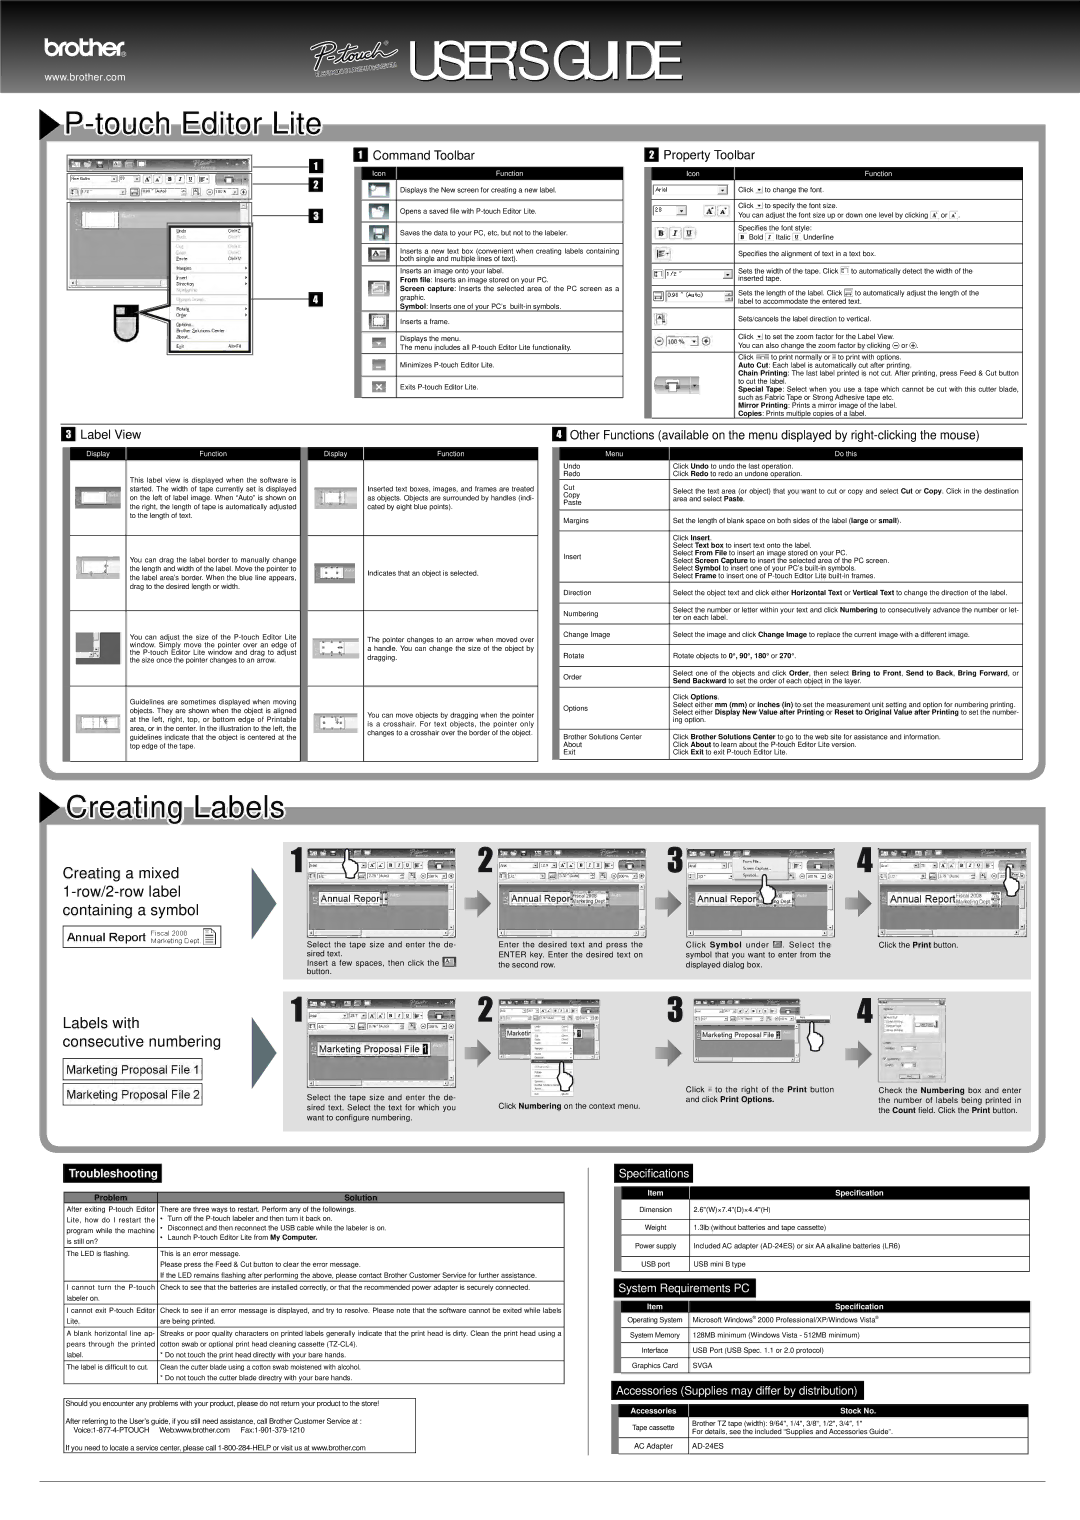
P-touch Editor Lite
 Command Toolbar
Icon | Function |
Displays the New screen for creating a new label.
Opens a saved file with
Saves the data to your PC, etc, but not to the labeler.
Inserts a new text box (convenient when creating labels containing both single and multiple lines of text).
Inserts an image onto your label.
From file: Inserts an image stored on your PC.
Screen capture: Inserts the selected area of the PC screen as a graphic.
Symbol: Inserts one of your PC’s
Inserts a frame.
Displays the menu.
The menu includes all
Minimizes
Exits
 Property Toolbar
Icon | Function |
Click ![]() to change the font.
to change the font.
Click ![]() to specify the font size.
to specify the font size.
You can adjust the font size up or down one level by clicking ![]() or
or ![]() .
.
Specifies the font style:
![]() Bold
Bold ![]() Italic
Italic ![]() Underline
Underline
Specifies the alignment of text in a text box.
Sets the width of the tape. Click ![]() to automatically detect the width of the inserted tape.
to automatically detect the width of the inserted tape.
Sets the length of the label. Click ![]() to automatically adjust the length of the label to accommodate the entered text.
to automatically adjust the length of the label to accommodate the entered text.
Sets/cancels the label direction to vertical.
Click ![]() to set the zoom factor for the Label View.
to set the zoom factor for the Label View.
You can also change the zoom factor by clicking ![]() or
or ![]() .
.
Click ![]() to print normally or
to print normally or ![]() to print with options. Auto Cut: Each label is automatically cut after printing.
to print with options. Auto Cut: Each label is automatically cut after printing.
Chain Printing: The last label printed is not cut. After printing, press Feed & Cut button to cut the label.
Special Tape: Select when you use a tape which cannot be cut with this cutter blade, such as Fabric Tape or Strong Adhesive tape etc.
Mirror Printing: Prints a mirror image of the label.
Copies: Prints multiple copies of a label.
 Label View
Display | Function |
This label view is displayed when the software is started. The width of tape currently set is displayed on the left of label image. When “Auto” is shown on the right, the length of tape is automatically adjusted to the length of text.
You can drag the label border to manually change the length and width of the label. Move the pointer to the label area’s border. When the blue line appears, drag to the desired length or width.
You can adjust the size of the
Guidelines are sometimes displayed when moving objects. They are shown when the object is aligned at the left, right, top, or bottom edge of Printable area, or in the center. In the illustration to the left, the guidelines indicate that the object is centered at the top edge of the tape.
Display | Function |
Inserted text boxes, images, and frames are treated as objects. Objects are surrounded by handles (indi- cated by eight blue points).
Indicates that an object is selected.
The pointer changes to an arrow when moved over a handle. You can change the size of the object by dragging.
You can move objects by dragging when the pointer is a crosshair. For text objects, the pointer only changes to a crosshair over the border of the object.
![]() Other Functions (available on the menu displayed by
Other Functions (available on the menu displayed by
| Menu | Do this |
|
|
|
| Undo | Click Undo to undo the last operation. |
| Redo | Click Redo to redo an undone operation. |
| Cut | Select the text area (or object) that you want to cut or copy and select Cut or Copy. Click in the destination |
| Copy | |
| area and select Paste. | |
| Paste | |
|
| |
|
|
|
| Margins | Set the length of blank space on both sides of the label (large or small). |
|
|
|
|
| Click Insert. |
|
| Select Text box to insert text onto the label. |
| Insert | Select From File to insert an image stored on your PC. |
| Select Screen Capture to insert the selected area of the PC screen. | |
|
| |
|
| Select Symbol to insert one of your PC’s |
|
| Select Frame to insert one of |
| Direction | Select the object text and click either Horizontal Text or Vertical Text to change the direction of the label. |
|
|
|
| Numbering | Select the number or letter within your text and click Numbering to consecutively advance the number or let- |
| ter on each label. | |
|
| |
| Change Image | Select the image and click Change Image to replace the current image with a different image. |
|
|
|
| Rotate | Rotate objects to 0°, 90°, 180° or 270°. |
|
|
|
| Order | Select one of the objects and click Order, then select Bring to Front, Send to Back, Bring Forward, or |
| Send Backward to set the order of each object in the layer. | |
|
| |
|
| Click Options. |
| Options | Select either mm (mm) or inches (in) to set the measurement unit setting and option for numbering printing. |
| Select either Display New Value after Printing or Reset to Original Value after Printing to set the number- | |
|
| |
|
| ing option. |
|
|
|
| Brother Solutions Center | Click Brother Solutions Center to go to the web site for assistance and information. |
| About | Click About to learn about the |
| Exit | Click Exit to exit |
 Creating Labels
Creating a mixed
1-row/2-row label containing a symbol
Select the tape size and enter the de- sired text.
Insert a few spaces, then click the ![]() button.
button.
Enter the desired text and press the ENTER key. Enter the desired text on the second row.
Click Symbol under ![]() . Select theClick the Print button. symbol that you want to enter from the
. Select theClick the Print button. symbol that you want to enter from the
displayed dialog box.
Labels with consecutive numbering
Select the tape size and enter the de-
sired text. Select the text for which youClick Numbering on the context menu. want to configure numbering.
Click ![]() to the right of the Print button and click Print Options.
to the right of the Print button and click Print Options.
Check the Numbering box and enter the number of labels being printed in the Count field. Click the Print button.
Troubleshooting
Problem | Solution |
After exiting | There are three ways to restart. Perform any of the followings. |
Lite, how do I restart the | • Turn off the |
program while the machine | • Disconnect and then reconnect the USB cable while the labeler is on. |
is still on? | • Launch |
| |
|
|
The LED is flashing. | This is an error message. |
| Please press the Feed & Cut button to clear the error message. |
| If the LED remains flashing after performing the above, please contact Brother Customer Service for further assistance. |
Icannot turn the
I cannot exit
Lite. | are being printed. |
A blank horizontal line ap- Streaks or poor quality characters on printed labels generally indicate that the print head is dirty. Clean the print head using a
pears through the printed cotton swab or optional print head cleaning cassette
label. | * Do not touch the print head directly with your bare hands. |
The label is difficult to cut. | Clean the cutter blade using a cotton swab moistened with alcohol. |
| * Do not touch the cutter blade directry with your bare hands. |
Should you encounter any problems with your product, please do not return your product to the store!
After referring to the User’s guide, if you still need assistance, call Brother Customer Service at :
If you need to locate a service center, please call
Specifications
Item | Specification |
Dimension | 2.6"(W)×7.4"(D)×4.4"(H) |
|
|
Weight | 1.3lb (without batteries and tape cassette) |
|
|
Power supply | Included AC adapter |
|
|
USB port | USB mini B type |
|
|
System Requirements PC
| Item | Specification |
| Operating System | Microsoft Windows® 2000 Professional/XP/Windows Vista® |
|
|
|
| System Memory | 128MB minimum (Windows Vista - 512MB minimum) |
|
|
|
| Interface | USB Port (USB Spec. 1.1 or 2.0 protocol) |
|
|
|
| Graphics Card | SVGA |
|
|
|
Accessories (Supplies may differ by distribution)
| Accessories | Stock No. |
| Tape cassette | Brother TZ tape (width): 9/64", 1/4", 3/8", 1/2", 3/4", 1" |
| For details, see the included “Supplies and Accessories Guide”. | |
|
| |
| AC Adapter | |
|
|
|