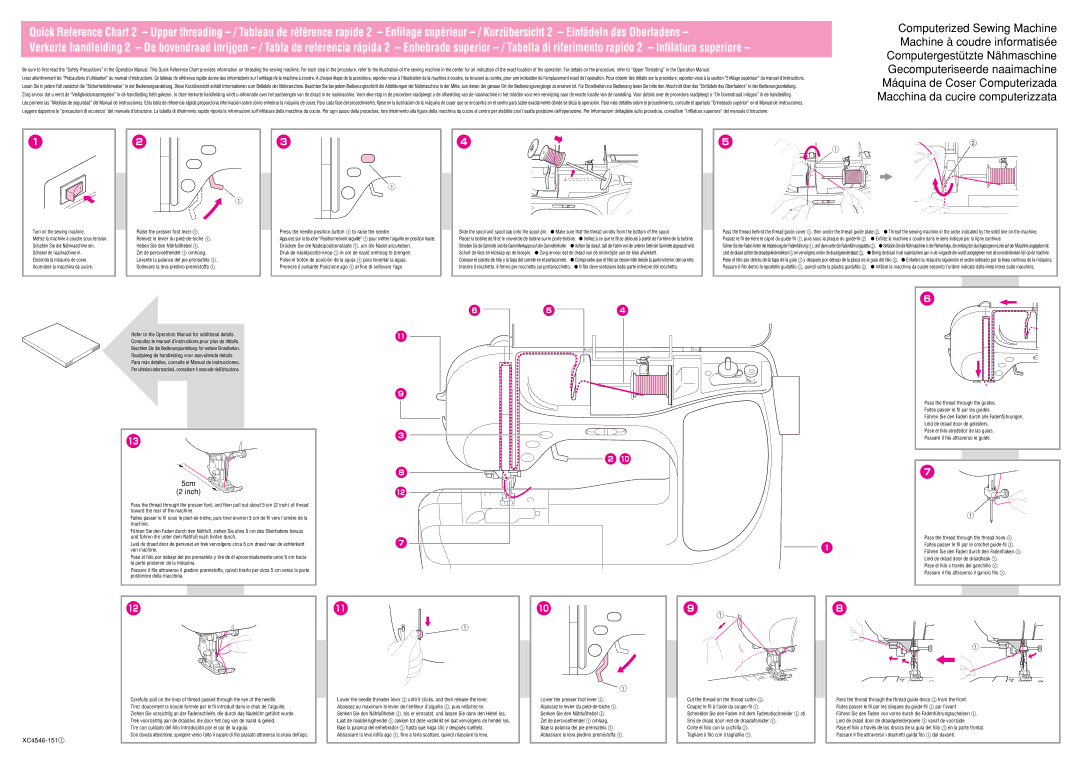
Quick Reference Chart 2 – Upper threading – / Tableau de référence rapide 2 – Enfilage supérieur – / Kurzübersicht 2 – Einfädeln des Oberfadens –

Verkorte handleiding 2 – De bovendraad inrijgen – / Tabla de referencia rápida 2 – Enhebrado superior – / Tabella di riferimento rapido 2 – Infilatura superiore –

Be sure to first read the “Safety Precautions” in the Operation Manual. This Quick Reference Chart provides information on threading the sewing machine. For each step in the procedure, refer to the illustration of the sewing machine in the center for an indication of the exact location of the operation. For details on the procedure, refer to “Upper Threading” in the Operation Manual.

Lisez attentivement les “Précautions d’utilisation” du manuel d’instructions. Ce tableau de référence rapide donne des informations sur l’enfilage de la machine à coudre. A chaque étape de la procédure, reportez-vous à l’illustration de la machine à coudre, se trouvant au centre, pour une indication de l’emplacement exact de l’opération. Pour obtenir des détails sur la procédure, reportez-vous à la section “Enfilage supérieur” du manuel d’instructions. Lesen Sie in jedem Fall zunächst die “Sicherheitshinweise” in der Bedienungsanleitung. Diese Kurzübersicht enhält Informationen zum Befädeln der Nähmaschine. Beachten Sie bei jedem Bedienungsschritt die Abbildungen der Nähmaschine in der Mitte, aus denen der genaue Ort der Bedienungsvorgänge zu ersehen ist. Für Einzelheiten zur Bedienung lesen Sie bitte den Abschnitt über das “Einfädeln des Oberfadens” in der Bedienungsanleitung. Zorg ervoor dat u eerst de “Veiligheidsmaatregelen” in de handleiding hebt gelezen. In deze Verkorte handleiding vindt u informatie over het aanbrengen van de draad in de naaimachine. Voor elke stap in de procedure raadpleegt u de afbeelding van de naaimachine in het midden voor een verwijzing naar de exacte locatie van de handeling. Voor details over de procedure raadpleegt u “De bovendraad inrijgen” in de handleiding.

Lea primero las “Medidas de seguridad” del Manual de Instrucciones. Esta tabla de referencia rápida proporciona información sobre cómo enhebrar la máquina de coser. Para cada fase del procedimiento, fíjese en la ilustración de la máquina de coser que se encuentra en el centro para saber exactamente dónde se sitúa la operación. Para más detalles sobre el procedimiento, consulte el apartado “Enhebrado superior” en el Manual de Instrucciones. Leggere dapprima le “precauzioni di sicurezza” del manuale d’istruzione. La tabella di riferimento rapido riporta le informazioni sull’infilatura della macchina da cucire. Per ogni passo della procedura, fare riferimento alla figura della macchina da cucire al centro per stabilire così l’esatta posizione dell’operazione. Per informazioni dettagliate sulla procedura, consultare “Infilatura superiore” del manuale d’istruzione.

Computerized Sewing Machine Machine à coudre informatisée Computergestützte Nähmaschine Gecomputeriseerde naaimachine Máquina de Coser Computerizada Macchina da cucire computerizzata

1

Turn on the sewing machine.

Mettez la machine à coudre sous tension. Schalten Sie die Nähmaschine ein. Schakel de naaimachine in.

Encienda la máquina de coser. Accendere la macchina da cucire.

2

1

Raise the presser foot lever 1.

Relevez le levier du pied-de-biche 1.

Heben Sie den Nähfußhebel 1.

Zet de persvoethendel 1 omhoog.

Levante la palanca del pie prensatela 1.

Sollevare la leva piedino premistoffa 1.

3

1

Press the needle position button 1 to raise the needle.

Appuyez sur la touche “Positionnement aiguille” 1 pour mettre l’aiguille en position haute. Drücken Sie die Nadelpositionstaste 1, um die Nadel anzuheben.

Druk de naaldpositie-knop 1 in om de naald omhoog te brengen. Pulse el botón de posición de la aguja 1 para levantar la aguja. Premere il pulsante Posizione ago 1 al fine di sollevare l’ago.

4

Slide the spool and spool cap onto the spool pin. Make sure that the thread unrolls from the bottom of the spool.

Placez la bobine de fil et le couvercle de bobine sur le porte-bobine. Veillez à ce que le fil se déroule à partir de l’arrière de la bobine. Schieben Sie die Garnrolle und die Garnrollenkappe auf den Garnrollenhalter. Achten Sie darauf, daß der Faden von der unteren Seite der Garnrolle abgespult wird. Schuif de klos en kloskap op de klospin. Zorg ervoor dat de draad van de onderzijde van de klos afwikkelt.

Coloque el carrete de hilo y la tapa del carrete en el portacarrete. Compruebe que el hilo se desenrolle desde la parte inferior del carrete. Inserire il rocchetto, il fermo per rocchetto sul portarocchetto. Il filo deve srotolarsi dalla parte inferiore del rocchetto.

5

2


1

Pass the thread behind the thread guide cover 1, then under the thread guide plate 2. Thread the sewing machine in the order indicated by the solid line on the machine. Passez le fil derrière le capot du guide-fil 1, puis sous la plaque du guide-fil 2. Enfilez la machine à coudre dans le sens indiqué par la ligne continue.

Führen Sie den Faden hinter die Abdeckung der Fadenführung 1, und dann unter die Fadenführungsplatte 2. Befädeln Sie die Nähmaschine in der Reihenfolge, die entlang der durchgezogenen Linie auf der Maschine angegeben ist. Leid de draad achter de draadgeleiderdeksel 1en vervolgens onder de draadgeleiderplaat 2. Breng de draad in de naaimachine aan in de volgorde die wordt aangegeven met de ononderbroken lijn op de machine. Pase el hilo por detrás de la tapa de la guía 1 y después por debajo de la placa de la guía del hilo 2. Enhebre la máquina siguiendo el orden indicado por la línea continua de la máquina. Passare il filo dietro lo sportello guidafilo 1, quindi sotto la piastra guidafilo 2. Infilare la macchina da cucire secondo l’ordine indicato dalla linea intera sulla macchina.

Refer to the Operation Manual for additional details.

Consultez le manuel d’instructions pour plus de détails.

Beachten Sie die Bedienungsanleitung für weitere Einzelheiten.

Raadpleeg de handleiding voor aanvullende details.

Para más detalles, consulte el Manual de Instrucciones.

Per ulteriori informazioni, consultare il manuale dell’istruzione.

c

5cm

(2 inch)

Pass the thread through the presser foot, and then pull out about 5 cm (2 inch) of thread toward the rear of the machine.

Faites passer le fil sous le pied-de-biche, puis tirez environ 5 cm de fil vers l’arrière de la machine.

Führen Sie den Faden durch den Nähfuß, ziehen Sie etwa 5 cm des Oberfadens heraus und führen ihn unter dem Nähfuß nach hinten durch.

Leid de draad door de persvoet en trek vervolgens circa 5 cm draad naar de achterkant van machine.

Pase el hilo por debajo del pie prensatela y tire de él aproximadamente unos 5 cm hacia la parte posterior de la máquina.

Passare il filo attraverso il piedino premistoffa, quindi tirarlo per circa 5 cm verso la parte posteriore della macchina.

6

a

9

3

8

b

7

5

4

2 0

1

6

Pass the thread through the guides. Faites passer le fil par les guides.

Führen Sie den Faden durch alle Fadenführungen. Leid de draad door de geleiders.

Pase el hilo alrededor de las guías. Passare il filo attraverso le guide.

7

1

Pass the thread through the thread hook 1. Faites passer le fil par le crochet guide-fil 1. Führen Sie den Faden durch den Fadenhaken 1. Leid de draad door de draadhaak 1.

Pase el hilo a través del ganchillo 1. Passare il filo attraverso il gancio filo 1.

XC4546-1511

b

Carefully pull on the loop of thread passed through the eye of the needle. Tirez doucement la boucle formée par le fil introduit dans le chas de l’aiguille. Ziehen Sie vorsichtig an der Fadenschleife, die durch das Nadelöhr geführt wurde. Trek voorzichtig aan de draadlus die door het oog van de naald is geleid.

Tire con cuidado del hilo introducido por el ojo de la aguja.

Con dovuta attenzione, spingere verso l’alto il cappio di filo passato attraverso la cruna dell’ago.

a

1

Lower the needle threader lever 1 until it clicks, and then release the lever. Abaissez au maximum le levier de l’enfileur d’aiguille 1, puis relâchez-le.

Senken Sie den Nähfußhebel 1, bis er einrastet, und lassen Sie dann den Hebel los. Laat de naaldinrijghendel 1 zakken tot deze vastklikt en laat vervolgens de hendel los. Baje la palanca del enhebrador 1 hasta que haga clic y después suéltela.

Abbassare la leva infila ago 1, fino a farla scattare, quindi rilasciare la leva.

0

1

Lower the presser foot lever 1. Abaissez le levier du pied-de-biche 1. Senken Sie den Nähfußhebel 1.

Zet de persvoethendel 1 omlaag. Baje la palanca del pie prensatela 1. Abbassare la leva piedino premistoffa 1.

9 1

Cut the thread on the thread cutter 1. Coupez le fil à l’aide du coupe-fil 1.

Schneiden Sie den Faden mit dem Fadenabschneider 1 ab. Snij de draad door met de draadafsnijder 1.

Corte el hilo con la cuchilla 1. Tagliare il filo con il tagliafilo 1.

8

1

Pass the thread through the thread guide discs 1 from the front.

Faites passer le fil par les disques du guide-fil 1 par l’avant.

Führen Sie den Faden von vorne durch die Fadenführungsscheiben 1.

Leid de draad door de draadgeleiderpoelie 1 vanaf de voorzijde.

Pase el hilo a través de los discos de la guía del hilo 1 en la parte frontal.

Passare il file attraverso i dischetti guida filo 1 dal davanti.

Page 2
Image 2
Brother XC5434-051 operation manual 5cm Inch

XC5434-051 specifications

The Brother XC5434-051 is a versatile sewing machine that caters to a wide array of sewing needs. This model is designed for both novice and experienced sewers, providing a blend of simplicity and advanced features. Its user-friendly interface makes it an ideal choice for those new to sewing, while its robust capabilities will appeal to seasoned crafters.

One of the standout features of the Brother XC5434-051 is its built-in stitch selection. The machine offers a variety of pre-programmed stitches, including utility stitches, decorative stitches, and quilting options. This extensive selection allows users to tackle different projects, whether they are altering clothing or creating intricate patterns on quilts. The easy-to-read stitch guide displayed on the machine helps users quickly choose the appropriate stitch for their project.

The XC5434-051 is equipped with an automatic needle threader, which takes the frustration out of the threading process. This convenient feature ensures that users can spend more time sewing and less time dealing with setup. Additionally, the machine has a top-loading bobbin system that allows for quick and easy bobbin changes, minimizing downtime during sewing.

Another notable characteristic of this model is its adjustable sewing speed. Users can choose a slower speed for precision sewing on delicate fabrics or ramp up the speed for larger, more simple projects. This versatility is especially beneficial for those who may be new to sewing and require more control over their work.

The Brother XC5434-051 also boasts a lightweight design, making it easy to transport for classes or sewing gatherings. Despite its compact size, it does not compromise on stability or performance. The machine's durable construction ensures that it can handle a variety of fabrics, including thick materials like denim and multiple layers for quilting without skipping stitches.

In terms of technology, the XC5434-051 comes with several advanced features. The machine includes a LED work area that illuminates the sewing surface, making it easier to see details, especially when working with dark fabrics. Furthermore, the integrated free arm design facilitates sewing cuffs, collars, and other hard-to-reach areas, providing added convenience for users.

In conclusion, the Brother XC5434-051 is an excellent choice for those interested in sewing, offering a range of features that promote creativity and efficiency. With its built-in stitch options, automatic needle threader, adjustable speed, portability, and durable design, it is poised to meet the needs of a diverse sewing community. Whether for hobbyists or those pursuing sewing as a skill, this machine delivers reliable performance and ease of use.