M A P M E A S U R E R
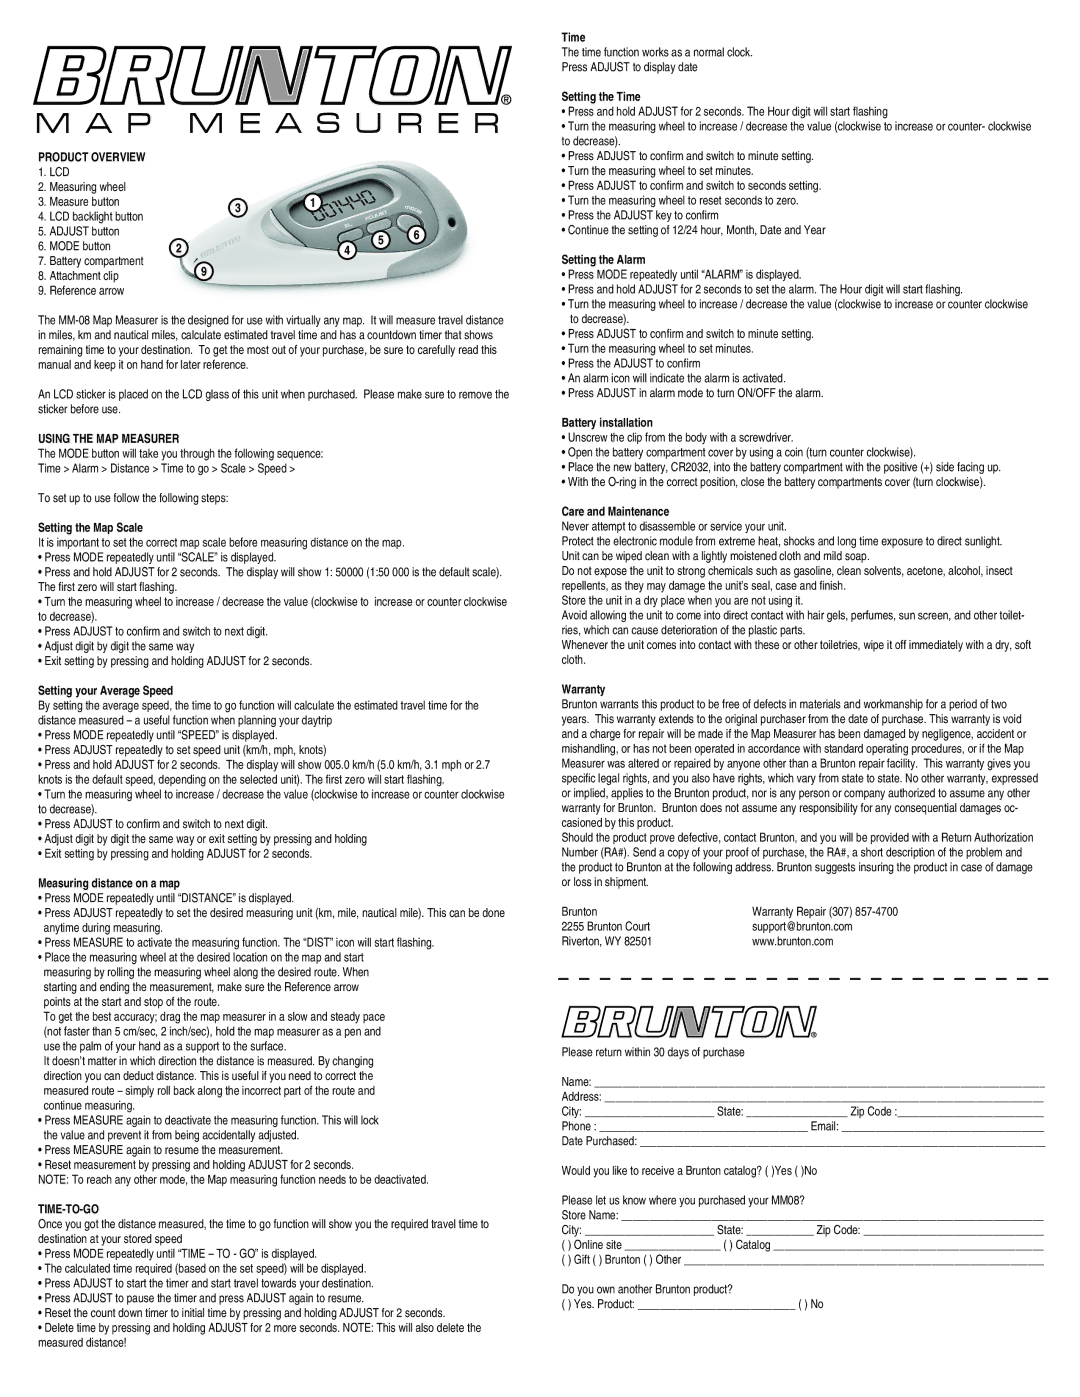
Product overview
1.LCD
2.Measuring wheel
3. Measure button
4.LCD backlight button
5.ADJUST button
6. MODE button
7. Battery compartment
8. Attachment clip
9. Reference arrow
The
An LCD sticker is placed on the LCD glass of this unit when purchased. Please make sure to remove the sticker before use.
Using the Map Measurer
The MODE button will take you through the following sequence:
Time > Alarm > Distance > Time to go > Scale > Speed >
To set up to use follow the following steps:
Setting the Map Scale
It is important to set the correct map scale before measuring distance on the map.
•Press MODE repeatedly until “SCALE” is displayed.
•Press and hold ADJUST for 2 seconds. The display will show 1: 50000 (1:50 000 is the default scale).
The first zero will start flashing.
•Turn the measuring wheel to increase / decrease the value (clockwise to increase or counter clockwise to decrease).
•Press ADJUST to confirm and switch to next digit.
•Adjust digit by digit the same way
•Exit setting by pressing and holding ADJUST for 2 seconds.
Setting your Average Speed
By setting the average speed, the time to go function will calculate the estimated travel time for the distance measured – a useful function when planning your daytrip
•Press MODE repeatedly until “SPEED” is displayed.
•Press ADJUST repeatedly to set speed unit (km/h, mph, knots)
•Press and hold ADJUST for 2 seconds. The display will show 005.0 km/h (5.0 km/h, 3.1 mph or 2.7 knots is the default speed, depending on the selected unit). The first zero will start flashing.
•Turn the measuring wheel to increase / decrease the value (clockwise to increase or counter clockwise to decrease).
•Press ADJUST to confirm and switch to next digit.
•Adjust digit by digit the same way or exit setting by pressing and holding
•Exit setting by pressing and holding ADJUST for 2 seconds.
Measuring distance on a map
•Press MODE repeatedly until “DISTANCE” is displayed.
•Press ADJUST repeatedly to set the desired measuring unit (km, mile, nautical mile). This can be done anytime during measuring.
•Press MEASURE to activate the measuring function. The “DIST” icon will start flashing.
•Place the measuring wheel at the desired location on the map and start measuring by rolling the measuring wheel along the desired route. When starting and ending the measurement, make sure the Reference arrow points at the start and stop of the route.
To get the best accuracy; drag the map measurer in a slow and steady pace
(not faster than 5 cm/sec, 2 inch/sec), hold the map measurer as a pen and use the palm of your hand as a support to the surface.
It doesn’t matter in which direction the distance is measured. By changing direction you can deduct distance. This is useful if you need to correct the measured route – simply roll back along the incorrect part of the route and continue measuring.
•Press MEASURE again to deactivate the measuring function. This will lock the value and prevent it from being accidentally adjusted.
•Press MEASURE again to resume the measurement.
•Reset measurement by pressing and holding ADJUST for 2 seconds.
NOTE: To reach any other mode, the Map measuring function needs to be deactivated.
Time-To-Go
Once you got the distance measured, the time to go function will show you the required travel time to destination at your stored speed
•Press MODE repeatedly until “TIME – TO - GO” is displayed.
•The calculated time required (based on the set speed) will be displayed.
•Press ADJUST to start the timer and start travel towards your destination.
•Press ADJUST to pause the timer and press ADJUST again to resume.
•Reset the count down timer to initial time by pressing and holding ADJUST for 2 seconds.
•Delete time by pressing and holding ADJUST for 2 more seconds. NOTE: This will also delete the measured distance!
Time
The time function works as a normal clock.
Press ADJUST to display date
Setting the Time
•Press and hold ADJUST for 2 seconds. The Hour digit will start flashing
•Turn the measuring wheel to increase / decrease the value (clockwise to increase or counter- clockwise to decrease).
•Press ADJUST to confirm and switch to minute setting.
•Turn the measuring wheel to set minutes.
•Press ADJUST to confirm and switch to seconds setting.
•Turn the measuring wheel to reset seconds to zero.
•Press the ADJUST key to confirm
•Continue the setting of 12/24 hour, Month, Date and Year
Setting the Alarm
•Press MODE repeatedly until “ALARM” is displayed.
•Press and hold ADJUST for 2 seconds to set the alarm. The Hour digit will start flashing.
•Turn the measuring wheel to increase / decrease the value (clockwise to increase or counter clockwise to decrease).
•Press ADJUST to confirm and switch to minute setting.
•Turn the measuring wheel to set minutes.
•Press the ADJUST to confirm
•An alarm icon will indicate the alarm is activated.
•Press ADJUST in alarm mode to turn ON/OFF the alarm.
Battery installation
•Unscrew the clip from the body with a screwdriver.
•Open the battery compartment cover by using a coin (turn counter clockwise).
•Place the new battery, CR2032, into the battery compartment with the positive (+) side facing up.
•With the
Care and Maintenance
Never attempt to disassemble or service your unit.
Protect the electronic module from extreme heat, shocks and long time exposure to direct sunlight. Unit can be wiped clean with a lightly moistened cloth and mild soap.
Do not expose the unit to strong chemicals such as gasoline, clean solvents, acetone, alcohol, insect repellents, as they may damage the unit’s seal, case and finish.
Store the unit in a dry place when you are not using it.
Avoid allowing the unit to come into direct contact with hair gels, perfumes, sun screen, and other toilet- ries, which can cause deterioration of the plastic parts.
Whenever the unit comes into contact with these or other toiletries, wipe it off immediately with a dry, soft cloth.
Warranty
Brunton warrants this product to be free of defects in materials and workmanship for a period of two years. This warranty extends to the original purchaser from the date of purchase. This warranty is void and a charge for repair will be made if the Map Measurer has been damaged by negligence, accident or mishandling, or has not been operated in accordance with standard operating procedures, or if the Map Measurer was altered or repaired by anyone other than a Brunton repair facility. This warranty gives you specific legal rights, and you also have rights, which vary from state to state. No other warranty, expressed or implied, applies to the Brunton product, nor is any person or company authorized to assume any other warranty for Brunton. Brunton does not assume any responsibility for any consequential damages oc- casioned by this product.
Should the product prove defective, contact Brunton, and you will be provided with a Return Authorization Number (RA#). Send a copy of your proof of purchase, the RA#, a short description of the problem and the product to Brunton at the following address. Brunton suggests insuring the product in case of damage or loss in shipment.
Brunton | Warranty Repair (307) |
2255 Brunton Court | support@brunton.com |
Riverton, WY 82501 | www.brunton.com |
Please return within 30 days of purchase
Name: ________________________________________________________________________________
Address: ______________________________________________________________________________
City: _______________________ State: __________________ Zip Code :__________________________
Phone : _____________________________________ Email: ____________________________________
Date Purchased: ________________________________________________________________________
Would you like to receive a Brunton catalog? ( )Yes ( )No
Please let us know where you purchased your MM08?
Store Name: ___________________________________________________________________________
City: _______________________ State: ____________ Zip Code: ________________________________
() Online site _________________ ( ) Catalog ________________________________________________
() Gift ( ) Brunton ( ) Other ________________________________________________________________
Do you own another Brunton product?
( ) Yes. Product: ____________________________ ( ) No