4.From above, insert new bolt through safety strap grommet, tow bar, and
the top of tow bar.) Figure 1
5.To hitch to the bicycle, insert retaining pin from above through hitch and flex connector holes. Close retaining pin.
6.Wrap safety strap around inside of bicycles chain stay twice, and fasten hook to
For use with Burley Classic (Plastic) Hitch
Note: The safety strap included in this kit has a retaining pin, which works with Burley metal hitches. The Classic hitch uses a bolt/nut in place of the retaining pin. A replacement safety strap for the Classic Hitch (Kit # 950067), with the bolt/nut, is available for purchase from your Authorized Burley Dealer or www.burley.com.
1.To remove trailer from bicycle hitch:
a.Unfasten hook on safety strap from
b.Remove shoulder bolt, lock nut and washer from flex connector in end of tow bar, and disconnect trailer tow bar from hitch. Figure 2
2.Remove bolt, safety strap, lock nut and
3.Replace old flex connector with new connector, aligning hole in connector with hole in tow bar.
4.From above,
5.To connect tow bar to Classic Hitch, slide new flex connector between hitch arms and line up holes.
6.From below, insert shoulder bolt through inner grommet on safety strap, flex connector and hitch arms. Install lock nut and tighten securely.
7.Wrap safety strap around inside of chain stay twice, and fasten hook to
Safety Strap![]()
![]()
Lock Nut
Hitch Arms | Shoulder Bolt | |
| ||
|
| |
FIGURE 2: Classic Hitch |
|
|
BU R LEY DES IG N
Copyright © 2008 by Burley Design LLC. “Burley” is a registered trademark of Burley Design LLC : Rev 07/08 : 170137 Hitch Flex Connector Replacement Instructions r0 4020 Stewart Rd. Eugene, OR 97402 : PH 541. 687.1644 800.423. 8445 FAX 541.687.0436 : burley@burley.com : www.burley.com
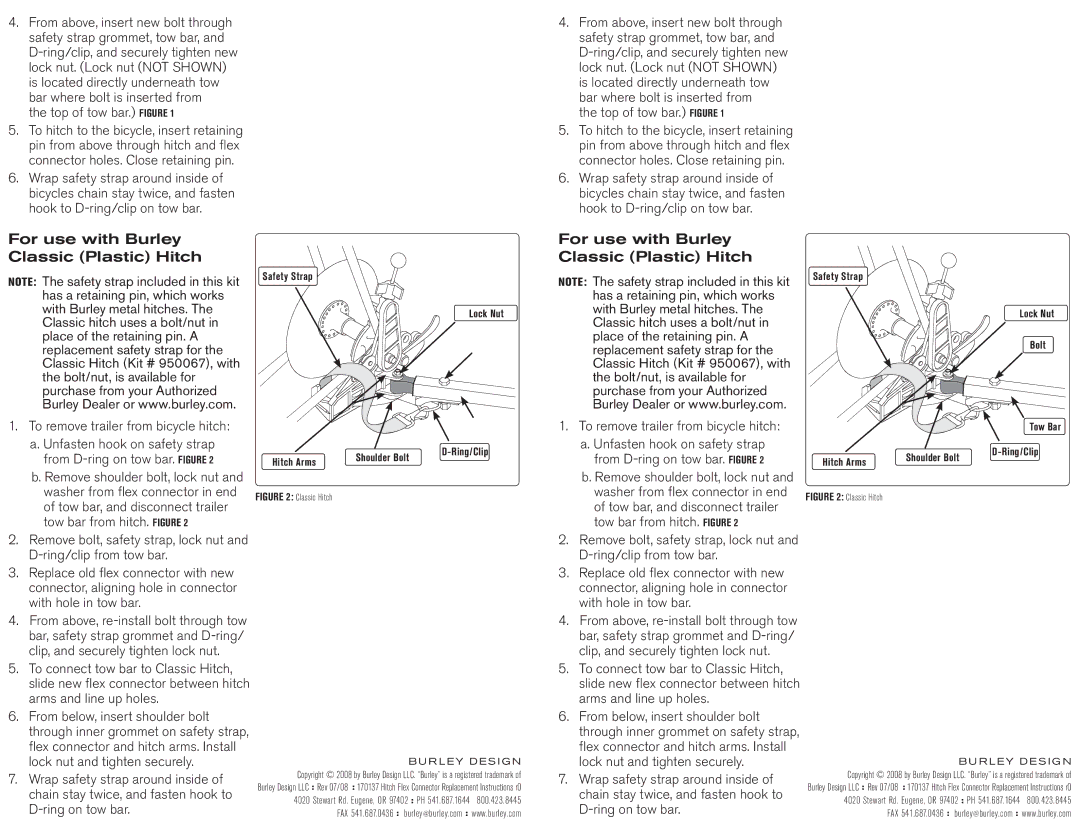
For use with Burley Classic (Plastic) Hitch
Note: The safety strap included in this kit has a retaining pin, which works with Burley metal hitches. The Classic hitch uses a bolt/nut in place of the retaining pin. A replacement safety strap for the Classic Hitch (Kit # 950067), with the bolt/nut, is available for purchase from your Authorized Burley Dealer or www.burley.com.
1.To remove trailer from bicycle hitch:
a.Unfasten hook on safety strap from
b.Remove shoulder bolt, lock nut and washer from flex connector in end of tow bar, and disconnect trailer tow bar from hitch. Figure 2
2.Remove bolt, safety strap, lock nut and
3.Replace old flex connector with new connector, aligning hole in connector with hole in tow bar.
4.From above,
5.To connect tow bar to Classic Hitch, slide new flex connector between hitch arms and line up holes.
6.From below, insert shoulder bolt through inner grommet on safety strap, flex connector and hitch arms. Install lock nut and tighten securely.
7.Wrap safety strap around inside of chain stay twice, and fasten hook to
Safety Strap![]()
![]()
Lock Nut
Bolt
Tow Bar
Hitch Arms | Shoulder Bolt | |
| ||
|
| |
FIGURE 2: Classic Hitch |
|
|
BU R LEY DES IG N
Copyright © 2008 by Burley Design LLC. “Burley” is a registered trademark of Burley Design LLC : Rev 07/08 : 170137 Hitch Flex Connector Replacement Instructions r0 4020 Stewart Rd. Eugene, OR 97402 : PH 541. 687.1644 800.423. 8445 FAX 541.687.0436 : burley@burley.com : www.burley.com