| COMPONENT LIST |
|
DIAGRAM | PART | PART NO. |
NUMBER | DESCRIPTION | NUMBER |
1 | Cutting Blade (2) | |
2 | Spin Tester Assembly (2) | |
3 | Shaft Position Bracket | |
4 | Measuring Tape |
ARROW SAW BLADE REPLACEMENT
![]() WARNING! Before cleaning, assembling or disassembling the Arrow Saw, make sure it is turned OFF and the PLUG IS REMOVED FROM THE OUTLET/POWER SOURCE!
WARNING! Before cleaning, assembling or disassembling the Arrow Saw, make sure it is turned OFF and the PLUG IS REMOVED FROM THE OUTLET/POWER SOURCE!
Your Arrow Saw comes complete with two, reinforced Cutting Blades. These Cutting Blades are ideal for cutting both carbon and aluminum arrow shafts. To order replacement Cutting Blades, contact Customer Service at the telephone number listed on the back of this manual.
5 | Socket Head Cap Screw | |
6 | Power Cord | N/A |
7 | On/Off Switch | N/A |
8 | Dust Collector | |
9 | Dust Collector Bracket | |
10 | Thumb Screw (2) | |
11 | Small | |
12 | Large | |
13 | Arrow Shaft Guide | |
14 | Electric Motor 8000 RPM | |
15 | Rubber Feet | |
16 | Wrench Kit | |
17 | Blade Mounting Bracket Assembly | |
| 17a Blade Spacer |
|
| 17b Blade Retaining Nut |
|
Before beginning the assembly, check the package contents for all of the parts.
If you are missing any parts, or if any parts are damaged, contact
Cabela’s Customer Service- Retail Store Purchases
Catalog & Internet Purchases:
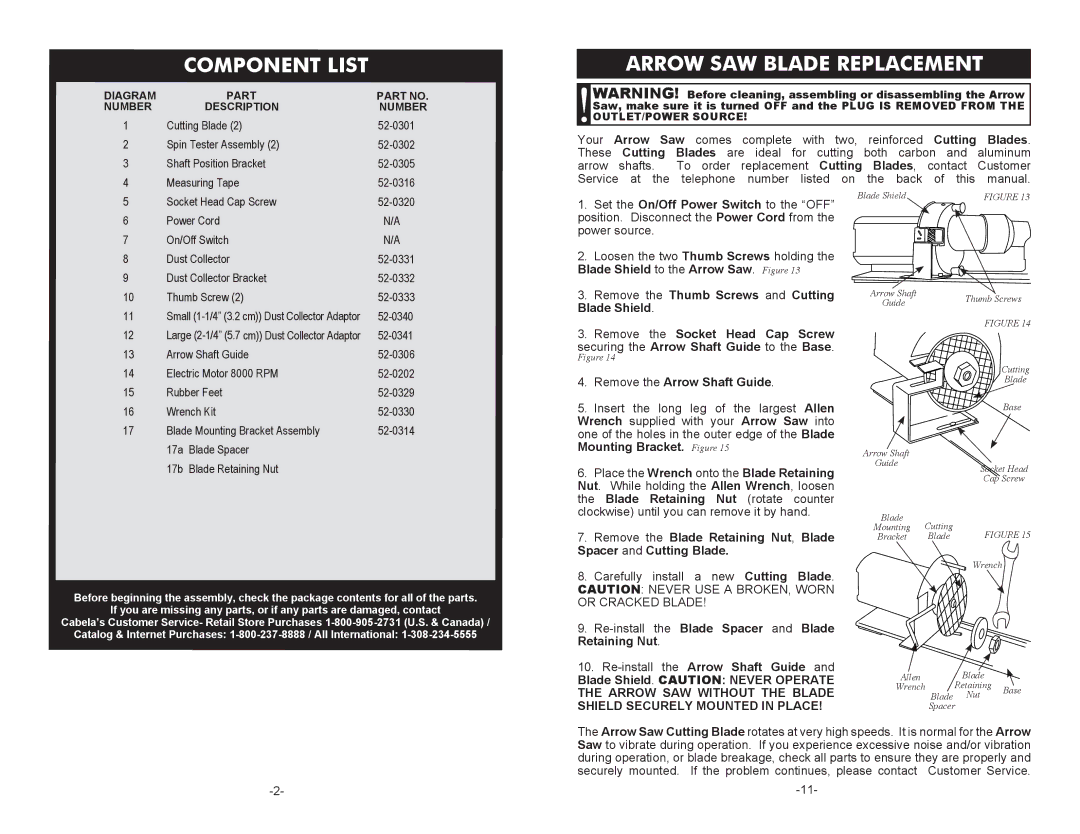
1.Set the On/Off Power Switch to the “OFF” position. Disconnect the Power Cord from the power source.
2.Loosen the two Thumb Screws holding the Blade Shield to the Arrow Saw. Figure 13
3.Remove the Thumb Screws and Cutting Blade Shield.
3.Remove the Socket Head Cap Screw securing the Arrow Shaft Guide to the Base.
Figure 14
4. | Remove the Arrow Shaft Guide. |
5. | Insert the long leg of the largest Allen |
Wrench supplied with your Arrow Saw into | |
one of the holes in the outer edge of the Blade | |
Mounting Bracket. Figure 15 | |
6. | Place the Wrench onto the Blade Retaining |
Nut. While holding the Allen Wrench, loosen | |
the Blade Retaining Nut (rotate counter | |
clockwise) until you can remove it by hand. | |
7. | Remove the Blade Retaining Nut, Blade |
Spacer and Cutting Blade. | |
8. | Carefully install a new Cutting Blade. |
CAUTION: NEVER USE A BROKEN, WORN | |
OR CRACKED BLADE! | |
9. | |
Retaining Nut. | |
10. | |
Blade Shield
Arrow Shaft
Guide
Arrow Shaft
Guide
Blade
Mounting Cutting
Bracket Blade
FIGURE 13
Thumb Screws
FIGURE 14
Cutting
Blade
Base
Socket Head
Cap Screw
FIGURE 15
Wrench
Blade Shield. CAUTION: NEVER OPERATE |
THE ARROW SAW WITHOUT THE BLADE |
SHIELD SECURELY MOUNTED IN PLACE! |
Allen | Blade |
| |
Wrench | Retaining | Base | |
Blade | Nut | ||
|
Spacer
The Arrow Saw Cutting Blade rotates at very high speeds. It is normal for the Arrow Saw to vibrate during operation. If you experience excessive noise and/or vibration during operation, or blade breakage, check all parts to ensure they are properly and securely mounted. If the problem continues, please contact Customer Service.
