![]() Rear Leg
Rear Leg
This is a UL Listed appliance. The following important safeguards are recommended by most portable appliance manufacturers.
IMPORTANT SAFEGUARDS
To reduce the risk of personal injury or property damage when using electrical appliances, basic safety precautions should always be followed, including the following:
1.READ ALL INSTRUCTIONS.
2.Do not touch hot surfaces. Use handles. Use hot mitts or potholders.
3.To protect against electrical shock, do not immerse unit base, cord or plug in water or other liquid.
4.Close supervision is necessary when any appliance is used by or near children.
5.Unplug from outlet when not in use and before cleaning. Allow to cool before putting on or taking off parts, and before cleaning the appliance.
6.Do not operate any appliance with a damaged cord or plug or after the appliance malfunctions or has been damaged in any manner.
Contact the Cadco Factory Service Department at (860)
for examination, repair or adjustment. In Canada call (905)
7.The use of accessory attachments not recommended by the appliance manufacturer may cause injuries.
8.Do not use outdoors.
9.Do not let cord hang over edge of table or counter or touch hot surfaces.
10.Do not place on or near a hot gas or electric burner or in a heated oven.
11.It is recommended that this appliance not be moved when it contains hot oil or other hot liquid.
12.ALLOW GREASE TRAY TO COOL COMPLETELY BEFORE REMOVING.
13.To disconnect, turn heat control to "OFF", push power rocker switch to OFF, then remove plug from wall outlet
14.Do not use appliance for other than intended use.
SAVE THESE INSTRUCTIONS
CAUTION: For safety's sake, when using
NOTE: A short power supply cord (or cord set) has been provided to reduce the hazards resulting from becoming entangled in or tripping over a longer cord. Longer cord sets or extension cords may be used if care is properly exercised in their use. If a long cord set or extension cord is used, the marked electrical rating of the cord set or extension cord should be at least as great as the electrical rating of the appliance. The longer cord should be arranged so that it will not drape over the counter top or table top where it can be pulled on by children or tripped over accidentally.
ASSEMBLY
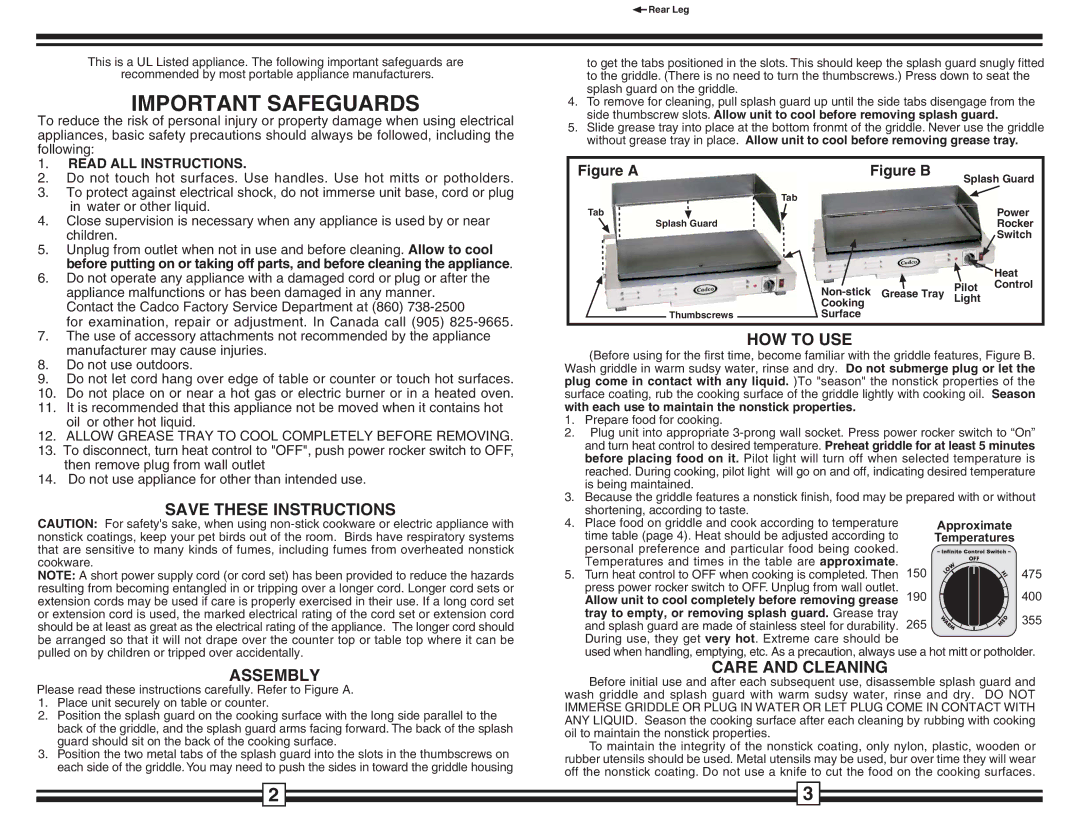
Please read these instructions carefully. Refer to Figure A.
1.Place unit securely on table or counter.
2.Position the splash guard on the cooking surface with the long side parallel to the back of the griddle, and the splash guard arms facing forward. The back of the splash guard should sit on the back of the cooking surface.
3.Position the two metal tabs of the splash guard into the slots in the thumbscrews on each side of the griddle. You may need to push the sides in toward the griddle housing
2
to get the tabs positioned in the slots. This should keep the splash guard snugly fitted to the griddle. (There is no need to turn the thumbscrews.) Press down to seat the splash guard on the griddle.
4.To remove for cleaning, pull splash guard up until the side tabs disengage from the side thumbscrew slots. Allow unit to cool before removing splash guard.
5.Slide grease tray into place at the bottom fronmt of the griddle. Never use the griddle without grease tray in place. Allow unit to cool before removing grease tray.
Figure A | Figure B | Splash Guard | |
|
| ||
| Tab |
|
|
Tab |
|
| Power |
Splash Guard |
|
| Rocker |
|
|
| Switch |
|
|
| Heat |
| Pilot | Control | |
|
| ||
| Cooking | Light |
|
Thumbscrews | Surface |
|
|
|
|
|
|
HOW TO USE
(Before using for the first time, become familiar with the griddle features, Figure B. Wash griddle in warm sudsy water, rinse and dry. Do not submerge plug or let the plug come in contact with any liquid. )To "season" the nonstick properties of the surface coating, rub the cooking surface of the griddle lightly with cooking oil. Season
with each use to maintain the nonstick properties.
1.Prepare food for cooking.
2.Plug unit into appropriate
3.Because the griddle features a nonstick finish, food may be prepared with or without shortening, according to taste.
4. | Place food on griddle and cook according to temperature |
| Approximate |
| time table (page 4). Heat should be adjusted according to |
| Temperatures |
| personal preference and particular food being cooked. |
|
|
| Temperatures and times in the table are approximate. | 150 | 475 |
5. | Turn heat control to OFF when cooking is completed. Then | ||
| press power rocker switch to OFF. Unplug from wall outlet. | 190 | 400 |
| Allow unit to cool completely before removing grease |
tray to empty, or removing splash guard. Grease tray | 355 | |
and splash guard are made of stainless steel for durability. 265 | ||
| ||
During use, they get very hot. Extreme care should be |
|
used when handling, emptying, etc. As a precaution, always use a hot mitt or potholder.
CARE AND CLEANING
Before initial use and after each subsequent use, disassemble splash guard and wash griddle and splash guard with warm sudsy water, rinse and dry. DO NOT IMMERSE GRIDDLE OR PLUG IN WATER OR LET PLUG COME IN CONTACT WITH ANY LIQUID. Season the cooking surface after each cleaning by rubbing with cooking oil to maintain the nonstick properties.
To maintain the integrity of the nonstick coating, only nylon, plastic, wooden or rubber utensils should be used. Metal utensils may be used, bur over time they will wear off the nonstick coating. Do not use a knife to cut the food on the cooking surfaces.
3