Operating Instructions
Cargador de batería
Reading the Ammeter
The ammeter on this charger indicates the current (amperage) that the battery is drawing from the charger. The current draw will depend on the charge in the battery and not necessarily match the setting. As the charge in the battery increases, the current draw decreases.
Charge Complete LED
The 2A 12V and 10A 12V settings on this battery charger feature an automatic charging technology that senses when the battery has reached full charge. Once the battery is fully charged, the charger discontinues charging and the green Charge Complete LED turns on. This feature does not work on the 10A 6V setting.
Reverse Polarity
Switching
This charger detects the polarity of the leads when it is connected to the battery and, if necessary, automatically reverses polarity to match the battery. This charger also has built in short circuit protection and will not turn on unless it detects a voltage drop across the battery terminals.
Charging Instructions
1. Locate battery charger in a safe place |
away from the battery, according to the |
instructions in the Charger Location |
section. |
2. Make sure the Selector Knob is turned |
in the DC CONNECTION PRECAUTIONS section.
4.Plug in the AC power cord. Refer to the GROUNDING AND AC POWER CORD CONNECTION INSTRUCTIONS section for information on proper grounding. Note: If an extension cord is needed, follow the instructions in note 5 in the GENERAL BATTERY SAFETY section.
5.For 12 volt batteries:
a. Turn the Selector Knob to the 2A or 10A setting.
b. Once the Charge Complete LED turns on, turn the Selector Knob to the OFF position.
6. For 6 volt batteries:
a. Turn the Selector Knob to the 10A 6V setting.
b. Closely monitor ammeter during charging. Turn the Selector Knob to the OFF position once the battery is charged.
7.Disconnect the AC power cord.
8.Disconnect the battery clips.
Using the Engine Assist
Note: For best results, charge battery for one (1) – three (3) minutes before using the engine assist.
1. Locate battery charger in a safe place |
away from the battery, according to the |
instructions in the Charger Location |
section. |
2. Make sure the Selector Knob is turned |
to the OFF position. |
3. Connect the battery clips to the |
battery, making sure to follow all the |
instructions in the DC CONNECTION |
CONNECTION INSTRUCTIONS section for information on proper grounding.
5.Note: If an extension cord is needed, follow the instructions in note 5 in the GENERAL BATTERY SAFETY section.
6.Turn the Selector Knob to the 55A Engine Assist setting.
7.Immediately crank the engine for three (3) seconds or until it starts.
8.If the engine fails to start, switch Selector Knob to 10A charge rate and charge battery for another three (3) minutes before trying again.
9.Once the engine has started, turn Selector Knob to the OFF position.
10.Disconnect the AC power cord.
11.Disconnect the battery clips.
Maintenance Instructions
After each use, clean the battery charger clips to remove any battery fluid that will cause corrosion of the clips.
Clean the outside case with a soft cloth and, if necessary, mild soap solution. Do not use any solvents on the case.
Keep the charger cords loosely coiled during storage to prevent damage to the cords. Do not use the charger if the cords or clips have been damaged in any way. This battery charger does not have any user serviceable parts.
Storage Instructions
Store battery charger in a dry area.
UBICACIÓN DEL
CARGADOR
1.Ubique el cargador lo más lejos posible de la batería como lo permitan los cables de CC.
2.Nunca coloque el cargador directamente encima de la batería a cargar; los gases de la batería corroerán y dañarán el cargador.
3.Nunca deje que el ácido de la batería gotee sobre el cargador cuando esté leyendo la gravedad o llenando la batería.
4.No haga funcionar el cargador en un área cerrada ni limite la ventilación en forma alguna.
5.No coloque la batería sobre el cargador.
PRECAUCIONES DE LA CONEXIÓN DE CC
1.Conecte y desconecte las pinzas para batería de CC únicamente después de colocar la Perilla de Selección en la posición de apagado (OFF) y de quitar el cable de CA del tomacorriente.
2.Nunca deje que las pinzas para batería se toquen entre sí.
SIGA ESTOS PASOS CUANDO LA BATERÍA ESTÉ INSTALADA EN EL VEHÍCULO. UNA CHISPA CERCA DE LA BATERÍA PUEDE CAUSAR LA EXPLOSIÓN DE LA MISMA. PARA REDUCIR EL RIESGO DE CHISPAS CERCA DE LA BATERÍA:
a)coloque los cables de CC y CA de modo de reducir el riesgo de daños causados por el capó, la puerta o una pieza móvil del motor;
b)manténgase alejado de las paletas de ventiladores, correas, poleas y otras piezas que pueden causar lesiones a las personas;
c)verifique la polaridad de los bornes de la batería. El borne POSITIVO (POS, P, +) generalmente tiene un diámetro mayor que el borne NEGATIVO (NEG, N,
d)determine qué borne de la batería está conectado a tierra a través del chasis. Si el borne negativo está conectado a tierra a través del chasis (como en la mayoría de los vehículos), consulte (e). Si el borne positivo está conectado a tierra a través del chasis, consulte (f);
e)para los vehículos con conexión a tierra negativa, conecte la pinza POSITIVA (ROJA) desde el cargador de batería al borne POSITIVO (POS, P, +) de la batería sin conexión a tierra. Conecte la pinza NEGATIVA (NEGRA) al borne NEGATIVO (NEG, N,
e)para los vehículos con conexión a tierra positiva, conecte la pinza NEGATIVA (NEGRA) desde el cargador de batería al borne NEGATIVO (NEG, N,
g)cuando desconecte el cargador, gire la Perilla de Selección a la posición de apagado, desconecte el cable de CA, retire la pinza del borne de la batería conectado a tierra y luego retire la pinza del terminal de la batería sin conexión a tierra.
SIGA ESTOS PASOS CUANDO LA BATERÍA ESTÉ FUERA DEL VEHÍCULO. UNA CHISPA CERCA DE LA BATERÍA PUEDE CAUSAR LA EXPLOSIÓN DE LA MISMA. PARA REDUCIR EL RIESGO DE CHISPAS CERCA DE LA BATERÍA:
a)verifique la polaridad de los bornes de la batería. El borne POSITIVO (POS, P, +) generalmente tiene un diámetro mayor que el borne NEGATIVO (NEG, N,
b)conecte la pinza POSITIVA (ROJA) del cargador al borne POSITIVO (POS, P, +) de la batería.
c)Conecte la pinza NEGATIVA (NEGRA) del cargador al borne NEGATIVO (NEG, N,
d)no se pare frente a la batería cuando haga la conexión final;
e)cuando desconecte el cargador, siempre hágalo en la secuencia inversa al procedimiento de conexión;
f)una batería marina (para botes) se debe retirar y cargar en tierra. Para cargarla a bordo se requiere equipo diseñado especialmente para uso marino.
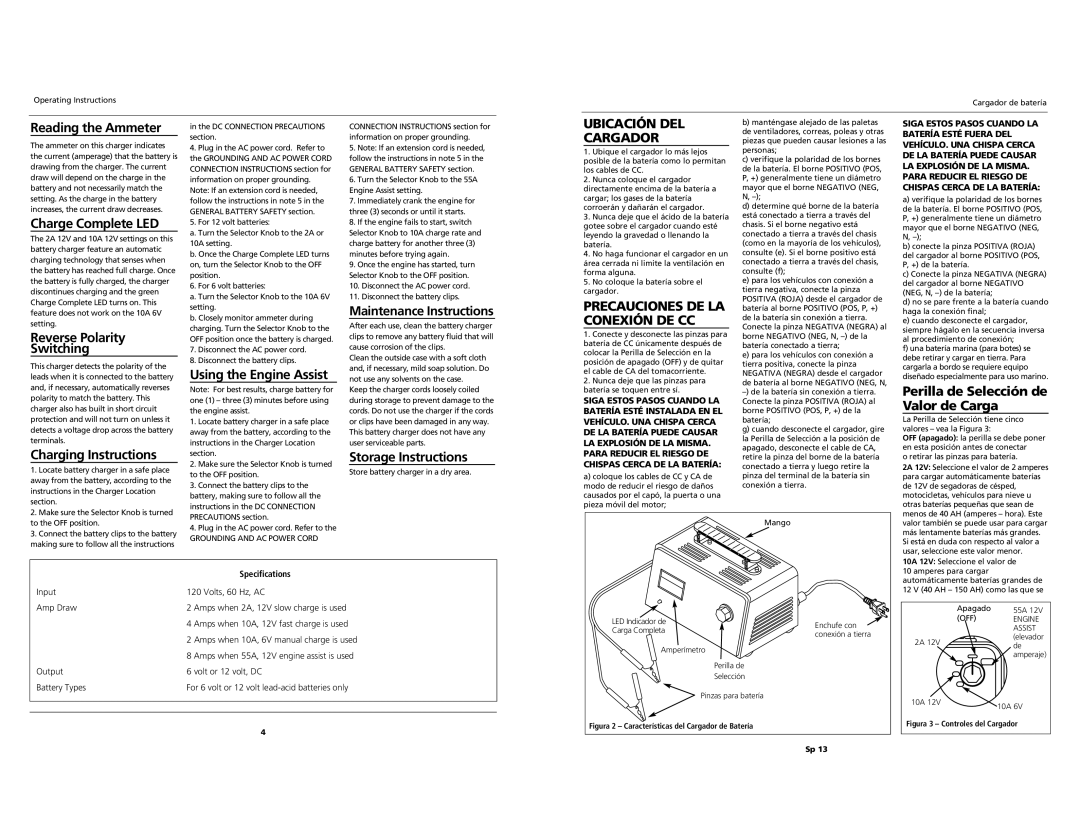
Perilla de Selección de Valor de Carga
La Perilla de Selección tiene cinco valores – vea la Figura 3:
OFF (apagado): la perilla se debe poner en esta posición antes de conectar
o retirar las pinzas para batería.
2A 12V: Seleccione el valor de 2 amperes para cargar automáticamente baterías de 12V de segadoras de césped, motocicletas, vehículos para nieve u otras baterías pequeñas que sean de
to the OFF position. |
3. Connect the battery clips to the battery |
making sure to follow all the instructions |
PRECAUTIONS section. |
4. Plug in the AC power cord. Refer to the |
GROUNDING AND AC POWER CORD |
Mango |
menos de 40 AH (amperes – hora). Este valor también se puede usar para cargar más lentamente baterías más grandes. Si está en duda con respecto al valor a usar, seleccione este valor menor.
|
| Specifications |
Input | 120 Volts, 60 Hz, AC | |
Amp Draw | 2 | Amps when 2A, 12V slow charge is used |
| 4 | Amps when 10A, 12V fast charge is used |
| 2 Amps when 10A, 6V manual charge is used | |
| 8 | Amps when 55A, 12V engine assist is used |
Output | 6 volt or 12 volt, DC | |
Battery Types | For 6 volt or 12 volt | |
|
|
|
|
|
|
|
| 4 |
LED Indicador de | Enchufe con | |
Carga Completa | ||
conexión a tierra | ||
| ||
Amperímetro |
| |
Perilla de |
| |
Selección |
| |
Pinzas para batería |
| |
Figura 2 – Características del Cargador de Batería |
|
10A 12V: Seleccione el valor de
10 amperes para cargar automáticamente baterías grandes de 12 V (40 AH – 150 AH) como las que se
Apagado | 55A 12V | |
(OFF) | ENGINE | |
| ASSIST | |
2A 12V | (elevador | |
de | ||
| ||
| amperaje) | |
10A 12V | 10A 6V | |
|
Figura 3 – Controles del Cargador
Sp 13