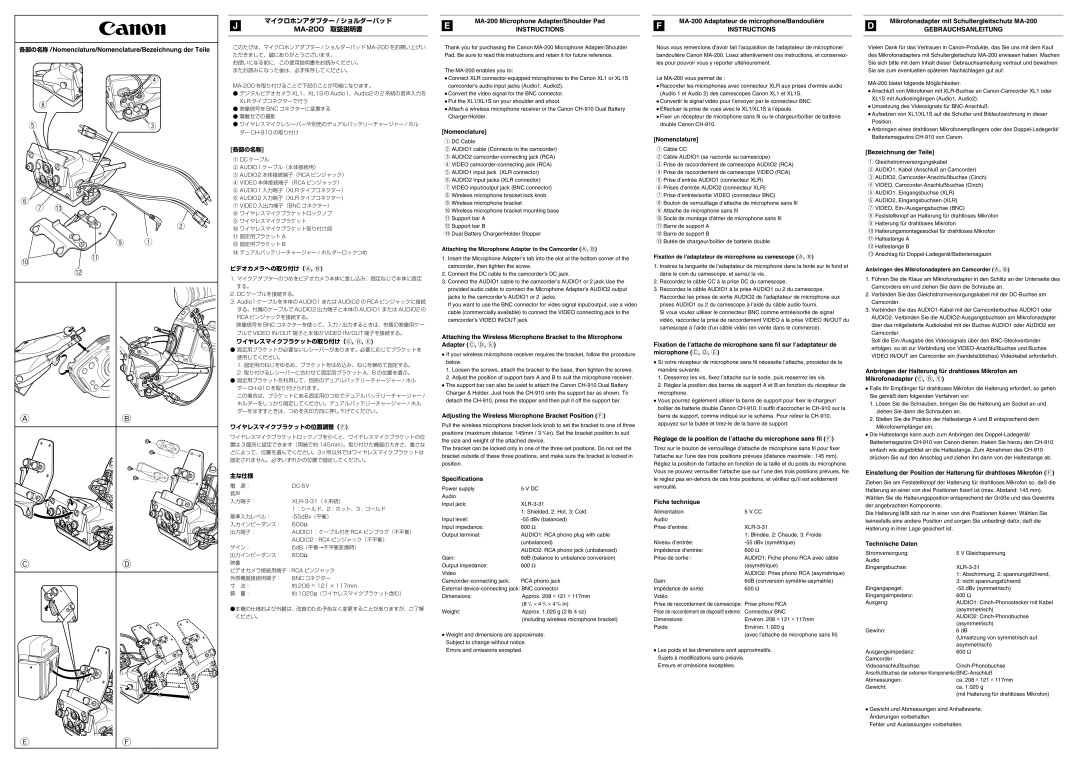
各部の名称 /Nomenclature/Nomenclature/Bezeichnung der Teile |
| r |
i | |
t | e |
y | |
u | !3 |
| w |
| o q |
!0 | !1 |
|
| !2 |
A | B |
C | D |
E | F |
このたびは、マイクロホンアダプター / ショルダーパッド MA-200をお買い上げい ただきまして、誠にありがとうございます。
お使いになる前に、この使用説明書をお読みください。 またお読みになった後は、必ず保存してください。
MA-200を取り付けることで下記のことが可能になります。
●デジタルビデオカメラ XL1、XL1S の Audio1、Audio2 の 2 系統の音声入力を XLR タイプコネクターで行う
●映像信号を BNC コネクターに変換する
●肩載せでの撮影
●ワイヤレスマイクレシーバーや別売のデュアルバッテリーチャージャー / ホル ダー CH-910の取り付け
[各部の名称]
qDC ケーブル
wAUDIO1 ケーブル(本体接続用)
eAUDIO2 本体接続端子(RCA ピンジャック) r VIDEO 本体接続端子(RCA ピンジャック) t AUDIO1 入力端子(XLR タイプコネクター) y AUDIO2 入力端子(XLR タイプコネクター) u VIDEO 入出力端子(BNC コネクター)
i ワイヤレスマイクブラケットロックノブ o ワイヤレスマイクブラケット !0ワイヤレスマイクブラケット取り付け部 !1固定用ブラケット A !2固定用ブラケット B
!3デュアルバッテリーチャージャー / ホルダーロックつめ
ビデオカメラへの取り付け(A, B)
1.マイクアダプターのつめをビデオカメラ本体に差し込み、固定ねじで本体に固定 する。
2.DC ケーブルを接続する。
3.Audio1 ケーブルを本体の AUDIO1 または AUDIO2 の RCA ピンジャックに接続 する。付属のケーブルで AUDIO2 出力端子と本体の AUDIO1 または AUDIO2 の RCA ピンジャックを接続する。
映像信号を BNC コネクターを使って、入力 / 出力するときは、市販の映像用ケー ブルで VIDEO IN/OUT 端子と本体の VIDEO IN/OUT 端子を接続する。
ワイヤレスマイクブラケットの取り付け(C, D, E)
●固定用ブラケットが必要ないレシーバーがあります。必要に応じてブラケットを 使用してください。
1.固定用のねじをゆるめ、ブラケットをはめ込み、ねじを締めて固定する。
2.取り付けるレシーバーに合わせて固定用ブラケット A、B の位置を選ぶ。
●固定用ブラケットを利用して、別売のデュアルバッテリーチャージャー / ホル ダー CH-910を取り付けられます。
この場合は、ブラケットにある固定用のつめでデュアルバッテリーチャージャー / ホルダーをしっかり固定してください。デュアルバッテリーチャージャー / ホル ダーをはずすときは、つめを矢印方向に押し下げてください。
ワイヤレスマイクブラケットの位置調整(F)
ワイヤレスマイクブラケットロックノブを引くと、ワイヤレスマイクブラケットの位 置は 3 箇所に設定できます(両端で約 145mm)。取り付けた機器の大きさ、重さな どによって、位置を選んでください。3ヶ所以外ではワイヤレスマイクブラケットは 固定されません。必ずいずれかの位置で固定してください。
主な仕様
電 | 源: | DC-5V |
音声 | | |
入力端子: | XLR-3-31(4系統) |
| | 1:シールド、2:ホット、3:コールド |
基準入力レベル: | -55dBv(平衡) |
入力インピーダンス: | 600Ω |
出力端子: | AUDIO1:ケーブル付き RCA ピンプラグ(不平衡) |
| | AUDIO2:RCA ピンジャック(不平衡) |
ゲイン: | 6dB(平衡→不平衡変換時) |
出力インピーダンス: | 600Ω |
映像 | | |
ビデオカメラ接続用端子:RCA ピンジャック |
外部機器接続用端子: | BNC コネクター |
寸 | 法: | 約 208 × 121 × 117mm |
質 | 量: | 約 1020g(ワイヤレスマイクブラケット含む) |
●本機の仕様および外観は、改良のため予告なく変更することがありますが、ご了解 ください。
Thank you for purchasing the Canon MA-200 Microphone Adapter/Shoulder Pad. Be sure to read this instructions and retain it for future reference.
The MA-200 enables you to:
●Connect XLR connector-equipped microphones to the Canon XL1 or XL1S camcorder's audio input jacks (Audio1, Audio2).
●Convert the video signal for the BNC connector.
●Put the XL1/XL1S on your shoulder and shoot.
●Attach a wireless microphone receiver or the Canon CH-910 Dual Battery Charger/Holder.
[Nomenclature]
qDC Cable
wAUDIO1 cable (Connects to the camcorder) e AUDIO2 camcorder-connecting jack (RCA) r VIDEO camcorder-connecting jack (RCA) t AUDIO1 input jack (XLR connector)
y AUDIO2 Input jacks (XLR connector)
u VIDEO input/output jack (BNC connector) i Wireless microphone bracket lock knob o Wireless microphone bracket !0Wireless microphone bracket mounting base !1Support bar A
!2Support bar B
!3Dual Battery Charger/Holder Stopper
Attaching the Microphone Adapter to the Camcorder (A, B)
1.Insert the Microphone Adapter’s tab into the slot at the bottom corner of the camcorder, then tighten the screw.
2.Connect the DC cable to the camcorder’s DC jack.
3.Connect the AUDIO1 cable to the camcorder’s AUDIO1 or 2 jack.Use the provided audio cable to connect the Microphone Adapter’s AUDIO2 output jacks to the camcorder’s AUDIO1 or 2 jacks.
If you want to use the BNC connector for video signal input/output, use a video cable (commercially available) to connect the VIDEO connecting jack to the camcorder’s VIDEO IN/OUT jack.
Attaching the Wireless Microphone Bracket to the Microphone Adapter (C, D, E)
●If your wireless microphone receiver requires the bracket, follow the procedure below.
1.Loosen the screws, attach the bracket to the base, then tighten the screws.
2.Adjust the position of support bars A and B to suit the microphone receiver.
●The support bar can also be used to attach the Canon CH-910 Dual Battery Charger & Holder. Just hook the CH-910 onto the support bar as shown. To detach the CH-910, press the stopper and then pull it off the support bar.
Adjusting the Wireless Microphone Bracket Position (F)
Pull the wireless microphone bracket lock knob to set the bracket to one of three positions (maximum distance: 145mm / 3 3/4in). Set the bracket position to suit the size and weight of the attached device.
The bracket can be locked only in one of the three set positions. Do not set the bracket outside of these three positions, and make sure the bracket is locked in position.
Specifications
Power supply | 5 V DC |
Audio | |
Input jack: | XLR-3-31 |
| 1: Shielded, 2: Hot, 3: Cold |
Input level: | -55 dBv (balanced) |
Input impedance: | 600 Ω |
Output terminal: | AUDIO1: RCA phono plug with cable |
| (unbalanced) |
| AUDIO2: RCA phono jack (unbalanced) |
Gain: | 6dB (balance to unbalance conversion) |
Output impedance: | 600 Ω |
Video | |
Camcorder-connecting jack: | RCA phono jack |
External device-connecting jack: BNC connector |
Dimensions: | Approx. 208 × 121 × 117mm |
| (8 1/4 × 4 3/4 × 4 5/8 in) |
Weight: | Approx. 1,020 g (2 lb 4 oz) |
| (including wireless microphone bracket) |
●Weight and dimensions are approximate. Subject to change without notice.
Errors and omissions excepted.
Nous vous remercions d’avoir fait l’acquisition de l’adaptateur de microphone/ bandouliére Canon MA-200. Lisez attentivement ces instructions, et conservez- les pour pouvoir vous y reporter ultérieurement.
Le MA-200 vous permet de :
●Raccorder les microphones avec connecteur XLR aux prises d’entrée audio (Audio 1 et Audio 2) des camescopes Canon XL1 et XL1S.
●Convertir le signal vidéo pour l’envoyer par le connecteur BNC.
●Effectuer la prise de vues avec le XL1/XL1S à l’épaule.
●Fixer un récepteur de microphone sans fil ou le chargeur/boîtier de batterie double Canon CH-910.
[Nomenclature]
qCâble CC
wCâble AUDIO1 (se raccorde au camescope)
ePrise de raccordement de camescope AUDIO2 (RCA) r Prise de raccordement de camescope VIDEO (RCA) t Prise d’entrée AUDIO1 (connecteur XLR)
y Prises d’entrée AUDIO2 (connecteur XLR)
u Prise d’entrée/sortie VIDEO (connecteur BNC)
i Bouton de verrouillage d’attache de microphone sans fil o Attache de microphone sans fil
!0Socle de montage d’étrier de microphone sans fil !1Barre de support A
!2Barre de support B
!3Butée de chargeur/boîtier de batterie double
Fixation de l’adaptateur de microphone au camescope (A, B)
1.Insérez la languette de l’adaptateur de microphone dans la fente sur le fond et dans le coin du camescope, et serrez la vis.
2.Raccordez le câble CC à la prise DC du camescope.
3.Raccordez le câble AUDIO1 à la prise AUDIO1 ou 2 du camescope. Raccordez les prises de sortie AUDIO2 de l’adaptateur de microphone aux prises AUDIO1 ou 2 du camescope à l’aide du câble audio fourni.
Si vous voulez utiliser le connecteur BNC comme entrée/sortie de signal vidéo, raccordez la prise de raccordement VIDEO à la prise VIDEO IN/OUT du camescope à l’aide d’un câble vidéo (en vente dans le commerce).
Fixation de l’attache de microphone sans fil sur l’adaptateur de microphone (C, D, E)
●Si votre récepteur de microphone sans fil nécessite l’attache, procédez de la manière suivante.
1.Desserrez les vis, fixez l’attache sur le socle, puis resserrez les vis.
2.Réglez la position des barres de support A et B en fonction du récepteur de microphone.
●Vous pourrez également utiliser la barre de support pour fixer le chargeur/ boîtier de batterie double Canon CH-910. Il suffit d’accrocher le CH-910 sur la barre de support, comme indiqué sur le schéma. Pour retirer le CH-910, appuyez sur la butée et tirez-le de la barre de support.
Réglage de la position de l’attache du microphone sans fil (F)
Tirez sur le bouton de verrouillage d’attache de microphone sans fil pour fixer l’attache sur l’une des trois positions prévues (distance maximale : 145 mm). Réglez la position de l’attache en fonction de la taille et du poids du microphone. Vous ne pouvez verrouiller l’attache que sur l’une des trois positions prévues. Ne le réglez pas en-dehors de ces trois positions, et vérifiez qu’il est solidement verrouillé.
Fiche technique
Alimentation | 5 V CC |
Audio | |
Prise d’entrée: | XLR-3-31 |
| 1: Blindée, 2: Chaude, 3: Froide |
Niveau d’entrée: | -55 dBv (symétrique) |
Impédance d’entrée: | 600 Ω |
Prise de sortie : | AUDIO1: Fiche phono RCA avec câble |
| (asymétrique) |
| AUDIO2: Prise phono RCA (asymétrique) |
Gain: | 6dB (conversion symétrie-asymétrie) |
Impédance de sortie: | 600 Ω |
Vidéo
Prise de raccordement de camescope: Prise phono RCA
Prise de raccordement de dispositif externe: Connecteur BNC
Dimensions: | Environ. 208 × 121 × 117mm |
Poids: | Environ. 1.020 g |
| (avec l’attache de microphone sans fil) |
●Les poids et les dimensions sont approximatifs. Sujets à modifications sans préavis.
Erreurs et omissions exceptées.
Vielen Dank für das Vertrauen in Canon-Produkte, das Sie uns mit dem Kauf des Mikrofonadapters mit Schultergleitschutz MA-200 erwiesen haben. Machen Sie sich bitte mit dem Inhalt dieser Gebrauchsanleitung vertraut und bewahren Sie sie zum eventuellen späteren Nachschlagen gut auf.
MA-200 bietet folgende Möglichkeiten:
●Anschluß von Mikrofonen mit XLR-Buchse an Canon-Camcorder XL1 oder XL1S mit Audioeingängen (Audio1, Audio2).
●Umsetzung des Videosignals für BNC-Anschluß.
●Aufsetzen von XL1/XL1S auf die Schulter und Bildaufzeichnung in dieser Position.
●Anbringen eines drahtlosen Mikrofonempfängers oder des Doppel-Ladegerät/ Batteriemagazins CH-910 von Canon.
[Bezeichnung der Teile]
qGleichstromversorgungskabel
wAUDIO1, Kabel (Anschluß an Camcorder)
e AUDIO2, Camcorder-Anschlußbuchse (Cinch) r VIDEO, Camcorder-Anschlußbuchse (Cinch) t AUDIO1, Eingangsbuchse (XLR)
y AUDIO2, Eingangsbuchsen (XLR) u VIDEO, Ein-/Ausgangsbuchse (BNC)
i Feststellknopf an Halterung für drahtloses Mikrofon o Halterung für drahtloses Mikrofon !0Halterungsmontagesockel für drahtloses Mikrofon !1Haltestange A
!2Haltestange B
!3Anschlag für Doppel-Ladegerät/Batteriemagazin
Anbringen des Mikrofonadapters am Camcorder (A, B)
1.Führen Sie die Klaue am Mikrofonadapter in den Schlitz an der Unterseite des Camcorders ein und ziehen Sie dann die Schraube an.
2.Verbinden Sie das Gleichstromversorgungskabel mit der DC-Buchse am Camcorder.
3.Verbinden Sie das AUDIO1-Kabel mit der Camcorderbuchse AUDIO1 oder AUDIO2. Verbinden Sie die AUDIO2-Ausgangsbuchsen am Mikrofonadapter über das mitgelieferte Audiokabel mit der Buchse AUDIO1 oder AUDIO2 am Camcorder.
Soll die Ein-/Ausgabe des Videosignals über den BNC-Steckverbinder erfolgen, so ist zur Verbindung von VIDEO-Anschlußbuchse und Buchse VIDEO IN/OUT am Camcorder ein (handelsübliches) Videokabel erforderlich.
Anbringen der Halterung für drahtloses Mikrofon am Mikrofonadapter (C, D, E)
●Falls Ihr Empfänger für drahtloses Mikrofon die Halterung erfordert, so gehen Sie gemäß dem folgenden Verfahren vor:
1.Lösen Sie die Schrauben, bringen Sie die Halterung am Sockel an und ziehen Sie dann die Schrauben an.
2.Stellen Sie die Position der Haltestange A und B entsprechend dem Mikrofonempfänger ein.
●Die Haltestange kann auch zum Anbringen des Doppel-Ladegerät/ Batteriemagazins CH-910 von Canon dienen. Haken Sie hierzu den CH-910 einfach wie abgebildet an die Haltestange. Zum Abnehmen des CH-910 drücken Sie auf den Anschlag und ziehen ihn dann von der Haltestange ab.
Einstellung der Position der Halterung für drahtloses Mikrofon (F)
Ziehen Sie am Feststellknopf der Halterung für drahtloses Mikrofon so, daß die Halterung an einer von drei Positionen fixiert ist (max. Abstand: 145 mm). Wählen Sie die Halterungsposition entsprechend der Größe und des Gewichts der angebrachten Komponente.
Die Halterung läßt sich nur in einer von drei Positionen fixieren. Wählen Sie keinesfalls eine andere Position und sorgen Sie unbedingt dafür, daß die Halterung in ihrer Lage gesichert ist.
Technische Daten
Stromversorgung: | 5 V Gleichspannung |
Audio | |
Eingangsbuchse: | XLR-3-31 |
| 1: Abschirmung, 2: spannungsführend, |
| 3: nicht spannungsführend |
Eingangspegel: | -55 dBv (symmetrisch) |
Eingangsimpedanz: | 600 Ω |
Ausgang: | AUDIO1: Cinch-Phonostecker mit Kabel |
| (asymmetrisch) |
| AUDIO2: Cinch-Phonobuchse |
| (asymmetrisch) |
Gewinn: | 6 dB |
| (Umsetzung von symmetrisch auf |
| asymmetrisch) |
Ausgangsimpedanz: | 600 Ω |
Camcorder | |
Videoanschlußbuchse: | Cinch-Phonobuchse |
Anschlußbuchse der externen Komponente:BNC-Anschluß |
Abmessungen: | ca. 208 × 121 × 117mm |
Gewicht: | ca. 1.020 g |
| (mit Halterung für drahtloses Mikrofon) |
●Gewicht und Abmessungen sind Anhaltswerte. Änderungen vorbehalten.
Fehler und Auslassungen vorbehalten.