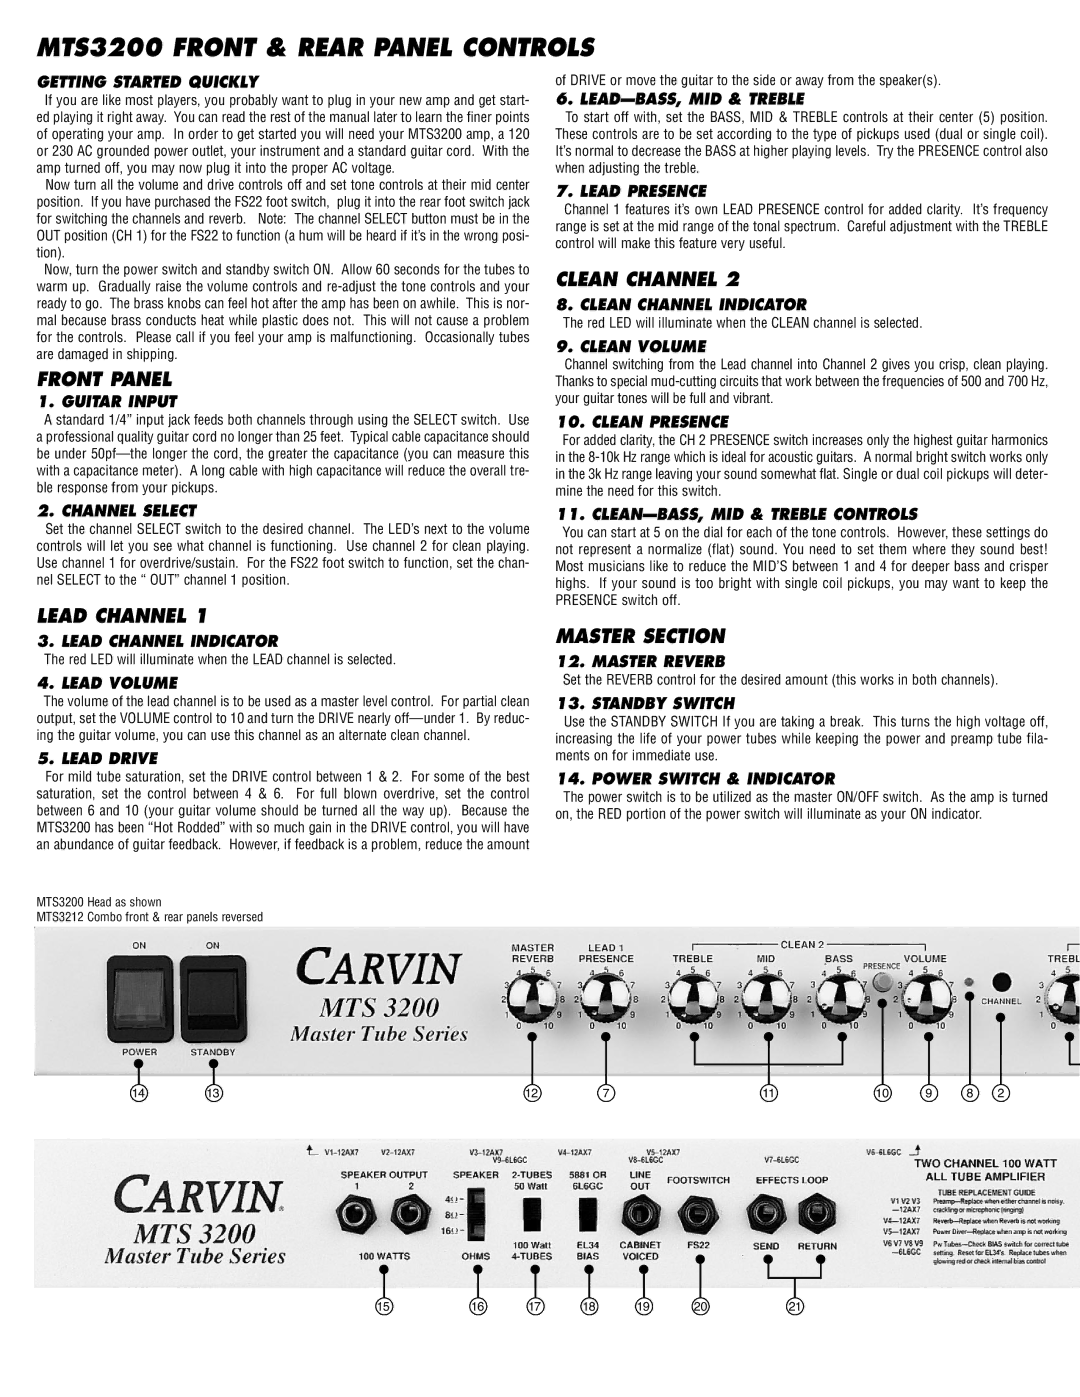
MTS3200 FRONT & REAR PANEL CONTROLS
GETTING STARTED QUICKLY
If you are like most players, you probably want to plug in your new amp and get start- ed playing it right away. You can read the rest of the manual later to learn the finer points of operating your amp. In order to get started you will need your MTS3200 amp, a 120 or 230 AC grounded power outlet, your instrument and a standard guitar cord. With the amp turned off, you may now plug it into the proper AC voltage.
Now turn all the volume and drive controls off and set tone controls at their mid center position. If you have purchased the FS22 foot switch, plug it into the rear foot switch jack for switching the channels and reverb. Note: The channel SELECT button must be in the OUT position (CH 1) for the FS22 to function (a hum will be heard if it’s in the wrong posi- tion).
Now, turn the power switch and standby switch ON. Allow 60 seconds for the tubes to warm up. Gradually raise the volume controls and
FRONT PANEL
1. GUITAR INPUT
A standard 1/4” input jack feeds both channels through using the SELECT switch. Use a professional quality guitar cord no longer than 25 feet. Typical cable capacitance should be under
of DRIVE or move the guitar to the side or away from the speaker(s).
6. LEAD—BASS, MID & TREBLE
To start off with, set the BASS, MID & TREBLE controls at their center (5) position. These controls are to be set according to the type of pickups used (dual or single coil). It’s normal to decrease the BASS at higher playing levels. Try the PRESENCE control also when adjusting the treble.
7. LEAD PRESENCE
Channel 1 features it’s own LEAD PRESENCE control for added clarity. It’s frequency range is set at the mid range of the tonal spectrum. Careful adjustment with the TREBLE control will make this feature very useful.
CLEAN CHANNEL 2
8. CLEAN CHANNEL INDICATOR
The red LED will illuminate when the CLEAN channel is selected.
9. CLEAN VOLUME
Channel switching from the Lead channel into Channel 2 gives you crisp, clean playing. Thanks to special
10. CLEAN PRESENCE
For added clarity, the CH 2 PRESENCE switch increases only the highest guitar harmonics in the
2. CHANNEL SELECT
Set the channel SELECT switch to the desired channel. The LED’s next to the volume controls will let you see what channel is functioning. Use channel 2 for clean playing. Use channel 1 for overdrive/sustain. For the FS22 foot switch to function, set the chan- nel SELECT to the “ OUT” channel 1 position.
LEAD CHANNEL 1
3. LEAD CHANNEL INDICATOR
The red LED will illuminate when the LEAD channel is selected.
4. LEAD VOLUME
The volume of the lead channel is to be used as a master level control. For partial clean output, set the VOLUME control to 10 and turn the DRIVE nearly
5. LEAD DRIVE
For mild tube saturation, set the DRIVE control between 1 & 2. For some of the best saturation, set the control between 4 & 6. For full blown overdrive, set the control between 6 and 10 (your guitar volume should be turned all the way up). Because the MTS3200 has been “Hot Rodded” with so much gain in the DRIVE control, you will have an abundance of guitar feedback. However, if feedback is a problem, reduce the amount
MTS3200 Head as shown
MTS3212 Combo front & rear panels reversed
11. CLEAN—BASS, MID & TREBLE CONTROLS
You can start at 5 on the dial for each of the tone controls. However, these settings do not represent a normalize (flat) sound. You need to set them where they sound best! Most musicians like to reduce the MID’S between 1 and 4 for deeper bass and crisper highs. If your sound is too bright with single coil pickups, you may want to keep the PRESENCE switch off.
MASTER SECTION
12. MASTER REVERB
Set the REVERB control for the desired amount (this works in both channels).
13. STANDBY SWITCH
Use the STANDBY SWITCH If you are taking a break. This turns the high voltage off, increasing the life of your power tubes while keeping the power and preamp tube fila- ments on for immediate use.
14. POWER SWITCH & INDICATOR
The power switch is to be utilized as the master ON/OFF switch. As the amp is turned on, the RED portion of the power switch will illuminate as your ON indicator.
14 | 13 | 12 | 7 | 11 | 10 | 9 | 8 | 2 |
15 | 16 | 17 | 18 | 19 | 20 | 21 |