CARVIN ENGINEERING DATA | SERIES |
| III |
| WITH |
R600/R1000 HEAD/RL6815 CYCLOPS/RC210 RED EYE | |||||
OPERATING MANUAL
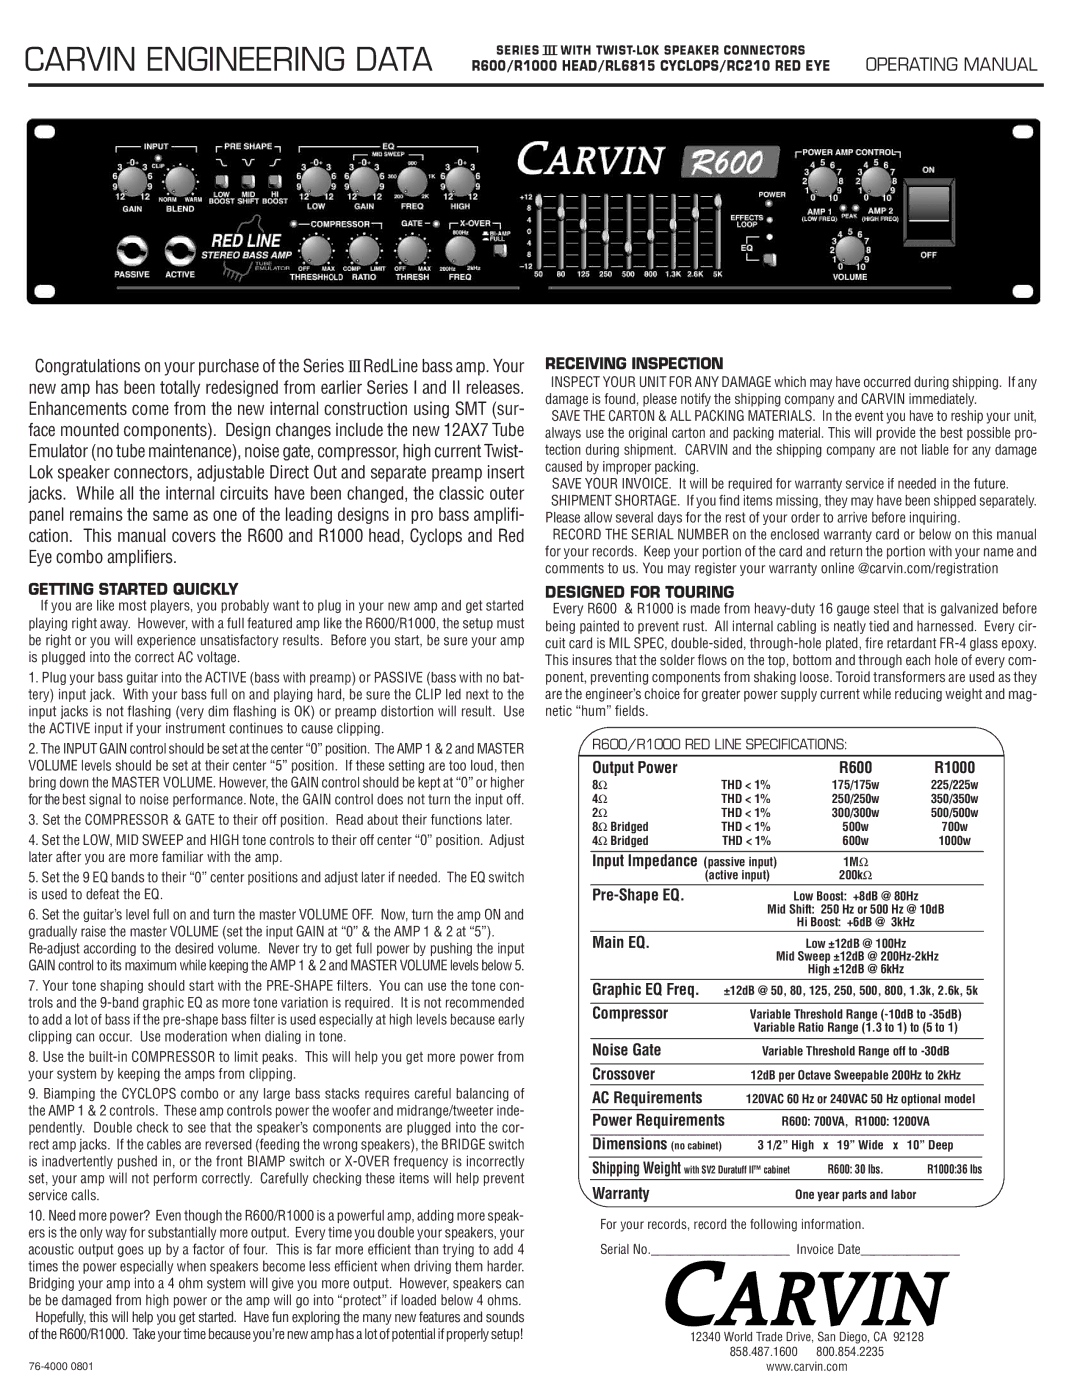
Congratulations on your purchase of the Series IIIRedLine bass amp. Your new amp has been totally redesigned from earlier Series I and II releases. Enhancements come from the new internal construction using SMT (sur- face mounted components). Design changes include the new 12AX7 Tube Emulator (no tube maintenance), noise gate, compressor, high current Twist- Lok speaker connectors, adjustable Direct Out and separate preamp insert jacks. While all the internal circuits have been changed, the classic outer panel remains the same as one of the leading designs in pro bass amplifi- cation. This manual covers the R600 and R1000 head, Cyclops and Red Eye combo amplifiers.
RECEIVING INSPECTION
INSPECT YOUR UNIT FOR ANY DAMAGE which may have occurred during shipping. If any damage is found, please notify the shipping company and CARVIN immediately.
SAVE THE CARTON & ALL PACKING MATERIALS. In the event you have to reship your unit, always use the original carton and packing material. This will provide the best possible pro- tection during shipment. CARVIN and the shipping company are not liable for any damage caused by improper packing.
SAVE YOUR INVOICE. It will be required for warranty service if needed in the future. SHIPMENT SHORTAGE. If you find items missing, they may have been shipped separately. Please allow several days for the rest of your order to arrive before inquiring.
RECORD THE SERIAL NUMBER on the enclosed warranty card or below on this manual for your records. Keep your portion of the card and return the portion with your name and comments to us. You may register your warranty online @carvin.com/registration
GETTING STARTED QUICKLY
If you are like most players, you probably want to plug in your new amp and get started playing right away. However, with a full featured amp like the R600/R1000, the setup must be right or you will experience unsatisfactory results. Before you start, be sure your amp is plugged into the correct AC voltage.
1.Plug your bass guitar into the ACTIVE (bass with preamp) or PASSIVE (bass with no bat- tery) input jack. With your bass full on and playing hard, be sure the CLIP led next to the input jacks is not flashing (very dim flashing is OK) or preamp distortion will result. Use the ACTIVE input if your instrument continues to cause clipping.
2.The INPUT GAIN control should be set at the center “0” position. The AMP 1 & 2 and MASTER VOLUME levels should be set at their center “5” position. If these setting are too loud, then bring down the MASTER VOLUME. However, the GAIN control should be kept at “0” or higher for the best signal to noise performance. Note, the GAIN control does not turn the input off.
3.Set the COMPRESSOR & GATE to their off position. Read about their functions later.
4.Set the LOW, MID SWEEP and HIGH tone controls to their off center “0” position. Adjust later after you are more familiar with the amp.
5.Set the 9 EQ bands to their “0” center positions and adjust later if needed. The EQ switch is used to defeat the EQ.
6.Set the guitar’s level full on and turn the master VOLUME OFF. Now, turn the amp ON and gradually raise the master VOLUME (set the input GAIN at “0” & the AMP 1 & 2 at “5”).
7.Your tone shaping should start with the
8.Use the
9.Biamping the CYCLOPS combo or any large bass stacks requires careful balancing of the AMP 1 & 2 controls. These amp controls power the woofer and midrange/tweeter inde- pendently. Double check to see that the speaker’s components are plugged into the cor- rect amp jacks. If the cables are reversed (feeding the wrong speakers), the BRIDGE switch is inadvertently pushed in, or the front BIAMP switch or
10.Need more power? Even though the R600/R1000 is a powerful amp, adding more speak- ers is the only way for substantially more output. Every time you double your speakers, your acoustic output goes up by a factor of four. This is far more efficient than trying to add 4 times the power especially when speakers become less efficient when driving them harder. Bridging your amp into a 4 ohm system will give you more output. However, speakers can be be damaged from high power or the amp will go into “protect” if loaded below 4 ohms.
Hopefully, this will help you get started. Have fun exploring the many new features and sounds of the R600/R1000. Take your time because you’re new amp has a lot of potential if properly setup!
DESIGNED FOR TOURING
Every R600 & R1000 is made from
R600/R1000 RED LINE SPECIFICATIONS:
Output Power |
|
| R600 | R1000 |
8Ω | THD < 1% | 175/175w | 225/225w | |
4Ω | THD < 1% | 250/250w | 350/350w | |
2Ω | THD < 1% | 300/300w | 500/500w | |
8Ω Bridged | THD < 1% | 500w | 700w | |
4Ω Bridged | THD < 1% | 600w | 1000w | |
Input Impedance (passive input) | 1MΩ |
| ||
| (active input) | 200kΩ |
| |
| Low Boost: +8dB @ 80Hz | |||
|
| Mid Shift: 250 Hz or 500 Hz @ 10dB | ||
|
| Hi Boost: +6dB @ 3kHz | ||
Main EQ. |
| Low ±12dB @ 100Hz |
| |
|
| Mid Sweep ±12dB @ | ||
|
| High ±12dB @ 6kHz |
| |
Graphic EQ Freq. | ±12dB @ 50, 80, 125, 250, 500, 800, 1.3k, 2.6k, 5k | |||
|
|
| ||
Compressor |
| Variable Threshold Range | ||
|
| Variable Ratio Range (1.3 to 1) to (5 to 1) | ||
|
|
| ||
Noise Gate |
| Variable Threshold Range off to | ||
|
|
| ||
Crossover |
| 12dB per Octave Sweepable 200Hz to 2kHz | ||
AC Requirements |
| 120VAC 60 Hz or 240VAC 50 Hz optional model | ||
Power Requirements | R600: 700VA, R1000: 1200VA | |||
|
|
|
| |
Dimensions (no cabinet) | 3 1/2” High | x 19” Wide x | 10” Deep | |
Shipping Weight with SV2 Duratuff II™ cabinet | R600: 30 lbs. | R1000:36 lbs | ||
Warranty |
| One year parts and labor | ||
For your records, record the following information.
Serial No._____________________ Invoice Date_______________
12340 World Trade Drive, San Diego, CA 92128
858.487.1600 800.854.2235
www.carvin.com