CATEYE STRADA


日本語


CYCLOCOMPUTER CC-RD100


U.S. Pat. Nos. 5236759/6957926 Pat./Design Pat. Pending


CCRD10-061114

066600501 3


Copyright© 2006 CATEYE Co., Ltd.

警告・注意


自転車への取付け方法


・走行中は、コンピュータに気を取られないで、安全走行を心がけてください。


2

5

1 ブラケットバンド


・マグネット、センサー及びブラケットはしっかりと自転車に取付け、緩みがないかを定


4

2 ブラケット


期的に点検してください。


1


6 43

マグネットセンサー


・誤って電池を飲み込んだ場合は、すぐに医師に相談してください。


・コンピュータは炎天下に長時間放置しないでください。


5 センサーゴムバンド(2 本)

・コンピュータは絶対分解しないでください。


3

8

6 フック


・コンピュータは落下させないでください。損傷の原因となります。


7


7 センサーゴムパッド(3 枚)

・ブラケットに装着した状態でMODEを押すときはコンピュータ表面のドット部周辺を押

9


8 ブラケットゴムパッド


してください。他の部分を強く押すと誤作動や損傷の原因となります。


9 ナイロンタイ(5 本)


・金属板の上にコンピュータを置かないでください。接点が導通し電池が消耗します。


・ブラケットバンドのダイヤル部は必ず手で締付けてください。強く締めるとネジ山がつ

1 ブラケットをステムまたはハンドルバーに取付けます


ぶれる恐れがあります。


・コンピュータや付属品を拭くとき、シンナー、ベンジン、アルコール等は表面を傷める


ステムに取付ける場合


ので使わないでください。


ステム

・使用済みの電池は各地域によって定められた方法で処理してください。


8


・液晶画面の特性として、偏光レンズサングラスでは表示が見えにくくなります。


2

1


コンピュータの準備


タイヤ周長ガイド


AC


タイヤサイズ

L (mm)


ブラケット装着時

12 x 1.75

935


14 x 1.50

1020


MENU


押す

14 x 1.75

1055


コードがステムに挟まらないよ


バッテリーカバー


16 x 1.50

1185


16 x 1.75

1195


うに締付けます。


接点


18 x 1.50

1340


ハンドルバーに取付ける場合


18 x 1.75

1350


MODE


20 x 1.75

1515


8


ハンドルバー


20 x 1-3/8

1615


: 計測単位


22 x 1-3/8

1770


22 x 1-1/2

1785


: タイヤ周長アイコン


24 x 1

1753


1


24 x 3/4 Tubular

1785


24 x 1-1/8

1795


24 x 1-1/4

1905


オールクリア(初期化)します


24 x 1.75

1890


24 x 2.00

1925


1 裏面の AC ボタンを押します。


コードがハンドルバーに挟まら


24 x 2.125

1965


2


26 x 7/8

1920


ないように締付けます。


26 x 1(59)

1913


AC


26 x 1(65)

1952

2 コードをブレーキ


26 x 1.25

1953


26 x 1-1/8

1970


ケーブルに巻付けます


26 x 1-3/8

2068


26 x 1-1/2

2100


計測単位を選択します


26 x 1.40

2005


2

」または「

」を選択します。


26 x 1.50

2010


部分は、ハンドル


カット


26 x 1.75

2023


26 x 1.95

2050


を回したときにコード


26 x 2.00

2055


が引っ張られないよう


26 x 2.10

2068


に調節します。


切口でケガをしないように


km/h mph

確定


26 x 2.125

2070


26 x 2.35

2083


センサーへ

処理してください。


MODE

MENU


26 x 3.00

2170


27 x 1

2145


センサーとマグネットは次の条件を満たす位置に取付けます。


27 x 1-1/8

2155


27 x 1-1/4

2161


タイヤ周長を入力します


27 x 1-3/8

2169


A マグネットがセンサーのセンサー

B センサー表面と、マグネットの隙間


650 x 20C

1938


3 自転車のタイヤ外周の長さをmm単位で入


650 x 23C

1944


ラインを通過する。


が必ず 5 mm 以内である。

力します。


650 x 35A

2090


右フロント


650 x 38A

2125


※ タイヤ周長ガイドをご活用ください。


650 x 38B

2105


フォーク


700 x 18C

2070


700 x 19C

2080


3


4


数値増加

桁移動


700 x 20C

2086


確定


700 x 23C

2096


右フロント


(長押し)


700 x 25C

2105


フォーク

MODE

MODE

MENU


700 x 28C

2136


700 x 30C

2146


3


700 x 32C

2155


※ 必要に応じてセンサーにセンサーゴムパッ

時刻を入力します


700C Tubular

2130


センサーライン

4


700 x 35C

2168


71 3 枚重ねて取付けます。

4 MODE を長押しするごとに「表示時間」


700 x 38C

2180


700 x 40C

2200

3


センサーを取付けます


「時」「分」の設定に切替ります。


29 x 2.1

2288


3


29 x 2.3

2326


24h 12h


自転車のタイヤ周長(L)


右フロント


9


を実測して求めます。


フォーク


強く引く


または数値増加


タイヤの空気圧を適正


MODE


にし、タイヤ接地面に


5

6


ペンキ等で印を付けて


画面切替え


確定


乗車します。タイヤを1


または桁移動

(設定終了)


回転させ、路面に付い


※ センサーゴムバンド5の替わりにナイロンタイ


MODE

(長押し)

MENU


た印の間隔を測ります。


9 で取付けることもできます。


目安として周長ガイド

4


マグネットを取付けます


5

コンピュータの着脱


を活用してください。


L mm


右側スポーク


カチッ

手で添えて


4


センサーラインへ


押し出す


※ 取付後、前輪を軽く回し、コンピュータに速度が表示されることを確認します。


表示されないときは A B の位置関係が正しいか確認してください。

Page 1
Image 1
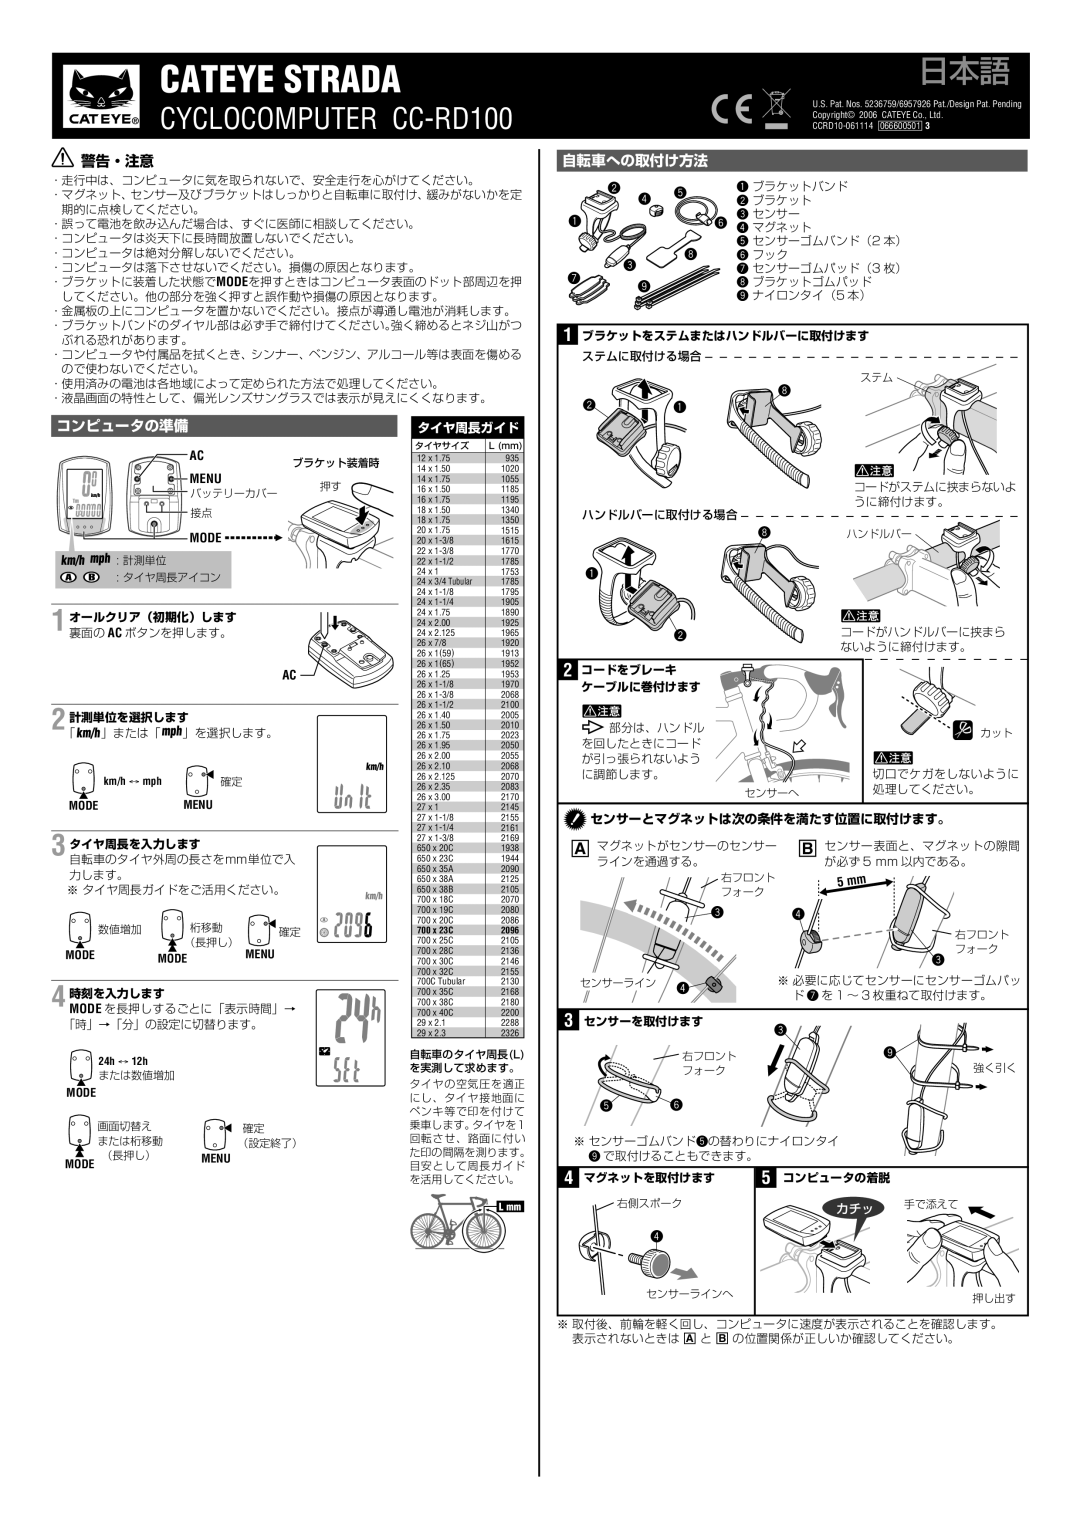
Cateye CC-RD100 manual 自転車への取付け方法, コンピュータの準備

CC-RD100 specifications

The Cateye CC-RD100 is an advanced cycling computer designed to enhance your cycling experience with its impressive array of features and user-friendly interface. As a cutting-edge device, it caters to both casual riders and serious cyclists, providing real-time data to track performance and improve training outcomes.

One of the standout features of the Cateye CC-RD100 is its ability to monitor key metrics such as current speed, average speed, maximum speed, total distance, and trip distance. This comprehensive data overview allows users to gauge their performance instantly and keep tabs on their progress over time. With its intuitive display, essential information is easily accessible, enabling cyclists to focus on the road ahead rather than navigating through complicated menus.

Incorporating advanced wireless technology, the CC-RD100 eliminates the hassle of tangled wires. The wireless sensor transmits data seamlessly, providing real-time updates without the clutter. This feature not only enhances ease of use but also simplifies installation, making it a hassle-free addition to any bike.

The Cateye CC-RD100 boasts a long battery life, allowing for extended rides without the constant need for recharging. The device features an auto power-saving mode, activating when the computer is not in use to conserve energy. This feature ensures that cyclists can rely on their device throughout long trips or challenging races without worrying about battery life.

Durability is another key characteristic of the CC-RD100, as it is designed to withstand the rigors of outdoor cycling. With robust construction and water resistance, it can endure various weather conditions, ensuring reliability in any environment.

The user interface is designed for simplicity and functionality, allowing quick access to settings and data. Riders can easily navigate through different modes and configure the device to meet their specific needs, tailoring their cycling experience for optimal performance.

Additionally, the Cateye CC-RD100 includes customizable settings, enabling users to adjust features such as the measurement unit and speed averaging intervals. This adaptability makes it suitable for various cycling disciplines, from road cycling to mountain biking.

In conclusion, the Cateye CC-RD100 is a reliable and feature-rich cycling computer that caters to the needs of cyclists of all levels. With its wireless technology, comprehensive feature set, durable design, and user-friendly interface, it stands out as an essential tool for anyone looking to track and improve their cycling performance. Whether you're a weekend warrior or a competitive athlete, the Cateye CC-RD100 provides valuable insights to enhance your cycling journey.