Operation of Buttons & Workload Adjustment Dial
To make the most of the functions of the unit.
1. Functions of the buttons
Advance Button 
It makes the program proceed. Each time you press this button, the display ad- vances in the order as Fig. 1.
Mode Button 
It is used in two ways.
a)In the "Initial Display", each press of this button switches the item to be modi- fied in the order as Fig. 2.
b)In the
Value Adjust Buttons 

In the "Initial Display", each button serves to change the blinking numerical value in each selected mode.
Button | Each press increases the numerical value by 1, and |
| when held down, it increases rapidly. |
Button | Each press decreases the numerical value by 1, and |
| when held down it decreases rapidly. |
Target Pulse On/Off Button![]()
The  mark turns on and off each time you press this button.
When the ![]() mark is shown, the buzzer beeps if your pulse rate deviates from the target pulse rate zone. When the
mark is shown, the buzzer beeps if your pulse rate deviates from the target pulse rate zone. When the ![]() mark is off, such a function is not activated.
mark is off, such a function is not activated.
[Beeping Sound Pattern] | 0 | 1 | 2 (sec.) | ||
|
|
|
|
|
|
Beyond the target pulse rate zone |
|
|
| 2kHz | |
|
|
|
|
|
|
Below the target pulse rate zone |
|
|
|
| 1kHz |
|
|
|
|
|
|
Advance Button ![]()
INITIAL DISPLAY
Fig.1
Mode Button ![]()
AGE
TARGET EXERCISE TIME
TARGET PULSE RATE
Fig.2
Before starting exercise, set the workload adjustment dial to the fol- lowing standard level in accordance with your age and sex.
Age | Male |
| Female | |||
20~30's | 3 | 2 | ||||
|
|
| ||||
40~50's | 2 | 1 | ||||
|
|
| ||||
Over 60 | 1 | 1 | ||||
|
|
|
|
|
| |
Easier |
|
|
|
| Harder | |
|
| |||||
|
|
|
|
|
|
|
|
|
|
|
|
|
|
|
|
|
|
|
|
|
Fig.5
2.Workload Adjustment Dial and Work rate
•Work rate (watt) is determined by the position of the workload adjustment dial, and your pedal cadence. (Fig.5)
•To get the desired work rate during the exercise, first adjust it roughly by the workload adjustment dial, then precisely by changing your pedal cadence. The workload can be shifted to 8 positions, 1 is the easiest and 8 is the heaviest.(Fig.4) Turning the workload adjustment dial leftward make the workload easier and turning it the rightward make the
workload heavier. Each position of the workload adjustment dial is identified by the ![]() mark displayed on the screen. The following table shows work rate (watt) corresponding
mark displayed on the screen. The following table shows work rate (watt) corresponding
to each workload adjustment dial position, and the pedal cadence. Work Rate (watt)
Pedal Cadence | 50 | 60 | 70 | 80 | 100 | 120 |
Shifting Position |
|
|
|
|
|
|
1 | 25 | 33 | 41 | 50 | 65 | 85 |
2 | 50 | 65 | 85 | 105 | 140 | 195 |
3 | 75 | 100 | 130 | 155 | 215 | 265 |
4 | 100 | 135 | 170 | 210 | 285 | 355 |
5 | 125 | 165 | 215 | 260 | 350 | 440 |
6 | 150 | 200 | 255 | 310 | 420 | 520 |
7 | 175 | 235 | 295 | 355 | 480 | 595 |
8 | 200 | 265 | 335 | 405 | 545 | 680 |
|
|
|
|
|
|
|
REFERENCE: At the middle position of each workload level on the workload adjust-
| ment dial, it shows the exact work rate as per above figure. |
CAUTION: | Do not overtighten workload adjustment dial. |
•The buzzer function is not activated until your pulse rate once reaches the target pulse rate.
•The target pulse rate zone may slightly differ depending on the target pulse rate that you input, but approximately within +/- 5 bpm from the target pulse rate.
Special functions of buttons
"All Clear" Function
When new batteries are loaded, or when abnormal signal is received due to elec- trostatic trouble, etc., the screen may show abnormal displays. In such a case, first
hold down the set buttons![]()
![]() and the mode button
and the mode button![]() simultaneously, then
simultaneously, then
press the advance button![]() . The screen first turns to
. The screen first turns to
Recovery Function
If you press the advance button![]() by mistake during exercise, making the screen turn to
by mistake during exercise, making the screen turn to
vance button![]() , within 10 seconds. The screen recalls the previous
, within 10 seconds. The screen recalls the previous
Memory Function
In the ![]() and press the advance button
and press the advance button![]() , the data that was set for your last exercise can be recalled. This func- tion is useful when you can use the unit exclusively and want to repeat the same exercise program.
, the data that was set for your last exercise can be recalled. This func- tion is useful when you can use the unit exclusively and want to repeat the same exercise program.
*This function becomes effective 10 seconds after the unit is turned off.
IN-EXERCISE DISPLAY (A)
IN-EXERCISE DISPLAY (B)
Fig.3
All-clear Process
•Press the three buttons ![]()
![]()
![]() simultaneously, and holding
simultaneously, and holding
them down press the ![]() button.
button.
•Be sure to perform this procedure after replacing the batteries.
Trainingspuls | Einstellung | Modus | Start / Stop |
Ein / Aus |
Fig.4
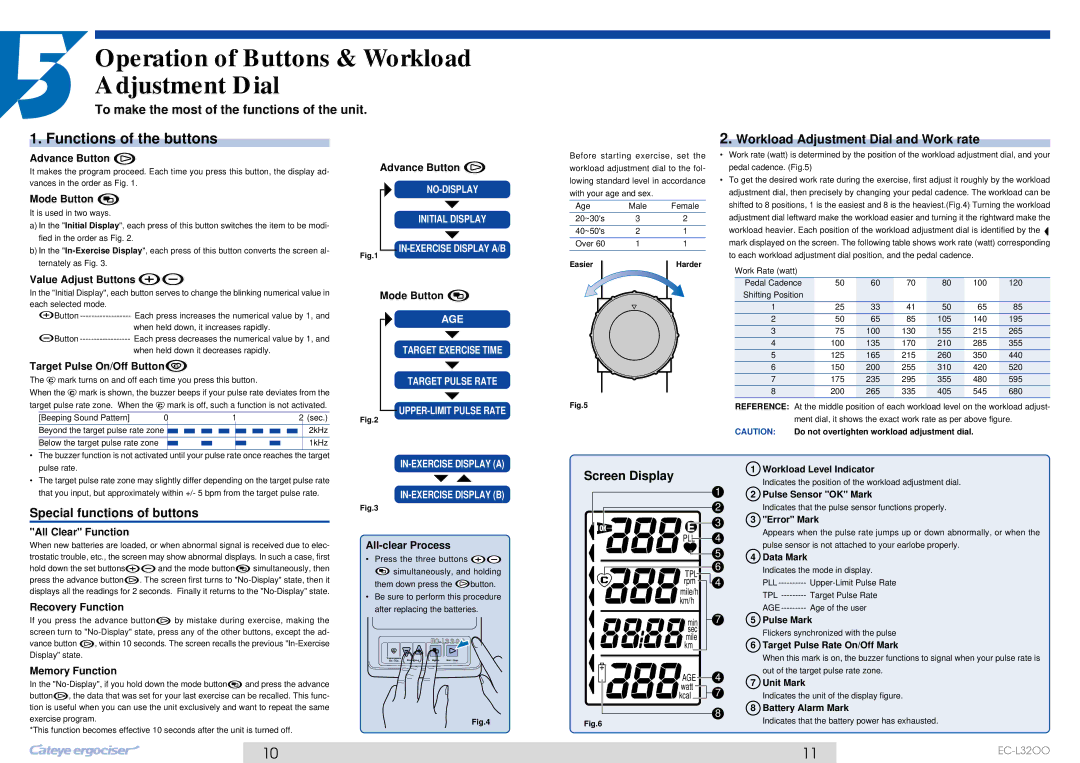
Screen Display
| 1 | |
| 2 | |
| 3 | |
PLL | 4 | |
| 5 | |
TPL | 6 | |
4 | ||
rpm | ||
mile/h |
| |
km/h |
| |
min | 7 | |
sec |
| |
mile |
| |
km |
| |
AGE | 4 | |
watt | 7 | |
kcal | ||
Fig.6 | 8 | |
|
1Workload Level Indicator
Indicates the position of the workload adjustment dial.
2Pulse Sensor "OK" Mark
Indicates that the pulse sensor functions properly.
3"Error" Mark
Appears when the pulse rate jumps up or down abnormally, or when the pulse sensor is not attached to your earlobe properly.
4Data Mark
Indicates the mode in display.
PLL
5Pulse Mark
Flickers synchronized with the pulse
6Target Pulse Rate On/Off Mark
When this mark is on, the buzzer functions to signal when your pulse rate is out of the target pulse rate zone.
7Unit Mark
Indicates the unit of the display figure.
8Battery Alarm Mark
Indicates that the battery power has exhausted.
10 | 11 | |
|
|
|