HL-EL830RC
Pat. and Design Pat. Pending Copyright©2007 CATEYE Co., Ltd. ENG
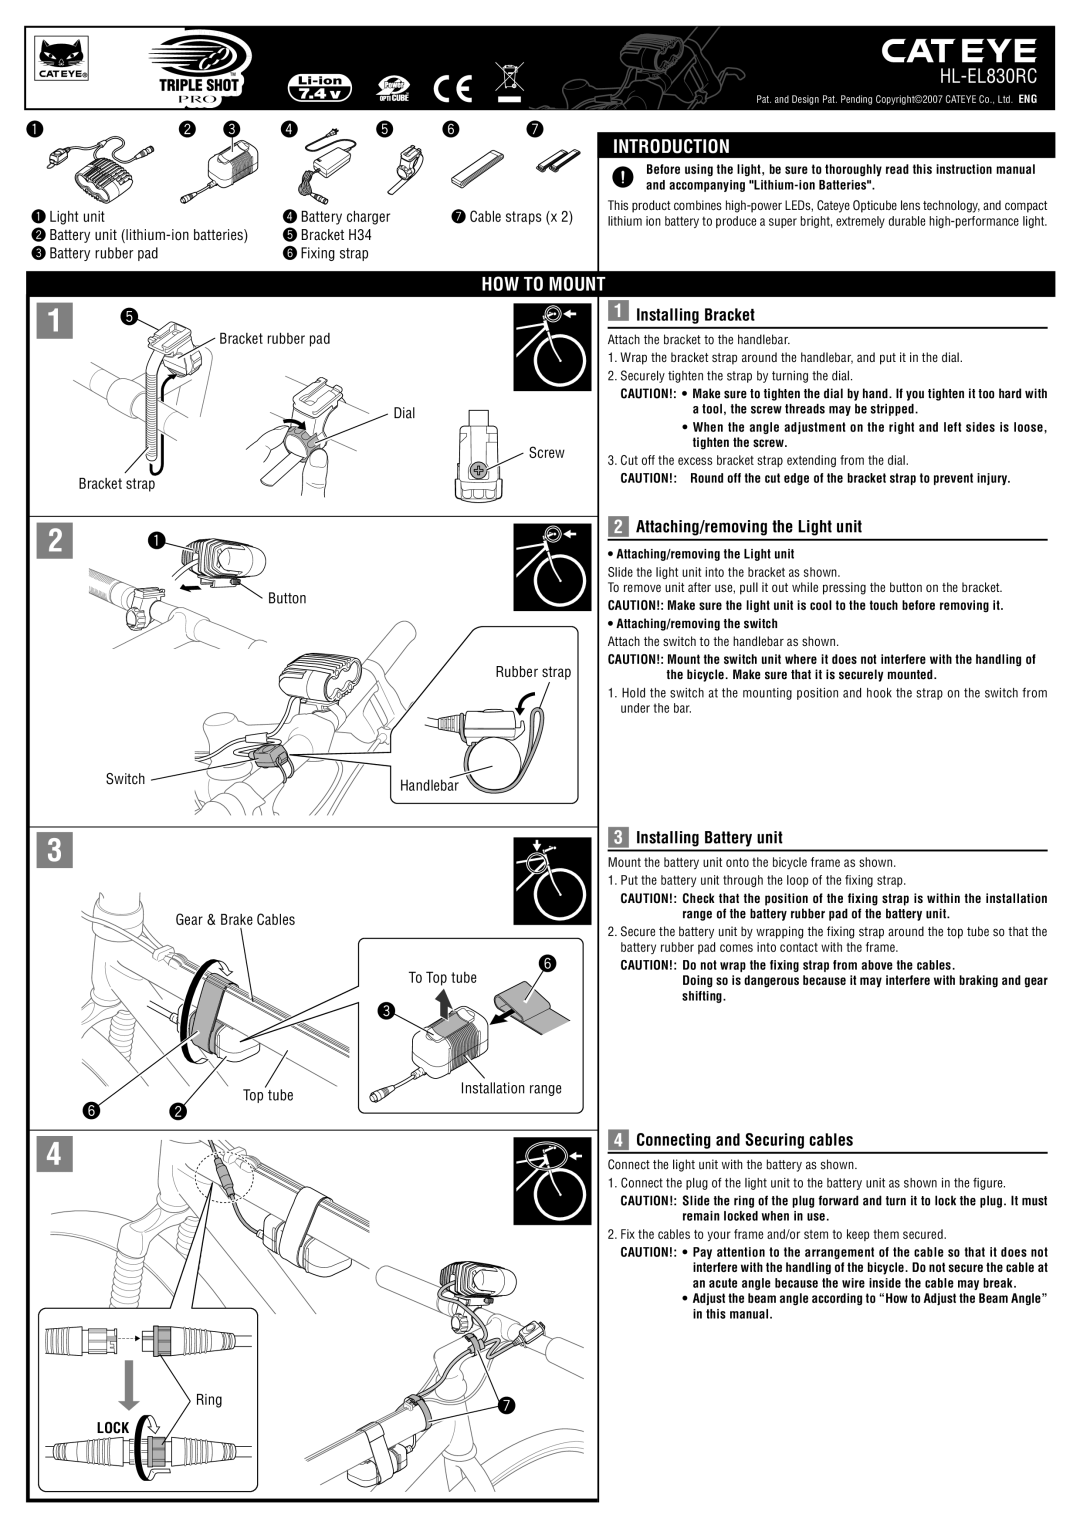
1 | 2 | 3 | 4 | 5 | 6 | 7 |
1 Light unit | 4 Battery charger | 7 Cable straps (x 2) |
2 Battery unit | 5 Bracket H34 |
|
3 Battery rubber pad | 6 Fixing strap |
|
INTRODUCTION
Before using the light, be sure to thoroughly read this instruction manual and accompanying
This product combines
HOW TO MOUNT
1 | 5 |
|
|
| Bracket rubber pad |
| |
|
|
| |
|
|
| Dial |
|
|
| Screw |
| Bracket strap |
|
|
2 | 1 |
|
|
|
|
| |
|
| Button |
|
|
|
| Rubber strap |
| Switch |
| Handlebar |
|
|
| |
3 |
|
|
|
|
| Gear & Brake Cables |
|
|
|
| 6 |
|
|
| To Top tube |
|
|
| 3 |
|
| Top tube | Installation range |
| 6 |
| |
| 2 |
| |
4 |
|
|
|
|
| Ring | 7 |
|
|
| |
| LOCK |
|
|
1Installing Bracket
Attach the bracket to the handlebar.
1.Wrap the bracket strap around the handlebar, and put it in the dial.
2.Securely tighten the strap by turning the dial.
CAUTION!: • Make sure to tighten the dial by hand. If you tighten it too hard with a tool, the screw threads may be stripped.
•When the angle adjustment on the right and left sides is loose, tighten the screw.
3.Cut off the excess bracket strap extending from the dial.
CAUTION!: Round off the cut edge of the bracket strap to prevent injury.
2Attaching/removing the Light unit
•Attaching/removing the Light unit
Slide the light unit into the bracket as shown.
To remove unit after use, pull it out while pressing the button on the bracket.
CAUTION!: Make sure the light unit is cool to the touch before removing it.
• Attaching/removing the switch
Attach the switch to the handlebar as shown.
CAUTION!: Mount the switch unit where it does not interfere with the handling of the bicycle. Make sure that it is securely mounted.
1.Hold the switch at the mounting position and hook the strap on the switch from under the bar.
3Installing Battery unit
Mount the battery unit onto the bicycle frame as shown.
1.Put the battery unit through the loop of the fixing strap.
CAUTION!: Check that the position of the fixing strap is within the installation range of the battery rubber pad of the battery unit.
2.Secure the battery unit by wrapping the fixing strap around the top tube so that the battery rubber pad comes into contact with the frame.
CAUTION!: Do not wrap the fixing strap from above the cables.
Doing so is dangerous because it may interfere with braking and gear shifting.
4Connecting and Securing cables
Connect the light unit with the battery as shown.
1.Connect the plug of the light unit to the battery unit as shown in the figure.
CAUTION!: Slide the ring of the plug forward and turn it to lock the plug. It must remain locked when in use.
2.Fix the cables to your frame and/or stem to keep them secured.
CAUTION!: • Pay attention to the arrangement of the cable so that it does not interfere with the handling of the bicycle. Do not secure the cable at an acute angle because the wire inside the cable may break.
•Adjust the beam angle according to “How to Adjust the Beam Angle” in this manual.