|
|
|
| HOW TO USE |
|
|
|
|
|
|
| |
|
|
|
|
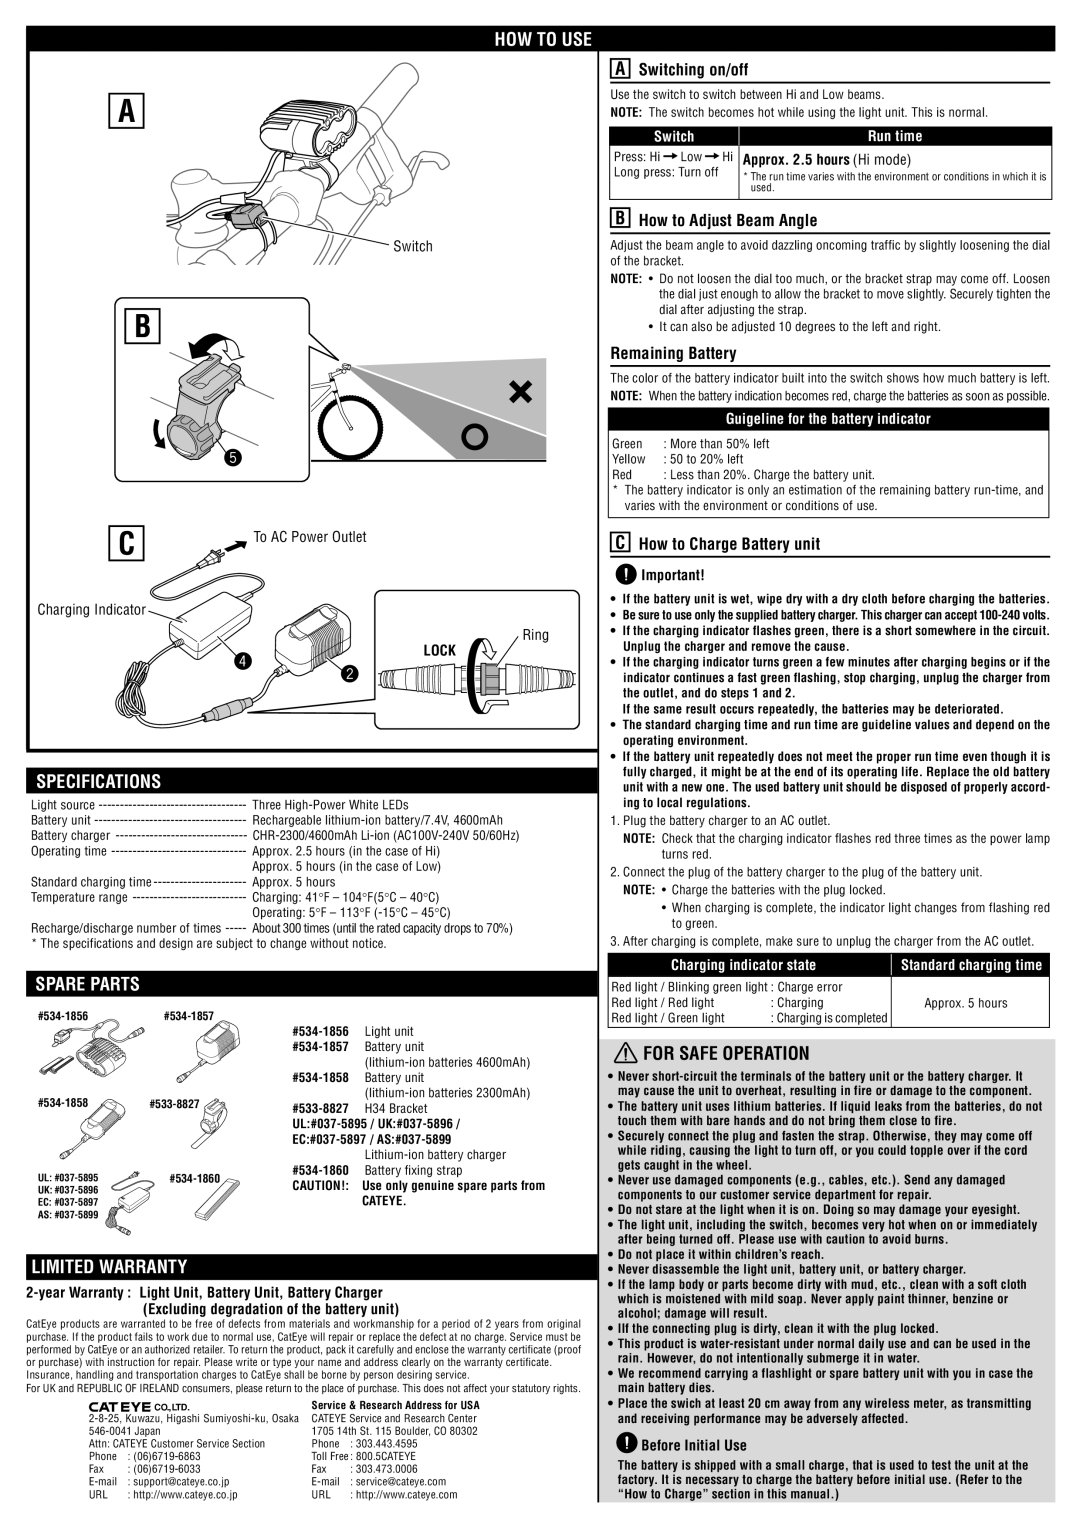
| A Switching on/off |
| ||||||
| A |
|
|
| Use the switch to switch between Hi and Low beams. |
| ||||||
|
|
|
| NOTE: The switch becomes hot while using the light unit. This is normal. | ||||||||
|
|
|
|
| ||||||||
|
|
|
|
|
|
| Switch |
| Run time | |||
|
|
|
|
| Press: Hi | Low | Hi | Approx. 2.5 hours (Hi mode) | ||||
|
|
|
|
| Long press: Turn off |
| * The run time varies with the environment or conditions in which it is | |||||
|
|
|
|
|
|
|
|
|
| used. |
| |
|
|
|
|
| B How to Adjust Beam Angle |
| ||||||
|
|
|
| Switch | Adjust the beam angle to avoid dazzling oncoming traffic by slightly loosening the dial | |||||||
|
|
|
|
| of the bracket. |
|
|
| ||||
|
|
|
|
| NOTE: • Do not loosen the dial too much, or the bracket strap may come off. Loosen | |||||||
|
|
|
|
|
|
| the dial just enough to allow the bracket to move slightly. Securely tighten the | |||||
| B |
|
|
|
|
| dial after adjusting the strap. |
| ||||
|
|
|
|
| • | It can also be adjusted 10 degrees to the left and right. | ||||||
|
|
|
|
|
| |||||||
|
|
|
|
| Remaining Battery |
|
| |||||
|
|
|
|
| The color of the battery indicator built into the switch shows how much battery is left. | |||||||
|
|
|
|
| NOTE: When the battery indication becomes red, charge the batteries as soon as possible. | |||||||
|
|
|
|
|
|
|
|
| Guigeline for the battery indicator | |||
| 5 |
|
|
| Green | : More than 50% left |
| |||||
|
|
|
| Yellow | : 50 to 20% left |
| ||||||
|
|
|
|
| Red | : Less than 20%. Charge the battery unit. |
| |||||
|
|
|
|
| * | The battery indicator is only an estimation of the remaining battery | ||||||
|
|
|
|
|
| varies with the environment or conditions of use. |
| |||||
| C | To AC Power Outlet | C How to Charge Battery unit |
| ||||||||
|
|
|
|
| ||||||||
|
|
|
|
|
| Important! |
|
|
| |||
Charging Indicator |
|
|
| • | If the battery unit is wet, wipe dry with a dry cloth before charging the batteries. | |||||||
|
|
| • Be sure to use only the supplied battery charger. This charger can accept | |||||||||
|
|
|
|
| ||||||||
|
|
|
| Ring | • | If the charging indicator flashes green, there is a short somewhere in the circuit. | ||||||
| 4 |
|
| LOCK |
| Unplug the charger and remove the cause. |
| |||||
|
| 2 | • | If the charging indicator turns green a few minutes after charging begins or if the | ||||||||
|
|
|
| indicator continues a fast green flashing, stop charging, unplug the charger from | ||||||||
|
|
|
|
|
| the outlet, and do steps 1 and 2. |
| |||||
|
|
|
|
|
| If the same result occurs repeatedly, the batteries may be deteriorated. | ||||||
|
|
|
|
| • | The standard charging time and run time are guideline values and depend on the | ||||||
|
|
|
|
|
| operating environment. |
| |||||
|
|
|
|
| • | If the battery unit repeatedly does not meet the proper run time even though it is | ||||||
SPECIFICATIONS |
|
|
|
| fully charged, it might be at the end of its operating life. Replace the old battery | |||||||
|
|
|
| unit with a new one. The used battery unit should be disposed of properly accord- | ||||||||
Light source |
| ing to local regulations. |
| |||||||||
Battery unit | 1. Plug the battery charger to an AC outlet. |
| ||||||||||
Battery charger |
| NOTE: Check that the charging indicator flashes red three times as the power lamp | ||||||||||
Operating time | Approx. 2.5 hours (in the case of Hi) |
|
| turns red. |
|
|
| |||||
|
| Approx. 5 hours (in the case of Low) | 2. Connect the plug of the battery charger to the plug of the battery unit. | |||||||||
Standard charging time |
| |||||||||||
|
| NOTE: • | Charge the batteries with the plug locked. |
| ||||||||
Temperature range |
|
| ||||||||||
|
| • When charging is complete, the indicator light changes from flashing red | ||||||||||
|
| Operating: 5°F – 113°F |
|
| ||||||||
|
|
|
|
| to green. |
|
|
| ||||
Recharge/discharge number of times |
|
|
|
|
|
| ||||||
3. After charging is complete, make sure to unplug the charger from the AC outlet. | ||||||||||||
* The specifications and design are subject to change without notice. | ||||||||||||
SPARE PARTS |
|
|
|
|
|
| Charging indicator state | Standard charging time | ||||
|
|
| Red light / Blinking green light : Charge error |
| ||||||||
|
|
|
|
| Red light / Red light |
| : Charging | Approx. 5 hours | ||||
Light unit | Red light / Green light | : Charging is completed |
| |||||||||
|
|
|
|
|
|
|
|
| ||||
|
| Battery unit |
| FOR SAFE OPERATION |
| |||||||
|
|
|
|
|
| |||||||
|
|
|
| • Never | ||||||||
|
| Battery unit | ||||||||||
|
|
|
| may cause the unit to overheat, resulting in fire or damage to the component. | ||||||||
H34 Bracket | • The battery unit uses lithium batteries. If liquid leaks from the batteries, do not | |||||||||||
|
| touch them with bare hands and do not bring them close to fire. | ||||||||||
|
| • Securely connect the plug and fasten the strap. Otherwise, they may come off | ||||||||||
|
|
|
| while riding, causing the light to turn off, or you could topple over if the cord | ||||||||
|
|
|
| gets caught in the wheel. |
| |||||||
UL: |
| |||||||||||
• Never use damaged components (e.g., cables, etc.). Send any damaged | ||||||||||||
CAUTION!: | Use only genuine spare parts from | |||||||||||
UK: |
| components to our customer service department for repair. | ||||||||||
|
|
| CATEYE. | |||||||||
EC: |
|
|
| • Do not stare at the light when it is on. Doing so may damage your eyesight. | ||||||||
AS: |
|
|
|
| ||||||||
|
|
|
| • The light unit, including the switch, becomes very hot when on or immediately | ||||||||
|
|
|
|
| ||||||||
|
|
|
|
| after being turned off. Please use with caution to avoid burns. | |||||||
LIMITED WARRANTY |
|
|
| • Do not place it within children’s reach. |
| |||||||
|
|
| • Never disassemble the light unit, battery unit, or battery charger. | |||||||||
| • If the lamp body or parts become dirty with mud, etc., clean with a soft cloth | |||||||||||
which is moistened with mild soap. Never apply paint thinner, benzine or | ||||||||||||
| (Excluding degradation of the battery unit) | |||||||||||
| alcohol; damage will result. |
| ||||||||||
CatEye products are warranted to be free of defects from materials and workmanship for a period of 2 years from original | • IIf the connecting plug is dirty, clean it with the plug locked. | |||||||||||
purchase. If the product fails to work due to normal use, CatEye will repair or replace the defect at no charge. Service must be | ||||||||||||
• This product is | ||||||||||||
performed by CatEye or an authorized retailer. To return the product, pack it carefully and enclose the warranty certificate (proof | ||||||||||||
rain. However, do not intentionally submerge it in water. | ||||||||||||
or purchase) with instruction for repair. Please write or type your name and address clearly on the warranty certificate. | ||||||||||||
Insurance, handling and transportation charges to CatEye shall be borne by person desiring service. | • We recommend carrying a flashlight or spare battery unit with you in case the | |||||||||||
For UK and REPUBLIC OF IRELAND consumers, please return to the place of purchase. This does not affect your statutory rights. | main battery dies. |
|
|
| ||||||||
| CO.,LTD. |
| Service & Research Address for USA | • Place the swich at least 20 cm away from any wireless meter, as transmitting | ||||||||
CATEYE Service and Research Center | and receiving performance may be adversely affected. | |||||||||||
| 1705 14th St. 115 Boulder, CO 80302 |
| Before Initial Use |
| ||||||||
Attn: CATEYE Customer Service Section | Phone | : 303.443.4595 |
|
| ||||||||
Phone : |
| Toll Free : 800.5CATEYE | The battery is shipped with a small charge, that is used to test the unit at the | |||||||||
Fax | : |
| Fax | : 303.473.0006 | ||||||||
| factory. It is necessary to charge the battery before initial use. (Refer to the | |||||||||||
URL | : http://www.cateye.co.jp |
| URL | : http://www.cateye.com | “How to Charge” section in this manual.) |
| ||||||