IMPORTANT NOTICE ABOUT | Copyright© 2001 CAT EYE Co.,Ltd. | E |
INSTALLATION | ||
066600120 | ||
|
|
|
For the sake of easy installation and operation, some components have been changed.
1
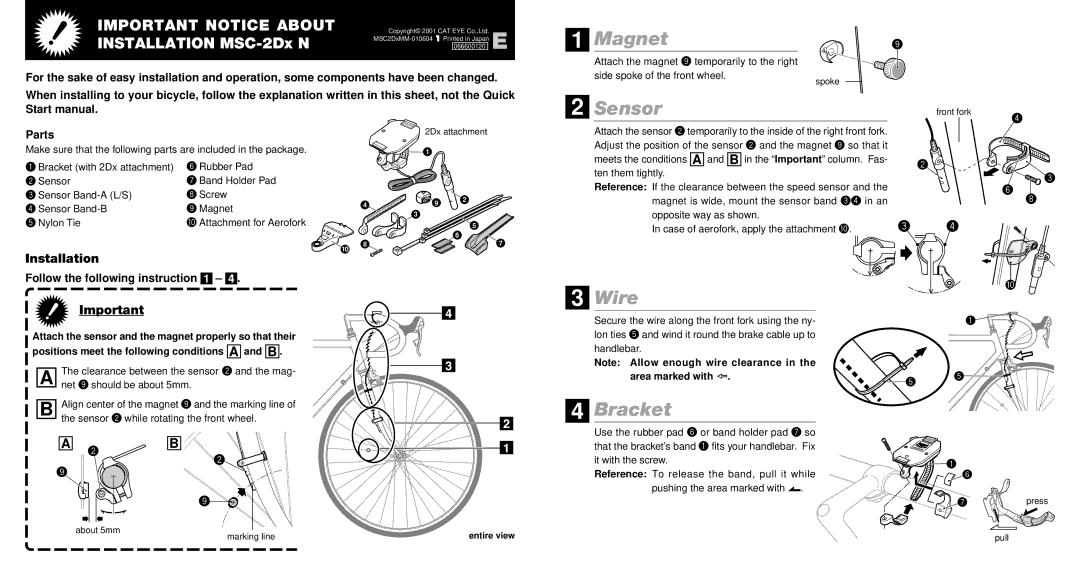
Magnet | 9 |
Attach the magnet 9 temporarily to the right side spoke of the front wheel.
spoke
When installing to your bicycle, follow the explanation written in this sheet, not the Quick Start manual.
2
 Sensor
front fork
4
Parts
Make sure that the following parts are included in the package.
2Dx attachment
![]()
![]() 1
1
Attach the sensor 2 temporarily to the inside of the right front fork. Adjust the position of the sensor 2 and the magnet 9 so that it meets the conditions A and B in the “Important” column. Fas-
1 Bracket (with 2Dx attachment) |
2 Sensor |
6Rubber Pad
7 Band Holder Pad |
2 ![]()
ten them tightly.
![]() 3
3
3 Sensor |
4 Sensor |
5 Nylon Tie |
8 Screw |
9 Magnet |
0 Attachment for Aerofork |
4 | 9 | 2 |
| ||
|
| |
| 3 |
|
|
| 5 |
|
| 6 |
8 |
| 7 |
Reference: If the clearance between the speed sensor and the
magnet is wide, mount the sensor band 34 in an opposite way as shown.
In case of aerofork, apply the attachment 0.
6
3 4
8
10
Installation
Follow the following instruction  –
–  .
.
Important
Attach the sensor and the magnet properly so that their
positions meet the following conditions A and B .
The clearance between the sensor 2 and the mag- A net 9 should be about 5mm.
B | Align center of the magnet 9 and the marking line of |
| the sensor 2 while rotating the front wheel. |
0
3Wire
Secure the wire along the front fork using the ny- | 1 |
lon ties 5 and wind it round the brake cable up to handlebar.
Note: Allow enough wire clearance in the |
|
|
area marked with . | 5 | 5 |
|
|
4 Bracket
A2
9
B
2
9![]()
Use the rubber pad 6 or band holder pad 7 so that the bracket’s band 1 fits your handlebar. Fix it with the screw.
Reference: To release the band, pull it while pushing the area marked with ![]() .
.
1 |
|
6 |
|
7 | press |
about 5mm
marking line
entire view | pull |