FLUE CONNECTION

AND INFILLING

Make the flue connection with the special 150°elbow part no. 010/AV12. Please note that this item is ordered separately from the appliance. The legs of the elbow may be cut on site to suit the chimney. Also note that the legs of the elbow are different lengths to enable some situations to be catered for by turning the elbow around.

The end of the flue pipe must line up with the centre-line of the chimney, and must also extend to the point where the chimney narrows to its final size. Any large voids must be filled and flaunched to the flue pipe to ensure that all soot deposits can be cleared when the appliance is swept, and to prevent problems with the operation of the appliance.

Ensure that the flue pipe is not obstructed or restricted in any way and that all joints are well sealed.

Before infilling cover the front of the appliance to protect it. Ensure that the flue pipe is central and then fill the space between the body of the


Flaunching


Take Flue Pipe


Up To Narrowest


Part Of Chimney.


150° Elbow


Part No. 010/AV12


Vermiculite

150°

Infill

Fig. 7. Typical Installation

appliance and the structural brickwork with vermiculite (e.g. micafil or similar) concrete. Ensure that there are no air pockets. The recommended mix is six volumes of vermiculite granules to one volume of Portland cement thoroughly mixed together. Enough water should be added so that no more than one or two drops of water are released when a handful of the mixture is squeezed.

After filling with vermiculite concrete flaunch the top of the flue connector pipe to the chimney with lime mortar. Ensure that the flue pipe is well sealed to the chimney.

Make good the hole(s) in the chimney breast making sure that it is completely airtight. A typical installation is shown in Fig. 7.

In most installations it will be possible to sweep the chimney through the appliance. If this is not possible then some alternative means (such as a soot door), must be provided.

The free inset method of installation may be used instead of infilling. Details are available on request.

THERMOSTAT

Before lighting the fire check the cold setting distance of the thermostat.

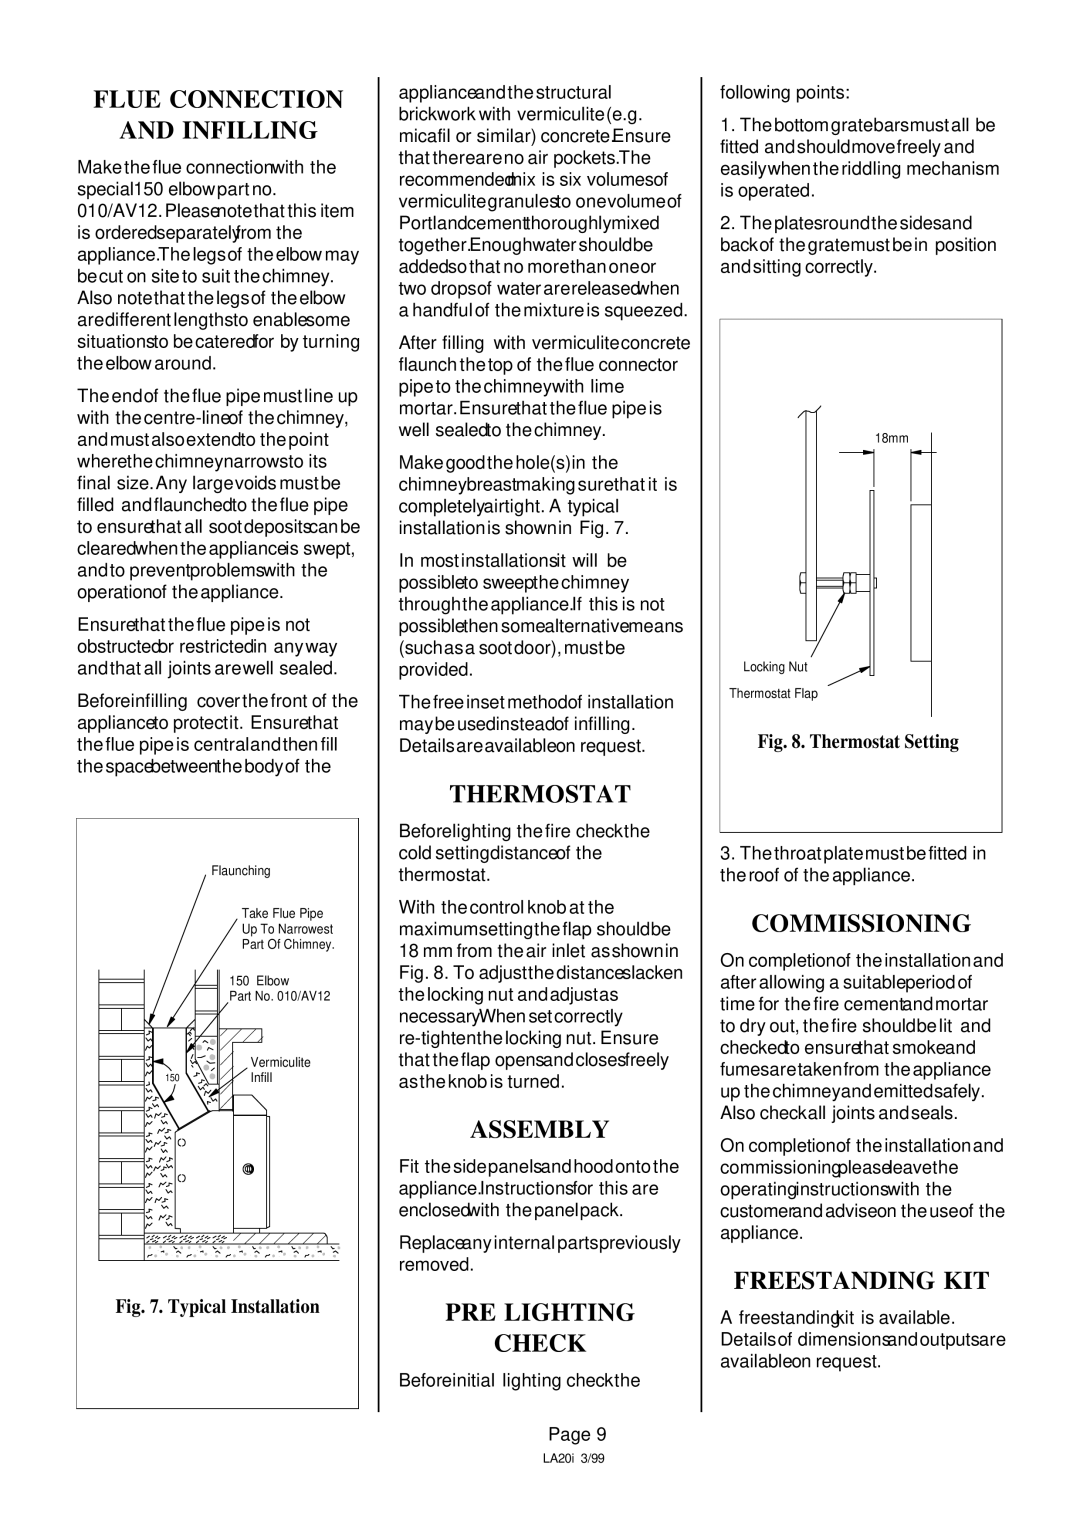
With the control knob at the maximum setting the flap should be 18 mm from the air inlet as shown in Fig. 8. To adjust the distance slacken the locking nut and adjust as necessary. When set correctly re-tighten the locking nut. Ensure that the flap opens and closes freely as the knob is turned.

ASSEMBLY

Fit the side panels and hood onto the appliance. Instructions for this are enclosed with the panel pack.

Replace any internal parts previously removed.

PRE LIGHTING

CHECK

Before initial lighting check the

Page 9

following points:

1.The bottom grate bars must all be fitted and should move freely and easily when the riddling mechanism is operated.

2.The plates round the sides and back of the grate must be in position and sitting correctly.

18mm

Locking Nut

Thermostat Flap

Fig. 8. Thermostat Setting

3.The throat plate must be fitted in the roof of the appliance.

COMMISSIONING

On completion of the installation and after allowing a suitable period of time for the fire cement and mortar to dry out, the fire should be lit and checked to ensure that smoke and fumes are taken from the appliance up the chimney and emitted safely. Also check all joints and seals.

On completion of the installation and commissioning please leave the operating instructions with the customer and advise on the use of the appliance.

FREESTANDING KIT

A freestanding kit is available. Details of dimensions and outputs are available on request.

LA20i 3/99

Page 9
Image 9
Charnwood Roomheater Flue Connection Infilling, Thermostat, Assembly, PRE Lighting Check, Commissioning, Freestanding KIT

Roomheater specifications

The Charnwood Roomheater is a pinnacle of modern heating technology, designed to deliver efficient warmth and comfort in any home environment. With its elegant design and robust construction, this room heater stands out not only for its heating capabilities but also for its aesthetic appeal.

One of the standout features of the Charnwood Roomheater is its advanced combustion technology. The unit employs a highly efficient burn process that maximizes heat output while minimizing smoke and emissions. This makes the Roomheater an environmentally conscientious choice, allowing homeowners to enjoy warmth without compromising their commitment to sustainability. The airwash system further enhances the experience by keeping the glass door clean and clear, providing an unobstructed view of the beautiful flames.

Another key characteristic of the Charnwood Roomheater is its versatile heating options. The room heater is designed to accommodate various fuel types, including wood and multi-fuel options, providing flexibility for users depending on their preferences and availability of resources. This adaptability ensures that it can function effectively in a variety of settings, from cozy living rooms to more open spaces.

The Roomheater’s build quality is exceptional, featuring durable materials that can withstand high temperatures and ensure longevity. The steel body is both strong and resilient, while the manufacturing process emphasizes precision, resulting in a tight, efficient seal that enhances heat retention and reduces heat loss.

Ease of use is another important aspect of the Charnwood Roomheater. With simple controls and a user-friendly design, homeowners can easily adjust the heat output to suit their comfort levels. The large viewing window not only adds to its charm but also allows users to monitor the burning process, ensuring optimal performance.

In summary, the Charnwood Roomheater is a perfect blend of efficiency, style, and usability. Its innovative technologies, including advanced combustion and airwash systems, coupled with its durable construction and flexible fuel options, make it a top choice for those seeking an effective and eco-friendly heating solution. With this room heater, homeowners can enjoy a warm and inviting atmosphere while contributing to a healthier planet.