KSG110

Installation Instructions

CAUTION: IMPROPER INSTALLATION CAN LEAD TO DISPLAY FALLING CAUSING SERIOUS PERSONAL INJURY OR DAMAGE TO EQUIPMENT! Inadequate thread engagement in display may cause display to fall! Back out screws ONLY as necessary to allow installation of Centris bracket!

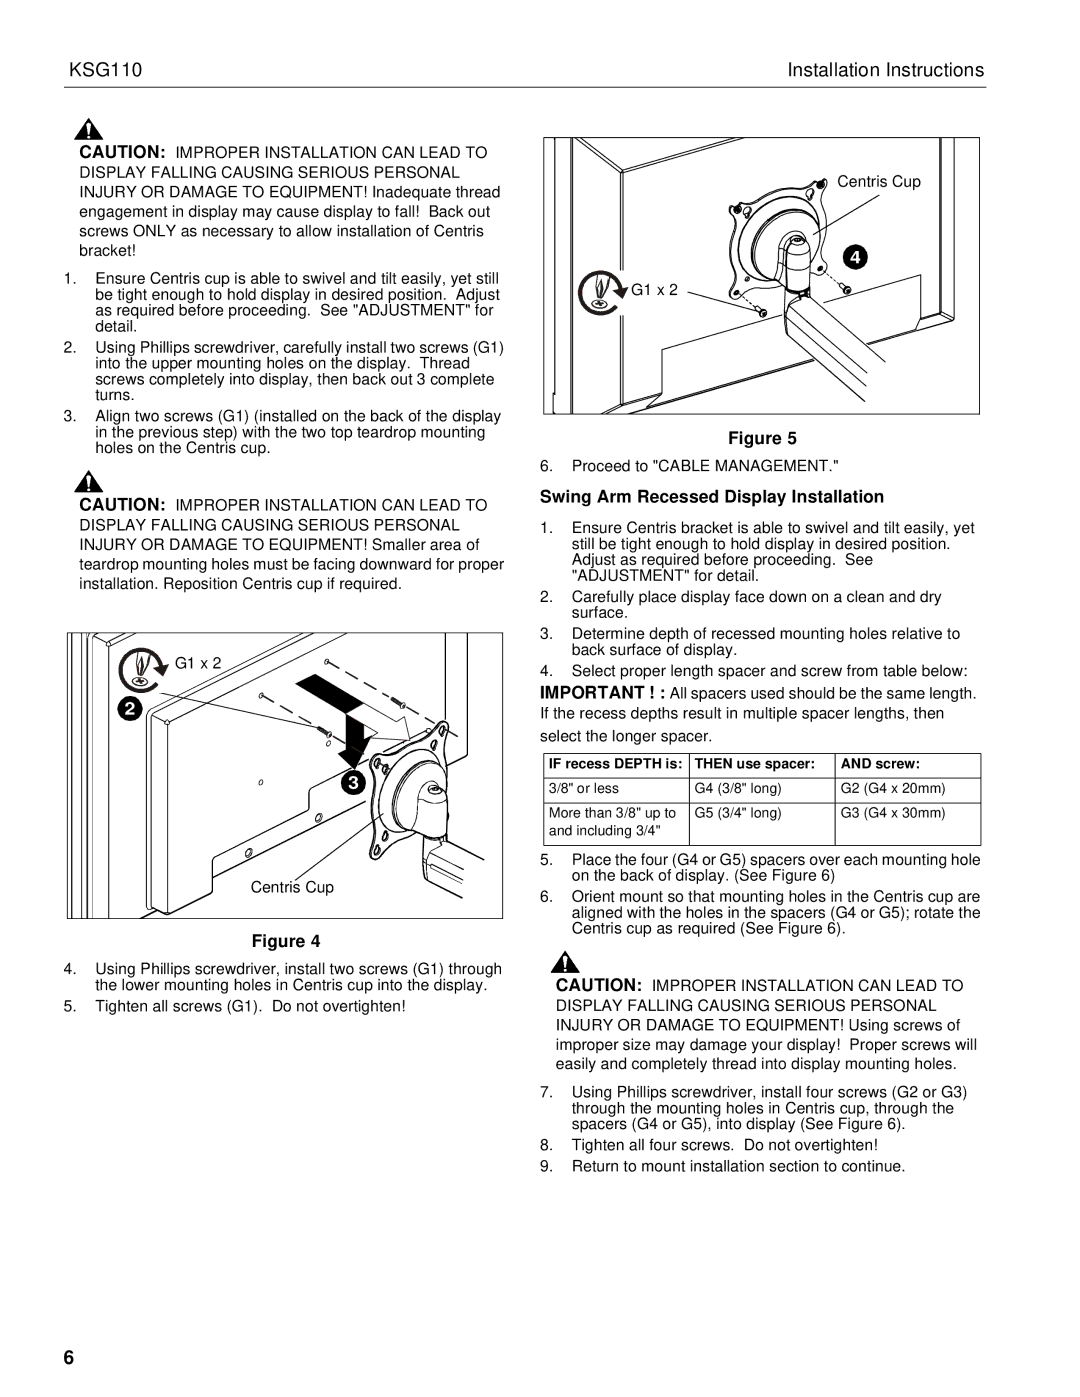
1.Ensure Centris cup is able to swivel and tilt easily, yet still be tight enough to hold display in desired position. Adjust as required before proceeding. See "ADJUSTMENT" for detail.

2.Using Phillips screwdriver, carefully install two screws (G1) into the upper mounting holes on the display. Thread screws completely into display, then back out 3 complete turns.

3.Align two screws (G1) (installed on the back of the display in the previous step) with the two top teardrop mounting holes on the Centris cup.

CAUTION: IMPROPER INSTALLATION CAN LEAD TO DISPLAY FALLING CAUSING SERIOUS PERSONAL INJURY OR DAMAGE TO EQUIPMENT! Smaller area of teardrop mounting holes must be facing downward for proper installation. Reposition Centris cup if required.

G1 x 2

2

3

Centris Cup

Figure 4

4.Using Phillips screwdriver, install two screws (G1) through the lower mounting holes in Centris cup into the display.

5.Tighten all screws (G1). Do not overtighten!

Centris Cup

4

G1 x 2

Figure 5

6.Proceed to "CABLE MANAGEMENT."

Swing Arm Recessed Display Installation

1. Ensure Centris bracket is able to swivel and tilt easily, yet still be tight enough to hold display in desired position. Adjust as required before proceeding. See "ADJUSTMENT" for detail.

2. Carefully place display face down on a clean and dry surface.

3. Determine depth of recessed mounting holes relative to back surface of display.

4. Select proper length spacer and screw from table below: IMPORTANT ! : All spacers used should be the same length. If the recess depths result in multiple spacer lengths, then select the longer spacer.


IF recess DEPTH is:

THEN use spacer:

AND screw:


3/8" or less

G4 (3/8" long)

G2 (G4 x 20mm)


More than 3/8" up to

G5 (3/4" long)

G3 (G4 x 30mm)


and including 3/4"


5.

Place the four (G4 or G5) spacers over each mounting hole


on the back of display. (See Figure 6)


6.

Orient mount so that mounting holes in the Centris cup are


aligned with the holes in the spacers (G4 or G5); rotate the


Centris cup as required (See Figure 6).

CAUTION: IMPROPER INSTALLATION CAN LEAD TO DISPLAY FALLING CAUSING SERIOUS PERSONAL INJURY OR DAMAGE TO EQUIPMENT! Using screws of improper size may damage your display! Proper screws will easily and completely thread into display mounting holes.

7.Using Phillips screwdriver, install four screws (G2 or G3) through the mounting holes in Centris cup, through the spacers (G4 or G5), into display (See Figure 6).

8.Tighten all four screws. Do not overtighten!

9.Return to mount installation section to continue.

6

Page 6
Image 6
Chief Manufacturing KSG110 Swing Arm Recessed Display Installation, If recess Depth is Then use spacer Screw

KSG110 specifications

The Chief Manufacturing KSG110 is a state-of-the-art monitor mount designed for those seeking optimal versatility and ergonomic comfort in a workspace. With its innovative engineering and advanced features, the KSG110 stands out in the market, catering primarily to business professionals, gamers, and anyone requiring enhanced screen positioning.

One of the primary attributes of the KSG110 is its exceptional adjustability. Users can easily tilt, swivel, and rotate their monitors to achieve the perfect viewing angle. This flexibility not only alleviates neck strain but also enhances productivity by allowing users to customize their setups to suit their preferences. The mount supports a range of monitor sizes and is compatible with VESA 75x75mm and 100x100mm mounting patterns, making it a versatile option for various display types.

Another significant feature of the KSG110 is its robust construction. Built with high-quality materials, this monitor mount is designed to support heavy displays with stability and reliability. The KSG110 can accommodate monitors weighing up to 32 pounds, ensuring peace of mind that your equipment is secure.

In terms of installation, the KSG110 is user-friendly, with a quick-release bracket that simplifies the mounting process. It can be installed using either a clamp or a grommet base, giving users the flexibility to choose the method that best suits their workspace configuration. The clean cable management system integrated into the design allows for a neat and organized setup, reducing clutter and enhancing the overall aesthetics of the workspace.

Moreover, the KSG110 features a gas spring arm mechanism that facilitates smooth height adjustments. This technology enables users to effortlessly raise or lower their monitors to a comfortable viewing level. The gas spring system not only makes adjustments quick and easy but also adds a modern touch to any office environment.

In summary, the Chief Manufacturing KSG110 is an excellent investment for those seeking customizable, reliable, and ergonomic monitor solutions. With its sturdy construction, versatile adjustability, and user-friendly installation features, the KSG110 is engineered to enhance productivity and ensure comfort in any workspace. Whether for professional use, gaming, or general multimedia applications, the KSG110 delivers quality and performance, making it a standout choice in the realm of monitor mounts.