Cisco IronPort C370
These
Before you start, be sure you have the following:
•• Rack cabinet enclosure
•• Appropriate rails and adaptor kits
•• 10/100/Gigabit BaseT TCP/IP local area network (LAN)
•• Web browser software (or SSH and terminal software)
•• Network cable(s) for connecting to your network
1 unpack
Check to make sure the following items are present in the Cisco IronPort Email Security appliance system box:
•• Cisco IronPort C370 Email Security Appliance
••
•• Straight power cables (2)
•• Null modem serial cable
•• Cisco IronPort C370 Quickstart Guide (this guide)
•• Cisco IronPort AsyncOS Documentation CD
•• Safety and Compliance Guide
Note:
You can download the AsyncOS Release Notes from the Cisco IronPort Customer Support Portal located at www.ironport.com/support.
| 0 |
ort C37ce | |
IronP | Applian |
CiscoSecurity |
|
| |
PowerSerial
Quickstart
Guide
Documentation
CD
(1) | (2) | (1) |
Safety and
Compliance Guide
2![]() INstall
INstall
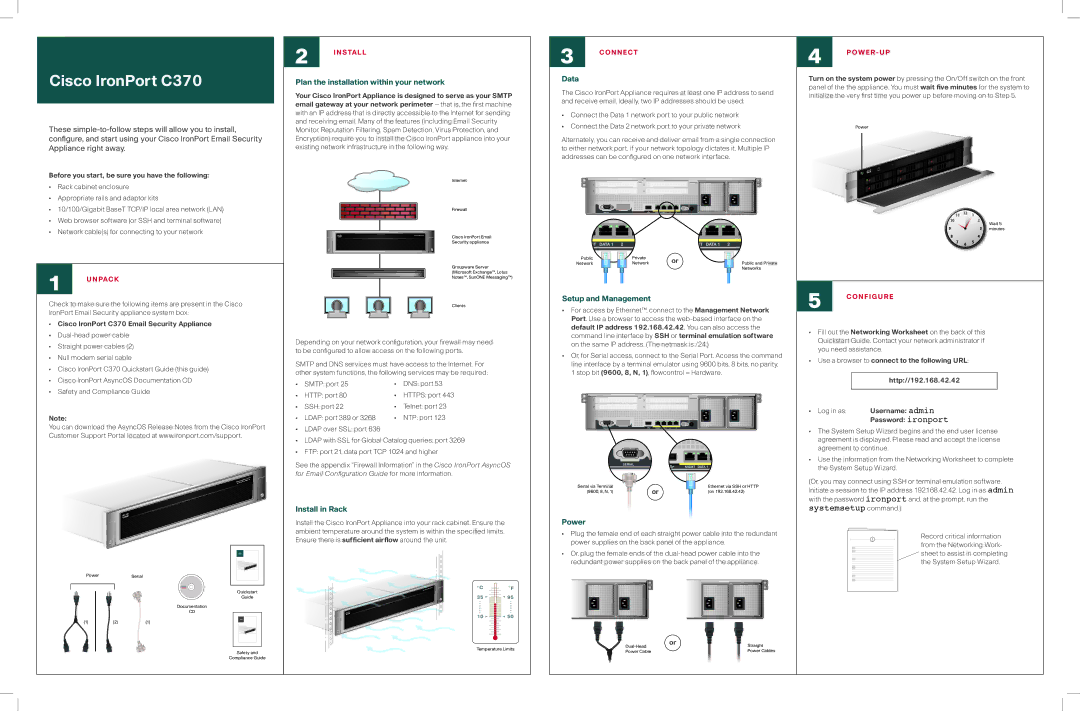
Plan the installation within your network
Your Cisco IronPort Appliance is designed to serve as your SMTP email gateway at your network perimeter – that is, the first machine with an IP address that is directly accessible to the Internet for sending and receiving email. Many of the features (including Email Security Monitor, Reputation Filtering, Spam Detection, Virus Protection, and Encryption) require you to install the Cisco IronPort appliance into your existing network infrastructure in the following way.
| Internet |
| Firewall |
Cisco IronPort C370 | Cisco IronPort Email |
| Security appliance |
Groupware Server
(Microsoft Exchange™, Lotus
Notes™, SunONE Messaging™)
Clients
Depending on your network configuration, your firewall may need to be configured to allow access on the following ports.
SMTP and DNS services must have access to the Internet. For other system functions, the following services may be required:
•• | SMTP: port 25 | •• | DNS: port 53 |
•• | HTTP: port 80 | •• | HTTPS: port 443 |
•• | SSH: port 22 | •• | Telnet: port 23 |
•• LDAP: port 389 or 3268 | •• | NTP: port 123 | |
•• LDAP over SSL: port 636 |
|
| |
•• LDAP with SSL for Global Catalog queries: port 3269
•• FTP: port 21, data port TCP 1024 and higher
See the appendix “Firewall Information” in the Cisco IronPort AsyncOS for Email Configuration Guide for more information.
Install in Rack
Install the Cisco IronPort Appliance into your rack cabinet. Ensure the ambient temperature around the system is within the specified limits. Ensure there is sufficient airflow around the unit.
Cisco IronPort | C370 | C | F |
|
35 ![]()
![]()
![]() 95
95
10 ![]()
![]()
![]() 50
50
Temperature Limits
3![]() connect
connect
Data
The Cisco IronPort Appliance requires at least one IP address to send and receive email. Ideally, two IP addresses should be used:
•• Connect the Data 1 network port to your public network
•• Connect the Data 2 network port to your private network
Alternately, you can receive and deliver email from a single connection to either network port, if your network topology dictates it. Multiple IP addresses can be configured on one network interface.
1 | 3 |
2 | 4 |
SERIAL | MGMT DATA 1 | 2 | 3 |
MT DATA 1 2 |
| MT DATA 1 | 2 |
Public | Private | or |
|
Network | Network | Public and Private | |
|
|
| Networks |
Setup and Management
•• For access by Ethernet™, connect to the Management Network Port. Use a browser to access the
•• Or, for Serial access, connect to the Serial Port. Access the command line interface by a terminal emulator using 9600 bits, 8 bits, no parity, 1 stop bit (9600, 8, N, 1), flowcontrol = Hardware.
1 | 3 |
2 | 4 |
SERIAL | MGMT DATA 1 | 2 | 3 |
SERIAL | MGMT DATA 1 |
|
Serial via Terminal | or | Ethernet via SSH or HTTP |
(9600, 8, N, 1) | (on 192.168.42.42) |
Power
•• Plug the female end of each straight power cable into the redundant power supplies on the back panel of the appliance.
•• Or, plug the female ends of the
or | Straight | |
| ||
Power Cable |
| Power Cables |
4 power-up
Turn on the system power by pressing the On/Off switch on the front panel of the the appliance. You must wait five minutes for the system to initialize the very first time you power up before moving on to Step 5.
Power
Wait 5 minutes
5 configure
•• Fill out the Networking Worksheet on the back of this Quickstart Guide. Contact your network administrator if you need assistance.
•• Use a browser to connect to the following URL:
http://192.168.42.42
•• Log in as: Username: admin Password: ironport
•• The System Setup Wizard begins and the end user license agreement is displayed. Please read and accept the license agreement to continue.
•• Use the information from the Networking Worksheet to complete the System Setup Wizard.
(Or, you may connect using SSH or terminal emulation software.
Initiate a session to the IP address 192.168.42.42. Log in as admin with the password ironport and, at the prompt, run the systemsetup command.)
Record critical information from the Networking Work- sheet to assist in completing the System Setup Wizard.