English Español Português
Italiano Français 中文
TIME ADJUSTMENT
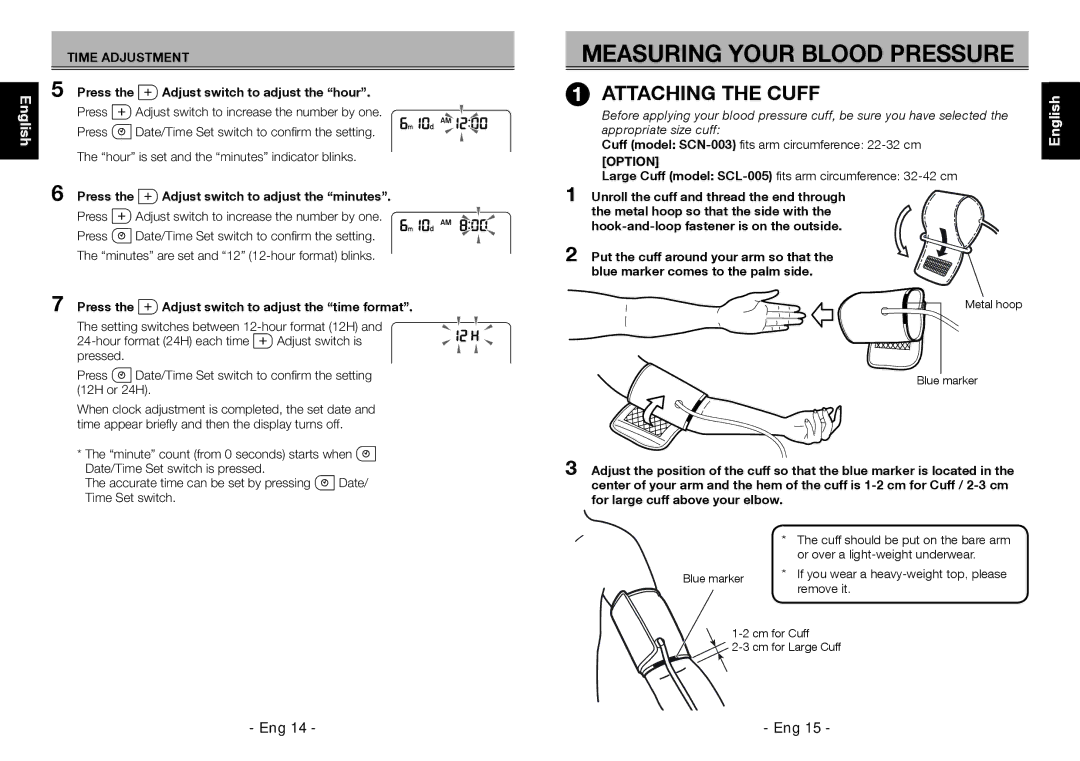
5 Press the  Adjust switch to adjust the “hour”.
Press ![]() Adjust switch to increase the number by one.
Adjust switch to increase the number by one.
Press ![]() Date/Time Set switch to confi rm the setting.
Date/Time Set switch to confi rm the setting.
The “hour” is set and the “minutes” indicator blinks.
6 Press the  Adjust switch to adjust the “minutes”.
Press  Adjust switch to increase the number by one.
Press ![]() Date/Time Set switch to confi rm the setting. The “minutes” are set and “12”
Date/Time Set switch to confi rm the setting. The “minutes” are set and “12”
7 Press the  Adjust switch to adjust the “time format”.
The setting switches between
![]() Adjust switch is pressed.
Adjust switch is pressed.
Press ![]() Date/Time Set switch to confi rm the setting (12H or 24H).
Date/Time Set switch to confi rm the setting (12H or 24H).
When clock adjustment is completed, the set date and time appear briefl y and then the display turns off.
*The “minute” count (from 0 seconds) starts when ![]() Date/Time Set switch is pressed.
Date/Time Set switch is pressed.
The accurate time can be set by pressing ![]() Date/ Time Set switch.
Date/ Time Set switch.
MEASURING YOUR BLOOD PRESSURE
1ATTACHING THE CUFF
Before applying your blood pressure cuff, be sure you have selected the appropriate size cuff:
Cuff (model:
[OPTION]
Large Cuff (model:
1 Unroll the cuff and thread the end through the metal hoop so that the side with the
2 Put the cuff around your arm so that the blue marker comes to the palm side.
Metal hoop
Blue marker
3 Adjust the position of the cuff so that the blue marker is located in the center of your arm and the hem of the cuff is
* The cuff should be put on the bare arm or over a
Blue marker | * If you wear a | |
remove it. | ||
|
中文 Français Italiano Deutsch Português Español English
- Eng 14 - | - Eng 15 - |
