3

4

SIDE VIEW

VUE DE CÔTÉ

VISTA LATERAL

5

6

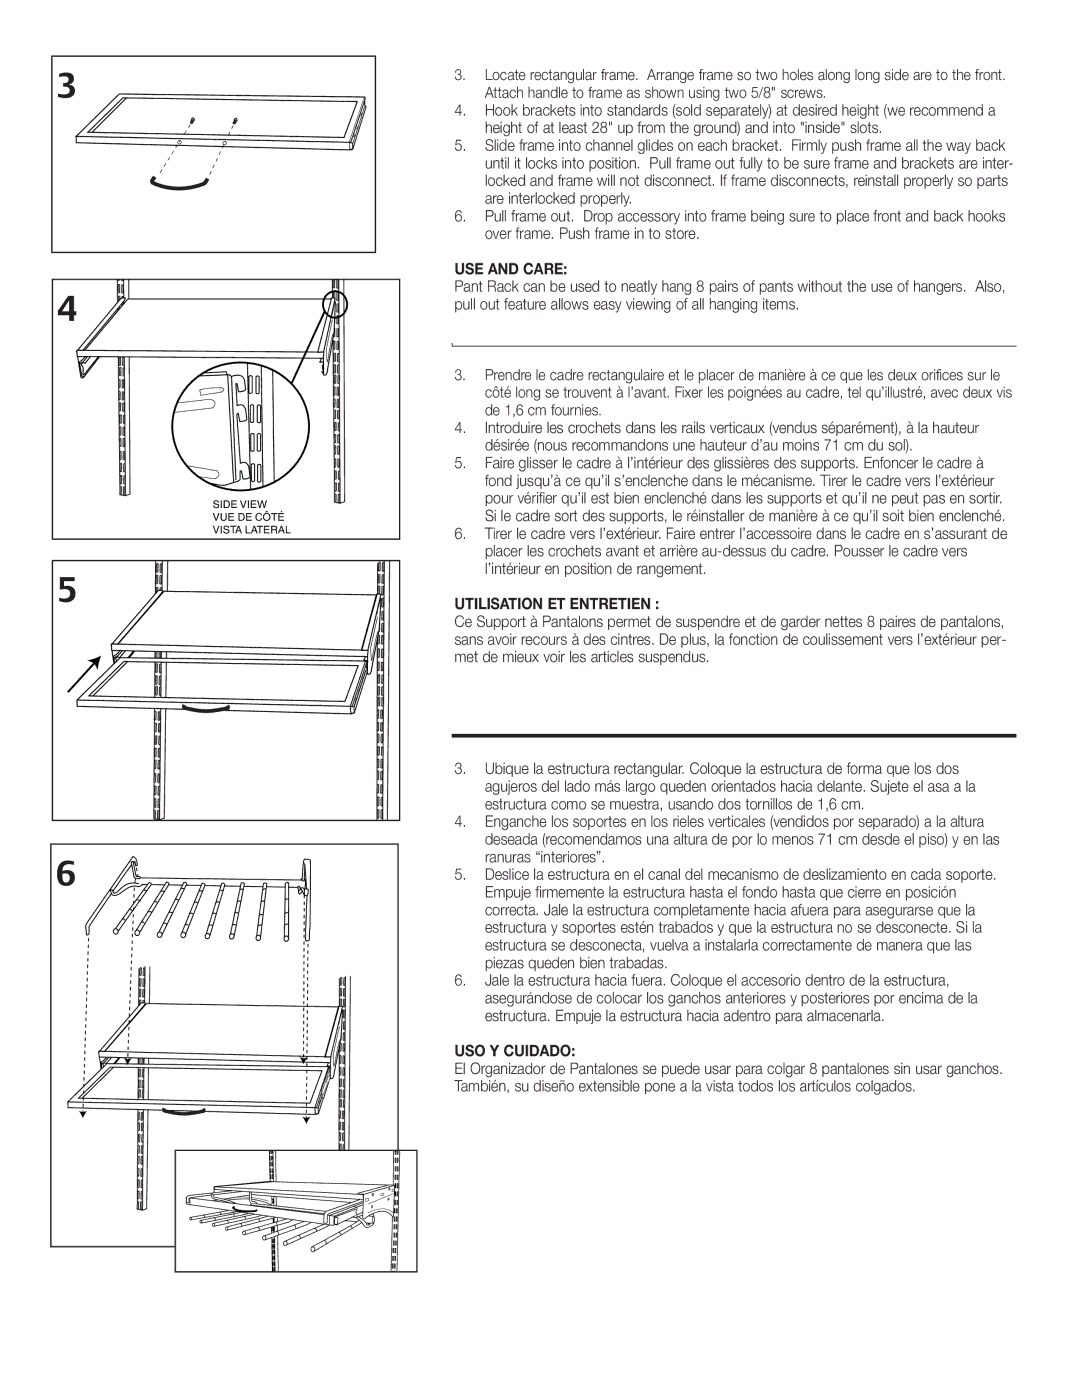
3.Locate rectangular frame. Arrange frame so two holes along long side are to the front. Attach handle to frame as shown using two 5/8" screws.

4.Hook brackets into standards (sold separately) at desired height (we recommend a height of at least 28" up from the ground) and into "inside" slots.

5.Slide frame into channel glides on each bracket. Firmly push frame all the way back until it locks into position. Pull frame out fully to be sure frame and brackets are inter- locked and frame will not disconnect. If frame disconnects, reinstall properly so parts are interlocked properly.

6.Pull frame out. Drop accessory into frame being sure to place front and back hooks over frame. Push frame in to store.

USE AND CARE:

Pant Rack can be used to neatly hang 8 pairs of pants without the use of hangers. Also, pull out feature allows easy viewing of all hanging items.

3.Prendre le cadre rectangulaire et le placer de manière à ce que les deux orifices sur le côté long se trouvent à l’avant. Fixer les poignées au cadre, tel qu’illustré, avec deux vis de 1,6 cm fournies.

4.Introduire les crochets dans les rails verticaux (vendus séparément), à la hauteur désirée (nous recommandons une hauteur d’au moins 71 cm du sol).

5.Faire glisser le cadre à l’intérieur des glissières des supports. Enfoncer le cadre à fond jusqu’à ce qu’il s’enclenche dans le mécanisme. Tirer le cadre vers l’extérieur pour vérifier qu’il est bien enclenché dans les supports et qu’il ne peut pas en sortir. Si le cadre sort des supports, le réinstaller de manière à ce qu’il soit bien enclenché.

6.Tirer le cadre vers l’extérieur. Faire entrer l’accessoire dans le cadre en s’assurant de placer les crochets avant et arrière au-dessus du cadre. Pousser le cadre vers l’intérieur en position de rangement.

UTILISATION ET ENTRETIEN :

Ce Support à Pantalons permet de suspendre et de garder nettes 8 paires de pantalons, sans avoir recours à des cintres. De plus, la fonction de coulissement vers l’extérieur per- met de mieux voir les articles suspendus.

3.Ubique la estructura rectangular. Coloque la estructura de forma que los dos agujeros del lado más largo queden orientados hacia delante. Sujete el asa a la estructura como se muestra, usando dos tornillos de 1,6 cm.

4.Enganche los soportes en los rieles verticales (vendidos por separado) a la altura deseada (recomendamos una altura de por lo menos 71 cm desde el piso) y en las ranuras “interiores”.

5.Deslice la estructura en el canal del mecanismo de deslizamiento en cada soporte. Empuje firmemente la estructura hasta el fondo hasta que cierre en posición correcta. Jale la estructura completamente hacia afuera para asegurarse que la estructura y soportes estén trabados y que la estructura no se desconecte. Si la estructura se desconecta, vuelva a instalarla correctamente de manera que las piezas queden bien trabadas.

6.Jale la estructura hacia fuera. Coloque el accesorio dentro de la estructura, asegurándose de colocar los ganchos anteriores y posteriores por encima de la estructura. Empuje la estructura hacia adentro para almacenarla.

USO Y CUIDADO:

El Organizador de Pantalones se puede usar para colgar 8 pantalones sin usar ganchos. También, su diseño extensible pone a la vista todos los artículos colgados.

Page 2
Image 2
Closet Maid 33813 installation instructions USE and Care, Utilisation ET Entretien, USO Y Cuidado

33813 specifications

The Closet Maid 33813 is a versatile and practical organization solution that caters to a variety of storage needs. This innovative product is designed specifically for maximizing closet space, making it an ideal choice for homeowners seeking to streamline their living areas. The Closet Maid 33813 boasts a blend of functionality, durability, and aesthetic appeal, making it a popular option among those looking for efficiency and style.

One of the standout features of the Closet Maid 33813 is its adjustable shelving system. This feature allows users to customize their storage space according to their personal needs, accommodating everything from shoes and clothing to accessories and other items. The adjustable shelves can be repositioned to different heights, providing flexibility to store items of varying sizes, which is particularly useful in small or compact closets.

The materials used in the construction of the Closet Maid 33813 are both sturdy and reliable. The shelves are crafted from high-quality engineered wood, ensuring that they can support substantial weight without warping or bending. The melamine finish gives the product a sleek, modern look while also making it resistant to scratches, stains, and moisture, which is essential for long-lasting performance in a crowded closet environment.

Installation of the Closet Maid 33813 is user-friendly, with a comprehensive set of instructions included. This do-it-yourself project can typically be completed in a matter of hours, allowing users to enjoy their newly organized space without the need for professional assistance. The design features a wall-mounted option that maximizes floor space and keeps belongings off the ground, contributing to a more open and airy feel within the closet.

In addition to these practical features, the Closet Maid 33813 comes equipped with innovative technologies that enhance its usability. Options for additional accessories like hanging rods, baskets, and drawer inserts are available, enabling further customization. The overall aesthetic can also be improved with various color options, allowing consumers to match their closet organization system with their home décor.

In conclusion, the Closet Maid 33813 is an excellent choice for those looking to optimize their storage solutions while maintaining a sense of style and organization. Its adjustable shelving, durable construction, and easy installation make it a standout product in the realm of home organization. Whether for clothing, shoes, or other belongings, the Closet Maid 33813 delivers a functional and attractive storage solution.