5

J

D

D

DA

D

B

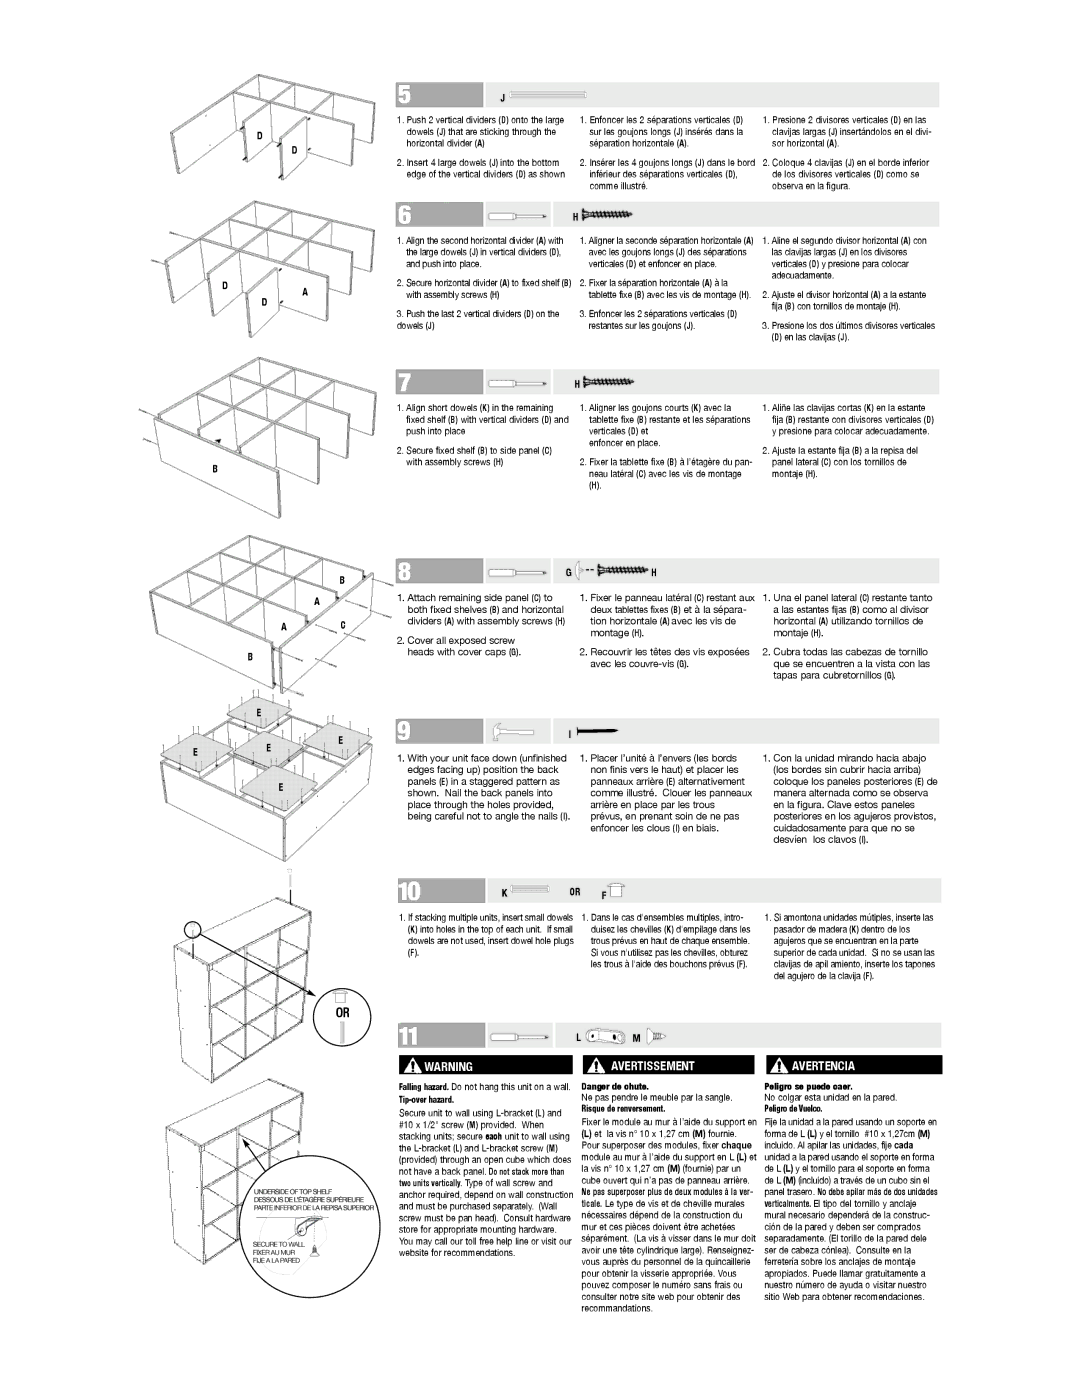
1.Push 2 vertical dividers (D) onto the large dowels (J) that are sticking through the horizontal divider (A)

2.Insert 4 large dowels (J) into the bottom edge of the vertical dividers (D) as shown

6

1.Align the second horizontal divider (A) with the large dowels (J) in vertical dividers (D), and push into place.

2.Secure horizontal divider (A) to fixed shelf (B) with assembly screws (H)

3.Push the last 2 vertical dividers (D) on the dowels (J)

7

1.Align short dowels (K) in the remaining fixed shelf (B) with vertical dividers (D) and push into place

2.Secure fixed shelf (B) to side panel (C) with assembly screws (H)

1.Enfoncer les 2 séparations verticales (D) sur les goujons longs (J) insérés dans la séparation horizontale (A).

2.Insérer les 4 goujons longs (J) dans le bord inférieur des séparations verticales (D), comme illustré.

H

1.Aligner la seconde séparation horizontale (A) avec les goujons longs (J) des séparations verticales (D) et enfoncer en place.

2.Fixer la séparation horizontale (A) à la tablette fixe (B) avec les vis de montage (H).

3.Enfoncer les 2 séparations verticales (D) restantes sur les goujons (J).

H

1.Aligner les goujons courts (K) avec la tablette fixe (B) restante et les séparations verticales (D) et

enfoncer en place.

2.Fixer la tablette fixe (B) à l’étagère du pan- neau latéral (C) avec les vis de montage

(H).

1.Presione 2 divisores verticales (D) en las clavijas largas (J) insertándolos en el divi- sor horizontal (A).

2.Coloque 4 clavijas (J) en el borde inferior de los divisores verticales (D) como se observa en la figura.

1.Aline el segundo divisor horizontal (A) con las clavijas largas (J) en los divisores verticales (D) y presione para colocar adecuadamente.

2.Ajuste el divisor horizontal (A) a la estante fija (B) con tornillos de montaje (H).

3.Presione los dos últimos divisores verticales

(D) en las clavijas (J).

1.Aliñe las clavijas cortas (K) en la estante fija (B) restante con divisores verticales (D) y presione para colocar adecuadamente.

2.Ajuste la estante fija (B) a la repisa del panel lateral (C) con los tornillos de montaje (H).


B


A


A

C


B


E


E

E

E


E


8


G

H


1. Attach remaining side panel (C) to


1. Fixer le panneau latéral (C) restant aux

1. Una el panel lateral (C) restante tanto


both fixed shelves (B) and horizontal


deux tablettes fixes (B) et à la sépara-

a las estantes fijas (B) como al divisor


dividers (A) with assembly screws (H)


tion horizontale (A) avec les vis de

horizontal (A) utilizando tornillos de

2. Cover all exposed screw


montage (H).

montaje (H).


heads with cover caps (G).


2. Recouvrir les têtes des vis exposées

2. Cubra todas las cabezas de tornillo


avec les couvre-vis (G).

que se encuentren a la vista con las


tapas para cubretornillos (G).


9


I


1. With your unit face down (unfinished


1. Placer l’unité à l’envers (les bords

1. Con la unidad mirando hacia abajo


edges facing up) position the back


non finis vers le haut) et placer les

(los bordes sin cubrir hacia arriba)


panels (E) in a staggered pattern as


panneaux arrière (E) alternativement

coloque los paneles posteriores (E) de


shown. Nail the back panels into


comme illustré. Clouer les panneaux

manera alternada como se observa


place through the holes provided,


arrière en place par les trous

en la figura. Clave estos paneles


being careful not to angle the nails (I).

prévus, en prenant soin de ne pas

posteriores en los agujeros provistos,


enfoncer les clous (I) en biais.

cuidadosamente para que no se


desvíen los clavos (I).

OR

10

K

OR

F


1. If stacking multiple units, insert small dowels

1. Dans le cas d'ensembles multiples, intro-


(K) into holes in the top of each unit. If small

duisez les chevilles (K) d'empilage dans les


dowels are not used, insert dowel hole plugs

trous prévus en haut de chaque ensemble.


(F).


Si vous n'utilisez pas les chevilles, obturez


les trous à l'aide des bouchons prévus (F).


11


L

M

1.Si amontona unidades mútiples, inserte las pasador de madera (K) dentro de los agujeros que se encuentran en la parte superior de cada unidad. Si no se usan las clavijas de apil amiento, inserte los tapones del agujero de la clavija (F).

WARNING

AVERTISSEMENT


AVERTENCIA

Falling hazard. Do not hang this unit on a wall.

Tip-over hazard.

Secure unit to wall using L-bracket (L) and #10 x 1/2" screw (M) provided. When stacking units; secure each unit to wall using the L-bracket (L) and L-bracket screw (M) (provided) through an open cube which does not have a back panel. Do not stack more than two units vertically. Type of wall screw and anchor required, depend on wall construction and must be purchased separately. (Wall screw must be pan head). Consult hardware store for appropriate mounting hardware. You may call our toll free help line or visit our website for recommendations.

Danger de chute.

Ne pas pendre le meuble par la sangle.

Risque de renversement.

Fixer le module au mur à l’aide du support en

(L)et la vis nº 10 x 1,27 cm (M) fournie. Pour superposer des modules, fixer chaque module au mur à l’aide du support en L (L) et la vis nº 10 x 1,27 cm (M) (fournie) par un cube ouvert qui n’a pas de panneau arrière.

Ne pas superposer plus de deux modules à la ver- ticale. Le type de vis et de cheville murales nécessaires dépend de la construction du mur et ces pièces doivent être achetées séparément. (La vis à visser dans le mur doit avoir une tête cylindrique large). Renseignez- vous auprès du personnel de la quincaillerie pour obtenir la visserie appropriée. Vous pouvez composer le numéro sans frais ou consulter notre site web pour obtenir des recommandations.

Peligro se puede caer.

No colgar esta unidad en la pared.

Peligro de Vuelco.

Fije la unidad a la pared usando un soporte en forma de L (L) y el tornillo #10 x 1,27cm (M) incluido. Al apilar las unidades, fije cada unidad a la pared usando el soporte en forma de L (L) y el tornillo para el soporte en forma de L (M) (incluido) a través de un cubo sin el panel trasero. No debe apilar más de dos unidades verticalmente. El tipo del tornillo y anclaje mural necesario dependerá de la construc- ción de la pared y deben ser comprados separadamente. (El torillo de la pared dele ser de cabeza cónlea). Consulte en la ferretería sobre los anclajes de montaje apropiados. Puede llamar gratuitamente a nuestro número de ayuda o visitar nuestro sitio Web para obtener recomendaciones.

Page 2
Image 2
Closet Maid CUBE9 manual Deux tablettes fixes B et à la sépara, Ne pas pendre le meuble par la sangle

CUBE9 specifications

The Closet Maid CUBE9 is a versatile storage solution designed to optimize space and enhance organization in various environments, from homes to offices. This innovative system is targeted at those looking for both functionality and aesthetics in their storage solutions.

One of the standout features of the CUBE9 is its modular design, which allows users to customize their storage setup according to their specific needs. Each unit can be stacked or arranged in different configurations, making it easy to fit into any room layout. With an array of colors and finishes available, users can choose options that match their personal style and home décor.

The CUBE9 is constructed from high-quality, durable materials, ensuring longevity and resilience in daily use. The product uses engineered wood that is not only robust but also lightweight, making it easy to move and install. Additionally, the surfaces are designed for easy cleaning, allowing users to maintain a neat and tidy appearance with minimal effort.

Functionality is another hallmark of the CUBE9. The compartments are spacious enough to accommodate a variety of items, such as books, toys, clothing, and other personal effects. This makes it an ideal choice for family rooms, playrooms, closets, and even office spaces. The open cubby design promotes visibility and easy access, encouraging users to keep their spaces organized.

One technological feature that enhances the usability of the CUBE9 is its integration capabilities. Users can combine CUBE9 units with other Closet Maid storage solutions, creating a cohesive and functional storage system. This interoperability enables seamless organization across different storage areas, enhancing overall efficiency.

In addition to functionality and design, the CUBE9 product line is also focused on sustainability. Closet Maid prioritizes eco-friendly practices in its manufacturing processes, ensuring that materials used are environmentally responsible. This commitment to sustainability resonates with consumers who are increasingly conscious of their environmental footprint.

In conclusion, the Closet Maid CUBE9 stands out as a practical and stylish storage solution. With its modular design, high-quality materials, spacious compartments, and focus on sustainability, it meets the diverse needs of consumers while elevating the organization of their spaces. Whether it's for a child's playroom or a professional office, the CUBE9 offers an ideal blend of functionality and modern design.